


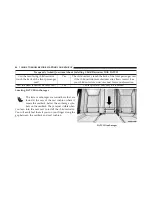


5. Tighten all of the straps as you push the child restraint
rearward and downward into the seat. Remove slack
in the straps according to the child restraint manufac-
turer’s instructions.
6. Test that the child restraint is installed tightly by
pulling back and forth on the child seat at the belt
path. It should not move more than 1 inch (25.4 mm)
in any direction.
How To Stow An Unused ALR Seat Belt:
When using the LATCH attaching system to install a child
restraint, stow all ALR seat belts that are not being used by
other occupants or being used to secure child restraints. An
unused belt could injure a child if they play with it and
accidentally lock the seat belt retractor. Before installing a
child restraint using the LATCH system, buckle the seat
belt behind the child restraint and out of the child’s reach.
If the buckled seat belt interferes with the child restraint
installation, instead of buckling it behind the child re-
straint, route the seat belt through the child restraint belt
path and then buckle it. Do not lock the seat belt. Remind
all children in the vehicle that the seat belts are not toys and
that they should not play with them.
WARNING!
•
Improper installation of a child restraint to the
LATCH anchorages can lead to failure of the re-
straint. The child could be badly injured or killed.
Follow the child restraint manufacturer’s directions
exactly when installing an infant or child restraint.
•
Child restraint anchorages are designed to with-
stand only those loads imposed by correctly-fitted
child restraints. Under no circumstances are they to
be used for adult seat belts, harnesses, or for
attaching other items or equipment to the vehicle.
2
THINGS TO KNOW BEFORE STARTING YOUR VEHICLE
89
Summary of Contents for 2016 300
Page 1: ...300 O W N E R S M A N U A L 2 0 1 6 ...
Page 4: ......
Page 7: ...1 INTRODUCTION 5 ...
Page 10: ......
Page 104: ......
Page 219: ...Slow Tone Solid Arc Fast Tone Flashing Arc 3 UNDERSTANDING THE FEATURES OF YOUR VEHICLE 217 ...
Page 264: ......
Page 269: ...INSTRUMENT CLUSTER Premium Instrument Cluster 4 UNDERSTANDING YOUR INSTRUMENT PANEL 267 ...
Page 372: ......
Page 428: ...426 STARTING AND OPERATING ...
Page 478: ......
Page 570: ......
Page 571: ...MAINTENANCE SCHEDULES CONTENTS 䡵 MAINTENANCE SCHEDULE 570 Maintenance Chart 572 8 ...
Page 587: ...INDEX 10 ...


