Christopeit Sport 1574 Assembly And Exercise Instructions Download Page 20

20

Parts List – Spare Parts List
TM 2000S Order No. 1574

Technical data: 

   Issue: 01. 10. 2015

•  2 HP Motor continuous (1,5Kw), maximum 3 HP Motor Peak (2,2Kw)

•  Speed from 1 km/h - 20 km/h (adjustable in 0,1 km/h steps)

•  4 individual program with target of Time, Distance, Calories and Speed

•  5 installed programs with different speed

•  3 target HRC programs (pulse controlled)

•  3 User programs

•  1 Body fat porogramm

•  Quick speed buttons for 3 km/h, 5 km/h, 7km/h, 9km/h, 11 km/h, 13 km/h and 

  16 km/h

•  Power Incline 0-18%, electronically adjustable

•  Quick incline buttons for 2%, 4%, 6%, 9%, 12%, 15% and 18% incline

•  Speed and incline adjustable at hand rail

•  Hand pulse measurement

•  Vibration absorbing running surface (Cushion System)

•  Safety pin for emergency stop

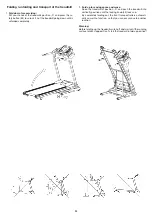
•  Foldable for save space

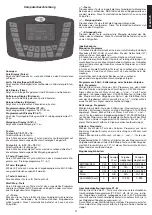
•  Blue Back Light LCD Display showing: Time, Speed, Distance,

  approx Calories consumption, Inclination and pulse

•  Inputs of limits: Time, Speed and approx Calories

•  Announcement of higher limits

•  Fan for coolig air

•  Possible connection for MP 3 Player

•  Receiver for wireless pulse belt

•  Fold-out automatic (Soft-Drop-System) for a safety and easy let down of the tread

•  4 transport rollers for an easy and comfortable move to location

•  Walking surface approx. L 140 x W 50 cm

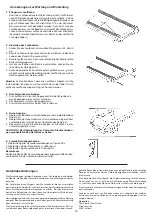
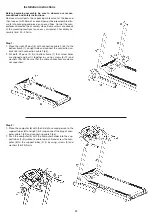
Please check after opening the packing that all the parts shown 
in the following parts lists are there. Once you are sure that this 
is the case, you can start assembly.
Please contact us if any components are defective or missing, or 
if you need any spare parts or replacements in future:
Adresse:


Top-Sports Gilles GmbH


Friedrichstraße 55


42551 Velbert


Telefon: +49 (0) 20 51 / 60 67-0


Telefax: +49 (0) 20 51 / 60 67-44


e-mail: [email protected]


www. christopeit-sport.com

This treadmill is created only for private Home sports activity 
and not allowed to us in a commercial or professional area.
Home Sport use class H/C
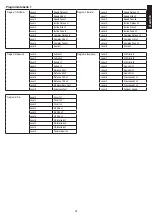
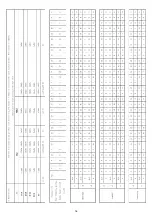
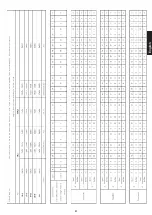
  Illustration  

Designation 

Dimension 

Quantity 

Attached to 

ET-Number


No. 


mm 


Illustration No. 


Base frame 


2-5 

33-1574-01-SI


Support left 


1+7 

33-1574-02-SI


Support right 


1+7 

33-1574-03-SI


Incline frame 


1+5 

33-1574-04-SI


Main frame 


1+4 

33-1574-05-SI


Motor base 


5+70 

33-1574-06-SI


Computer frame 


2,3+8 

33-1574-07-SI


Computer 


36-1574-03-BT


Screw 

M8x16  

16 

1,2,3,6+7 

39-9888


10 

Screw 

M8x30  

32 

39-10134


11 

Screw 

M8x40  

5,6+55 

39-9889-CR


12 

Screw 

M8x60  

1,2,3+43 

39-10436


13 

Screw 

M8x45  

80+81 

39-10110


14 

Screw 

M10x28  

1,4+5 

36-1241-37-BT


15 

Screw 

M4x10  

36-9210-30-BT


16 

Screw 

M4x15  

5+61 

39-10187


17 

Screw 

M4x12  

5,40+41 

39-10188


18 

Screw 

4x14  

47 

5,8,38-41+75 

39-10190


19 

Screw 

M8x55  

5+33 

39-10056


20 

Screw 

M8x80  

5+34 

39-9956


21 

Hex screw 

M10x50  

5+71 

39-10400


22 

Hex screw 

M10x120  

4+71 

39-10119-VC


23 

Hex screw 

M8x40 

39-10125-VC


24 

Screw  

4x25  

7+50 

36-9805-42-BT


25 

Screw  

6x25  

75 

39-10029


26 

Nylon nut 

8  

10-14 

39-9918-CR


27 

Nylon nut 

10   

14,21+22 

39-9981-CR


28 

Curved washer 

8//19  

39-9966-CR


29 

Washer 

8//16 

33 

9-13 

39-9862-CR


30 

Washer 

10//20 

14,21+22 

39-9989-CR


31 

Spring washer 

for M8 

9+11 

39-9864-VC


32 

Gas spring 


1+5 

36-1241-23-BT


33 

Front roller 


33-1574-08-SI


34 

Rear roller 


33-1574-09-SI


35 

End cap 


36-1574-08-BT


36 

Square end cap 


36-1574-09-BT


37 

End cap 


36-1574-10-BT

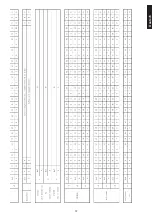
0  5  10  15  20  25  30  35  40 

50 

60 

70 

80 

90 

100 mm

•  Electrical data: 220-240V/50-60Hz /1.500 Watt

•  Load max. 130 kg (Body weight)

•  Weight approx. 87 kg

Space requirement approx: L 192 x W 82 x H 129 cm

Space requirement foldable approx: L 80 x W 82 x H 162 cm

Exercise space : approx. 6m²

Summary of Contents for 1574

Page 1: ...1 Heimsport Trainingsger t Elektrisches Laufband Montage und Bedienungsanleitung f r Bestell Nr Assembly and exercise instructions for Order No GB D 1574 1574...

Page 2: ...Fitness Training mit dem Ger t geeignet sind Die Kleidung muss so beschaffen sein dass diese aufgrund ihrer Form z B L nge w hrend des Trainings nicht h ngen bleiben kann Die Trainingsschuhe sollten...

Page 3: ...3 Deutsch...

Page 4: ...4...

Page 5: ...28 Unterlegscheibe gebogen 8 19 4 9 39 9966 CR 29 Unterlegscheibe 8 16 33 9 13 39 9862 CR 30 Unterlegscheibe 10 20 4 14 21 22 39 9989 CR 31 Federring f r M8 6 9 11 39 9864 VC 32 D mpfung 1 1 5 36 1241...

Page 6: ...BT 56 Lauffl che 500x2990 1 33 34 36 1574 15 BT 57 Flachriemen 205J 1 33 70 36 1574 16 BT 58 Sicherung 15A 2 73 36 1574 17 BT 59 Sicherungs Clip 1 8 36 1574 18 BT 60 Griff berzug 2 7 36 1574 19 BT 61...

Page 7: ...en Sie die Stecker vom Verbindungskabel 3 64 und Verbindungskabel 2 63 2 Stecken Sie das rechte und linke St tzrohr 2 3 an den Grund rahmen 1 sodass die Bohrungen bereinander stehen und verschrauben S...

Page 8: ...elbar nach Anlauf der Laufbandes auf die Lauffl che 56 treten und der eingestellten Geschwindigkeit folgen Machen Sie sich mit geringen Geschwindigkeiten mit dem Ger t vertraut 4 Laufen Sie mittig auf...

Page 9: ...appen Sie das Laufband durch Anheben hochkant zusammen bis der Sicherungsknopf 83 einrastet Durch vollst ndiges Einklappen werden automatisch die Transportrollen vorne in Funktion ge bracht sodass ein...

Page 10: ...gepr ft werden und ggf mit Siliconspay Kein Schmierstoff auf L oder Petroleum Basisverwenden nachbehandelt werden Dazu hebt man die Lauffl che etwas von Gleitbrett an und spr ht das Silicon l zwi sche...

Page 11: ...orne am Grundger t ein 2 Stellen Sie sich auf den schwarzen Fl chen am Seitenrand 3 Legen Sie den Sicherheits Clip an Ihre Trainings Kleidung z B Hosenbund an und in die entsprechende Aufnahme am Comp...

Page 12: ...verwendet B Ist der gemessene Pulswert geringer aber mehr als 30 Puls schl ge vom Vorgabewert entfernt so erh ht sich die Geschwin digkeit jeweils um 2km h C Ist der gemessene Pulswert geringer aber...

Page 13: ...2 Program 3 Special Level 0 Fartlek x1 Program 4 Everyday Level 0 Hill Climb x1 Level 1 Fartlek x2 Level 1 Hill Climb x2 Level 2 Rehab x1 Level 2 Hill Climb x3 Level 3 Rehab x2 Level 3 Downhill x1 Lev...

Page 14: ...14 Programmtabellen 2...

Page 15: ...15 Deutsch...

Page 16: ...16...

Page 17: ...17 Deutsch...

Page 18: ...n bestehen Aufw rm Phase Trainings Phase und Abk hl Phase In der Aufw rm Phase soll die K rpertemperatur und die Sauerstoffzufuhr langsam gesteigert werden Dieses ist durch gymnastische bungen ber ein...

Page 19: ...90 min daily 11 Wear training clothes and shoes which are suitable for fitness training with the machine Your clothes must be such that they cannot catch dur ing training due to their shape e g length...

Page 20: ...it sport com www christopeit sport com This treadmill is created only for private Home sports activity and not allowed to us in a commercial or professional area Home Sport use class H C Illustration...

Page 21: ...15A 2 73 36 1574 17 BT 59 Safety clip 1 8 36 1574 18 BT 60 Foam 2 7 36 1574 19 BT 61 Controller 1 5 36 1574 20 BT 62 Computer connection 1 1 8 63 36 1574 21 BT 63 Computer connection 2 1 62 64 36 157...

Page 22: ...with connection cable 2 63 to the bottom frame 1 on right side and connect the connection ca ble 3 64 with connection cable 2 63 2 Put both lift posts 2 3 at bottom frame 1 that screw holes are align...

Page 23: ...on the side rails 48 Press Start Stop button and after a 3 Sec Count Down the treadmill start moving Start walking onto the walk surface 56 when speed is slowly and follow the speed Familiarize yours...

Page 24: ...ld up for saving space and move Raise the treadmill at position A and push the treadmill into vertically position until the locking knob 43 locks up By completely folding out the front transport rolle...

Page 25: ...nd it is still not at the good range then the running belt should be damaged already please contact your local dealer for replace ment Note Make sure that the running surface is as centered as possibl...

Page 26: ...st the speed with and keys into desired speed If put off the safety clip from computer at any time the motor stop slowly and the display will show E0 After put on the safety key on computer the normal...

Page 27: ...creases in steps of 2km h C If the actually pulse is less than 30 beats min lower than target H R the speed increases in steps of 1km h D If the actually pulse is less than 30 beats min higher than ta...

Page 28: ...x2 Program 3 Special Level 0 Fartlek x1 Program 4 Everyday Level 0 Hill Climb x1 Level 1 Fartlek x2 Level 1 Hill Climb x2 Level 2 Rehab x1 Level 2 Hill Climb x3 Level 3 Rehab x2 Level 3 Downhill x1 Le...

Page 29: ...29 Table 2 English...

Page 30: ...30...

Page 31: ...31 English...

Page 32: ...32...

Page 33: ...ly in the warm up phase This can be done with gymnastic exercises lasting five to ten minutes Then the actual training training phase should begin The training exertion should be relatively low for th...

Page 34: ...34...

Page 35: ...35...

Page 36: ...bestellungen oder Reparaturen wenden Sie sich bitte an unsere Service Abteilung Service Top Sports Gilles GmbH Tel 49 0 2051 6067 0 Friedrichstrasse 55 info christopeit sport com Fax 49 0 2051 6067 44...

Reviews: