background image

37

Reset all adjustment to previous figure.

Reset

Store

Closes IMAGE ADJUST MENU.

Quit

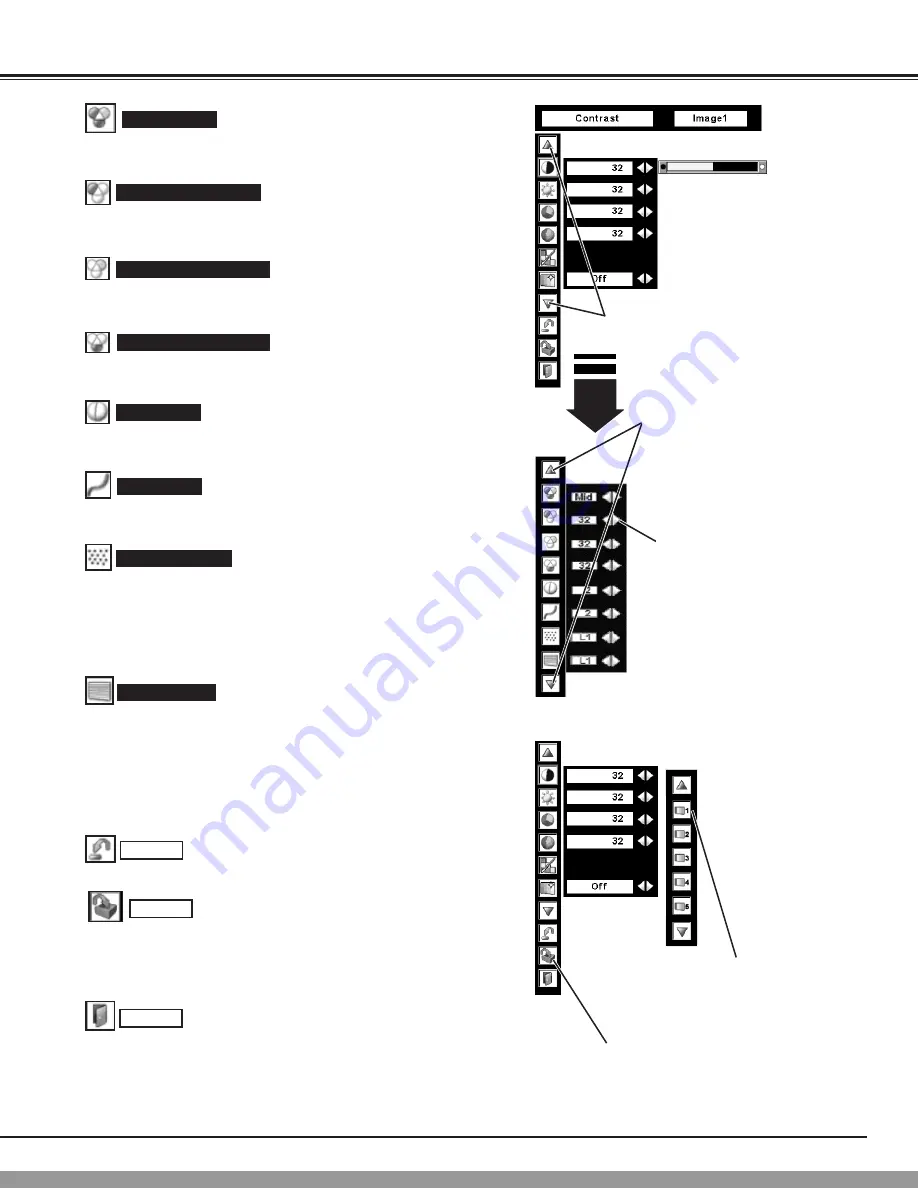
Other icons operates as follows.

To store manually preset image, move a red frame pointer to Store
icon and press SELECT button.  Image Level Menu will appear.
Move a red frame pointer to Image 1 to 10 where you want to set and
then press SELECT button.

Press either POINT LEFT button or POINT RIGHT button to obtain
better balance of contrast.  (From 0 to 15.)

Gamma

Press POINT LEFT button to soften the image, and POINT RIGHT
button to sharpen the image.  (From 0 to 31.)

Sharpness

Press POINT LEFT button to lighten red tone and POINT RIGHT
button to deeper tone.  (From 0 to 63.)

White balance (Red)

Press POINT LEFT button to lighten green tone and POINT RIGHT
button to deeper tone.  (From 0 to 63.)

White balance (Green)

Press POINT LEFT button to lighten blue tone and POINT RIGHT
button to deeper tone.  (From 0 to 63.)

White balance (Blue)

Press POINT LEFT/RIGHT buttons to change progressive scan
mode.  Dialog box display is changed to “Off”, “On”, “Film”.

Off   ··· Progressive scan mode to OFF.
On  ···· Progressive scan mode to ON.
Film  ···· Effective on 3:2 pulldown video sources. 

Press POINT LEFT/RIGHT buttons to change noise reduction mode.
Dialog box display is changed to “Off”, “L1”, “L2”.

Off  ··· Noise reduction mode to OFF.
L1  ···· Noise reduction mode to L1.
L2  ···· Noise reduction mode to L2.

Noise reduction

Progressive

Color temp.

Press either POINT LEFT button or POINT RIGHT button to Color
temp. level that you want to select. (XLow, Low, Mid or High) 

Press SELECT button at this icon
to display other items.

Press SELECT button at this icon
to display previous items.

Press POINT LEFT/RIGHT buttons
to adjust value.

Image Level Menu
Move a red frame pointer to
any of Image 1 to 10 where
you want to set  and then
press SELECT button.

Store icon
Press SELECT button at this
icon to store the adjustment.

PICTURE IMAGE

This Manual: http://www.manuallib.com/file/2671777

Summary of Contents for LW300 103-011100-01

Page 1: ...nualLib com ManualLib com collects and classifies the global product instrunction manuals to help users access anytime and anywhere helping users make better use of products Home http www manuallib com Chinese http www shuomingshuku com This Manual http www manuallib com file 2671777 ...

Page 2: ...User s Manual 103 011100 01 MODEL Projection lens is optional This Manual http www manuallib com file 2671777 ...

Page 3: ...nto a compartment or similarly enclosed the minimum distances must be maintained Do not cover the ventilation slot on the projector Heat build up can reduce the service life of your projector and can also be dangerous If the projector is not to be used for an extended time unplug the projector from the power outlet CAUTION Not for use in a computer room as defined in the Standard for the Protectio...

Page 4: ...out parts that could result in a fire or electric shock Never spill liquid of any kind on the projector Do not install the projector near the ventilation duct of air conditioning equipment This projector should be operated only from the type of power source indicated on the marking label If you are not sure of the type of power supplied consult your authorized dealer or local power company Do not ...

Page 5: ...nd if not installed and used in accordance with the instructions may cause harmful interference to radio communications However there is no guarantee that interference will not occur in a particular installation If this equipment does cause harmful interference to radio or television reception which can be determined by turning the equipment off and on the user is encouraged to try to correct the ...

Page 6: ... trademarks or registered trademarks of International Business Machines Inc Windows and PowerPoint are registered trademarks of Microsoft Corporation Each name of corporations or products in the owner s manual is a trademark or a registered trademark of its respective corporation COMPUTER INPUT 24 VIDEO INPUT 31 SETTING 38 APPENDIX 44 SELECTING INPUT SOURCE 24 SELECTING COMPUTER SYSTEM 24 PC ADJUS...

Page 7: ...al image size allowing you to focus on crucial information at a presentation Compact Design This projector is extremely compact in size and weight It is designed to carry and work anywhere you wish to use Power Management Power Management function is provided to reduce power consumption while a projector is not in use This Power Management function operates to turn Projection Lamp off when a proje...

Page 8: ...F CABINET LAMP COVER ADJUSTABLE FEET AND FEET LOCK LATCHES This projector is equipped with cooling fans for protection from overheating Pay attention to following to ensure proper ventilation and avoid a possible risk of fire and malfunction Do not cover vent slots Keep side clear of any objects Obstructions may block cooling air AIR INTAKE VENTS PROJECTION LENS SPEAKERS INFRARED REMOTE RECEIVER L...

Page 9: ...ower Cord when an appliance is not used When this projector is connected to outlet with AC Power Cord an appliance is in Stand by Mode and consumes a little electric power CONNECTING AC POWER CORD Connect AC Power Cord supplied to a projector AC outlet must be near this equipment and must be easily accessible To POWER CORD CONNECTOR on the projector Projector side AC Outlet side Ground CAUTION The...

Page 10: ...ed to project on a flat projection surface ROOM LIGHT Brightness in a room has a great influence on picture quality It is recommended to limit ambient lighting in order to provide best image SCREEN Before setting up a projector install Projection Lens on Projector 1 Before installation check where a projector is used and prepare a suitable lens For specifications of a Projection Lens contact sales...

Page 11: ... undo FEET LOCK LATCHES Position and keystone distortion of image can be adjusted using Menu Operation Refer to P 22 and 38 3 INSTALLING PROJECTOR IN PROPER POSITION Install the projector properly Improper installation may reduce the lamp lifetime and cause a fire hazard Do not tilt the projector more than 10 degrees above and below Do not point the projector up to project an image Do not point th...

Page 12: ...unsuitable transport case This may cause damage to a projector To transport a projector through a courier or transport service consult your dealer for best way MOVING PROJECTOR Use Carrying Handle when moving a Projector When moving a projector replace lens cap and retract feet to prevent damage to lens and cabinet When this projector is not in use for an extended period put it into case not suppl...

Page 13: ...gures on pages 12 to 14 and connect properly This projector uses a micro processor to control this unit and occasionally this micro processor may malfunction and need to be reset This can be done by pressing RESET button with a pen which will shut down and restart unit Do not use RESET function excessively RESET BUTTON Connect component video output Y Cb Cr or Y Pb Pr from video equipment to VIDEO...

Page 14: ...RT AUDIO IN 1 or 2 INPUT TERMINAL ANALOG Cables used for connection Cable or adapter is not supplied with this projector Audio Cable stereo VGA Cable HDB 15 pin DVI Digital Cable for Single Link T M D S BNC Cable Control Cable for Serial Port Audio Cables Mini Plug stereo Terminals of a Projector Terminal DVI Digital Cable Monitor Output BNC Cable INPUT TERMINAL DIGITAL Note When connecting the ca...

Page 15: ...player or high definition TV source Composite Video Output Component Video Output Y Cb Pb Cr Pr Component Video Output Y Cb Pb Cr Pr Y Cb Pb Cr Pr Video Cables RCA x 1 or RCA x 3 BNC Cable Audio Output Composite Video Output VIDEO Video Cable RCA x 1 or RCA x 3 BNC Cable S VIDEO Cable DVI Digital Cable for Single Link T M D S Audio Cable RCA x 2 HDB 15 pin SCART 21 pin Cable RGB Scart 21 pin Outpu...

Page 16: ...so used to pan image in DIGITAL ZOOM mode P30 POINT LEFT RIGHT buttons are also used as VOLUME buttons P23 Used to execute item selected It is also used to expand compress image in DIGITAL ZOOM mode P30 COLOR M BUTTON Used to operate COLOR MANAGEMENT P35 36 Used to adjust zoom P22 ZOOM BUTTON FOCUS BUTTON Used to adjust focus P22 NO SHOW BUTTON Used to turn picture into black image P23 D ZOOM BUTT...

Page 17: ...rectly replaced Dispose of used batteries according to batteries manufacturers instructions and local rules Pull up lid and remove it Remove battery compartment lid Slide batteries into compartment Replace compartment lid Two AA size batteries For correct polarity and be sure battery terminals are in contact with pins in compartment REMOTE CONTROL BATTERIES INSTALLATION 1 2 3 Operating Range Point...

Page 18: ...low when the lamp cannot light up P46 53 54 Flashes red when internal projector temperature is too high P44 53 54 Used to select input source P24 P31 Used to select an item or adjust value in ON SCREEN MENU They are also used to pan image in DIGITAL ZOOM mode P30 POINT LEFT RIGHT buttons are also used as VOLUME buttons P23 Used to execute the selected item It is also used to expand compress image ...

Page 19: ...EMOTE CONTROL UNIT ON OFF SELECT COLOR M MENU LIGHT I INPUT 2 3 SCREEN L L 1 D ZOOM NOSHOW FREEZE MUTE Z Z F F KEYS I I INPUT IMAGE SELECTION KEYSTONE FOCUS LENS ZOOM V O L U M E V O L U M E AUTO PC AUTO FLOW OF ON SCREEN MENU OPERATION Display ON SCREEN MENU Press MENU button to display ON SCREEN MENU MENU BAR A red frame is POINTER Move POINTER red frame to MENU ICON that you want to select by p...

Page 20: ...image Contrast Brightness Color Tint Color management Auto picture control Color temp White balance R G B Sharpness Gamma Noise reduction Progressive Refer to P35 37 PC ADJUST MENU Used to adjust parameters to match with input signal format Refer to P26 28 INPUT MENU Used to select input source Input 1 Input 2 or Input 3 Refer to P31 IMAGE SELECT MENU Used to select image level among Standard Cine...

Page 21: ...perating the projector A PIN code consists of a four digit number Refer to PIN Code Lock function in Setting on page 42 for locking operation of the projector with your PIN code Pointer PIN code Input Dialog Box Enter a PIN code Select a number by pressing the POINT LEFT RIGHT button and fix the number with the SELECT button The number will change to If you fixed a wrong number move the pointer to...

Page 22: ...lights GREEN again and you can turn projector on After cooling down completely disconnect AC Power Cord The message disappears after 4 seconds The projector cannot be turned on during the cooling period with the READY indicator turned off You can turn it on again after the READY indicator GREEN again When the On start function is on this projector is turned on automati cally by connecting the AC p...

Page 23: ...on SETTING menu Refer to page 38 Keystone dialog box appears 2 Correct keystone distortion by pressing POINT UP DOWN LEFT RIGHT buttons Press POINT UP button to reduce the upper part of the image and press POINT DOWN button to reduce the lower part Press POINT LEFT button to reduce the left part and press POINT RIGHT button to reduce the right part Reduce the upper width with POINT UP button Reduc...

Page 24: ...n for decreasing Mute Press MUTE button on Remote Control Unit to cut off sound To restore sound to its previous level press MUTE button again or press Volume buttons To increase volume press POINT RIGHT button and press POINT LEFT button for decreasing Press POINT UP DOWN buttons to move a red frame pointer to item that you want to select and then press SELECT button SOUND ADJUSTMENT DIRECT OPERA...

Page 25: ...inal select RGB PC digital RGB AV HDCP When your computer is connected to INPUT 1 ANALOG terminal select RGB PC analog Move a pointer red arrow to source and press SELECT button Source Select Menu INPUT Menu icon Move a pointer red arrow to Input 1 and press SELECT button RGB PC digital RGB Scart When scart video equipment is connected to INPUT 1 ANALOG terminal select RGB Scart If a HDCP compatib...

Page 26: ...MENU This projector automatically selects PC system among those provided in this projector and PC system can be also selected manually AUTOMATIC MULTI SCAN SYSTEM Press MENU button and ON SCREEN MENU will appear Press POINT LEFT RIGHT buttons to move a red frame pointer to INPUT Menu icon Press POINT UP DOWN buttons and a red arrow icon will appear Move arrow to RGB and then press SELECT button 1 ...

Page 27: ...dj Store adjustment parameters Adjustment parameters from Auto PC Adjustment can be memorized in this projector Once parameters are memorized setting can be done just by selecting Mode in PC SYSTEM Menu P25 Refer to MANUAL PC ADJUSTMENT section P27 28 NOTE Fine sync Total dots and Picture Position of some computers can not be fully adjusted with this Auto PC Adjustment function When image is not p...

Page 28: ...n image as necessary to eliminate flicker from display Press POINT LEFT RIGHT buttons to adjust value From 0 to 31 Fine sync Adjust the number of total dots in one horizontal period Press POINT LEFT RIGHT buttons and adjust number to match your PC image Total dots Adjusts horizontal picture position Press POINT LEFT RIGHT buttons to adjust position Position H Adjusts vertical picture position Pres...

Page 29: ...Shows values of Total dots Position H Position V Display area H and Display area V Close this dialog box To store adjustment data To clear adjustment data To clear adjustment parameters previously set move a red frame pointer to Mode free icon and then SELECT button Move a red arrow pointer to Mode that you want to clear and then press SELECT button This Mode has parameters being stored Close this...

Page 30: ...e for graphics Real User preset picture adjustment in IMAGE ADJUST Menu P37 IMAGE 1 10 IMAGE LEVEL SELECT DIRECT Select image level among Standard Real Image 1 to Image 10 by pressing IMAGE button on Top Control or IMAGE SELECTION button on Remote Control Unit IMAGE button Standard Real Image 1 Image 10 Normal picture level preset on this projector Picture level with improved halftone for graphics...

Page 31: ... PC SYSTEM Menu P25 This projector cannot display any resolution higher than 1600 X 1200 If your computer s screen resolution is higher than 1600 X 1200 reset resolution to lower before connecting projector Image data in other than XGA 1024 x 768 is modified to fit screen size in initial mode Panning function may not operate properly if computer system prepared on PC ADJUST Menu is used Normal SCR...

Page 32: ... to VIDEO jack select Video Video When connecting to those equipment select a type of Video source in SOURCE SELECT Menu Press MENU button and ON SCREEN MENU will appear Press POINT LEFT RIGHT buttons to move a red frame pointer to INPUT Menu icon 1 Move a pointer to source that you want to select and then press SELECT button 3 Press POINT UP DOWN buttons to move a red arrow pointer to Input 2 and...

Page 33: ...justs itself to optimize its performance When Video System is 1035i or 1080i select system manually first If projector cannot reproduce proper video image it is necessary to select a specific component video signal format among 480i 575i 480p 575p 720p 1035i and 1080i Auto COMPONENT VIDEO SIGNAL FORMAT VIDEO JACK OR S VIDEO JACK Y Pb Cb Pr Cr JACKS Projector automatically detects incoming Video sy...

Page 34: ... fine tone Cinema User preset picture adjustment in IMAGE ADJUST Menu P37 IMAGE 1 10 IMAGE LEVEL SELECT DIRECT Select image level among Standard Cinema Image 1 to Image 10 by pressing IMAGE button on Top Control or IMAGE SELECTION button on Remote Control Unit Normal picture level preset on this projector Standard Picture level adjusted for picture with fine tone Cinema User preset picture adjustm...

Page 35: ... of 16 9 When your video equipment such as DVD has 16 9 output mode select 16 9 and select Full on this SCREEN Menu to provide better quality Full Provides image to fit screen size 16 9 aspect ratio by expanding image width and height uniformly This function can be used for providing a letter box mode picture 4 3 aspect picture with black bar on top and bottom edges at wide video aspect of 16 9 Zo...

Page 36: ...oint er to COLOR MANAGEMENT and then press the SELECT button The COLOR MANAGEMENT menu will appear and pointer mode will be enabled The image that was being project ed when the button was pressed will be paused and the COLOR MANAGEMENT POINTER will appear Use the POINT buttons to move a pointer to a section of the paused image that contains the color that you would like to adjust and then press th...

Page 37: ...T menu will be exited and the display will return to the normal projection screen but any settings that have been changed will not be stored To store the changed settings be sure to select LIST using the POINT buttons and change to the next mode LIST mode If you press the COLOR M button on the remote control the COLOR MANAGEMENT menu will be exited and the display will return to the normal project...

Page 38: ...RIGHT button to deeper tone From 0 to 63 White balance Blue Press POINT LEFT RIGHT buttons to change progressive scan mode Dialog box display is changed to Off On Film Off Progressive scan mode to OFF On Progressive scan mode to ON Film Effective on 3 2 pulldown video sources Press POINT LEFT RIGHT buttons to change noise reduction mode Dialog box display is changed to Off L1 L2 Off Noise reductio...

Page 39: ...e dialog box appears Adjust keystone with the POINT UP DOWN LEFT RIGHT buttons Store stores the keystone adjustment even if the AC power cord is disconnected Reset resets the keystone adjustment when the AC power cord is disconnected This projector has Setting menu that allows you to set up the other various functions described as follows Display This function decides whether to display On Screen ...

Page 40: ...IGHT buttons or change the Logo PIN code Change the Logo PIN code Logo PIN code can be changed to your desired four digit number Select Logo PIN code change with the POINT DOWN button and press the SELECT button Set a new Logo PIN code Be sure to note the new Logo PIN code and keep it at hand If you lost the number you could no longer change the Logo PIN code setting For details on PIN code settin...

Page 41: ...the message No signal appears on the screen The count down of the set time will get started The count down time can be set between 1 and 30 min utes When the count down time has been elapsed the lamp will be turned off to cool itself down The READY indicator will be switched off during this cooling off period The next operation depends on the setting as follows Ready When the lamp has been fully c...

Page 42: ...code for the remote control Slide the Reset Switch to Reset position in the compartment lid on back of the remote control Remote control Security This function locks operation of the top control and remote control It is useful to prevent operation by an unauthorized person not locked locks operation of the top control To unlock use the remote control locks operation of the remote control To unlock...

Page 43: ...ttings for security options Off the projector is not locked with the PIN code On1 requires to enter the PIN code every time turning on the projector On2 requires to enter the PIN code to operate the projector once the power cord is disconnected as long as the AC power cord is connected the projector can be operated without the PIN code Whenever to change the PIN Code Lock setting or the PIN code t...

Page 44: ...r operation Lamp counter Factory default This function returns all setting values except for the user logo Key lock PIN code lock logo PIN code lock and the lamp counter to the factory default settings Select Factory default and this box appears Select Yes and the next box appears Factory default Select Yes to activate it This Manual http www manuallib com file 2671777 ...

Page 45: ...n again and the projector can be turned on by pressing the On Off button on the remote control unit or on the top control When you turn on the projector the Warning Temp Indicator will go out If the Warning Temp Indicator is still flashing check the followings TOP CONTROL When both of the Warning Temp and Ready indicators are flashing Warning Temp Indicator Ready Indicator When the projector detec...

Page 46: ...mely cleaning of the air filters is a very important factor When appropriate clean the air filters following the steps below Clean the air filters with a brush or rinse them softly When rinsing the air filters dry them well 3 Replace the air filters properly Make sure that the air filters are fully inserted to the projector 4 CAUTION Do not operate the projector with the Air Filter s removed Dust ...

Page 47: ...f the Projection Lamp of this projector draws to an end the LAMP REPLACE indicator lights yellow If this indicator lights yellow replace the projection lamp with a new one promptly ORDER REPLACEMENT LAMP Replacement Lamp can be ordered through your dealer When ordering a Projection Lamp give the following information to the dealer Model No of your projector 103 011100 01 Replacement Lamp Type No 0...

Page 48: ...of the lamp with the LAMP REPLACE INDICATOR lighted may increase the risk of lamp explosion A Lamp may explode as a result of vibration shock or degradation as a result of hours of use as its lifetime draws to an end Risk of explosion may differ according to the environment or conditions in which the projector and lamp are being used IF A LAMP EXPLODES THE FOLLOWING SAFETY PRECAUTIONS SHOULD BE TA...

Page 49: ...tor may be turned on by pressing Power ON OFF button Check WARNING TEMP and READY indicator If both WARNING TEMP and READY indicator flashes a projector cannot be turned on See TURNING ON OFF PROJECTOR section on pages 20 21 Check Projection Lamp Refer to page 46 Image is out of focus Adjust focus of a projector Make sure a projection screen is at least 5 0 1 5m from a projector Check Projection L...

Page 50: ...problems yourself If a projector fails to work properly see TROUBLESHOOT ING section on pages 48 49 To correct failure try Solutions If after following all operating instructions you find that service is necessary contact Christie Service Station or store where you purchased unit Give model number and explain difficulty We will advise you how to obtain service This symbol on the nameplate means th...

Page 51: ...de 1 Mode 2 Mode 3 Mode 4 Mode 5 Image Select Screen Mode 6 Yes No MENU TREE MODE 1 MODE 2 Mode 7 Mode 8 Mode 9 Mode 10 Quit Input RGB PC analog RGB Scart Go to System 1 Input 2 Video Input 3 Go to System 3 Go to System 2 Input 1 Video S video Y Pb Cb Pr Cr N A Go to System 2 Computer Input Video Input N A not applicable Go to System 3 Go to System 2 RGB PC digital RGB AV HDCP RGB Go to System 1 Y...

Page 52: ...ne Background Display Logo Ceiling Rear Power management On start Lamp control Remote control Factory default Yes No Quit Code 8 Quit Quit 0 63 Russian High Color Temp Mid Low XLow Ready Shut down Yes No Lamp counter reset Off Key lock Projector Remote Control 1 30 Min Quit Quit Computer Input Video Input Computer Input Video Input 1080i Off L1 L2 Noise reduction Normal Natural wide Quit Mute On O...

Page 53: ...terlace 63 98 60 02 SXGA 14 1280 x 1024 Interlace 61 20 65 20 71 40 75 60 50 00 86 00 720p Progressive 50 00 94 00 37 50 50 00 XGA 1 1024 x 768 XGA 2 1024 x 768 XGA 3 1024 x 768 XGA 4 1024 x 768 48 36 60 00 68 677 84 997 XGA 6 1024 x 768 60 023 75 03 XGA 7 1024 x 768 56 476 70 07 48 50 60 02 44 00 54 58 SXGA 9 1280 x 1024 SXGA 10 1280 x 960 79 976 75 025 60 00 60 00 SXGA 15 1280 x 1024 SXGA 16 128...

Page 54: ...0 19 INDICATORS AND PROJECTOR CONDITION Check the Indicators for projector condition on dim off flashing The projector is OFF The AC Power Cord is unplugged The projector is READY to be turned on with the POWER ON OFF button The Warning Temp Indicator flashes red to let you know the internal temperature of the projector exceeds the normal level If the temperature goes up further the projector will...

Page 55: ...e projector is turned off again disconnect the AC Power Cord and contact the dealer or the service center for service and checkup Do not leave the projector on It may cause electric shock or a fire hazard The projector is in the Power management mode The temperature inside the projector is abnormally high The lamp cannot light up The projector is preparing for stand by or the projection lamp is be...

Page 56: ...Weight 4 4 oz 126 g including batteries Remote Control Transmitter 480i 480p 575i 575p 720p 1035i and 1080i High Definition TV Signal H sync 15 100 KHz V sync 48 100 Hz Motorized Lens Shift DVI Terminal Digital HDCP Compatible HDB 15 pin Terminal Analog and Stereo Mini Type Jack Audio Input 1 Jacks BNC Type x 5 G or VIDEO Y B or Cb Pb R or Cr Pr H and V Stereo Mini Type Jack Audio Input 2 Jacks RC...

Page 57: ... RTS CTS T X D GND GND ADB GND GND PS 2 Serial ADB 1 2 3 4 5 6 7 8 COMPUTER INPUT 1 TERMINAL DIGITAL Terminal DVI 24 pin 1 9 17 2 10 18 3 11 19 4 12 20 5 13 21 6 14 22 7 15 23 8 16 24 T M D S Data2 No Connect T M D S Data2 No Connect T M D S Data2 Shield DDC Clock DDC Data No Connect 1 5 2 4 3 6 7 8 Pin Configuration T M D S Data1 No Connect T M D S Data1 No Connect T M D S Data1 Shield 5V Power G...

Page 58: ... lens of this projector can be replaced with other optional lens which are sold separately This feature enables you to use the projector for wide variety of uses For installation and replacement of the lens always contact the sales dealer The projector lens must be installed or replaced by well trained sales or service engineers Do not attempt to do by yourself as it may cause injury After install...

Page 59: ...ory default set No 1 2 3 4 Factory default set No 4 3 2 1 Should the four digit number be changed the factory set number will be invalid Put the label below supplied on in a prominent place of the projector s body while it is locked with a PIN code While the projector is locked with the PIN code PIN Code Lock No Logo PIN Code Lock No PIN CODE NUMBER MEMO This Manual http www manuallib com file 267...

Page 60: ...429 5 12 6 319 0 6 61 168 0 3 60 91 5 5 59 142 0 5 57 141 5 Screw Holes for Ceiling Mount Screw M6 Depth 10 9 06 230 0 5 28 134 0 4 49 114 0 4 55 115 5 4 61 117 0 3 74 95 0 5 79 147 0 Unit inch mm This Manual http www manuallib com file 2671777 ...

Page 61: ...7727 Toll Free 1 800 333 3816 CHRISTIE DIGITAL SYSTEMS Inc ViewPoint 200 Ashville Way Wokingham Berkshire U K RG41 2PL Telephone 44 118 977 8000 Fax 44 118 977 8100 sales europe christiedigital com CHRISTIE DIGITAL SYSTEMS Inc Willicher Damm 129 D 41066 Mönchengladbach Germany Telephone 49 2161 664540 Fax 49 2161 664546 sales germany christiedigital com CHRISTIE DIGITAL SYSTEMS Inc 627A Aljunied R...

Reviews: