Choc Edge Choc Creator V2.0 Plus User Manual Download Page 19

Choc Edge  


19 


3.3 Note 


3.3.1

   Before using your Choc Creator for the first time, please check the printing platform is level 


to make sure it has not been affected by shipping of the machine. If the platform appears to 


need adjustment, refer to the video on the provided USB flash drive. 


3.3.2  

Clean the syringe after every use in order to avoid the rubber bung sticking inside the 
syringe. If it does stick, put the entire syringe into a bowl of hot water (°C) for a few minutes 
and pull the rubber bung out with a pair of tweezers. When the rubber bung wears out, it 
can be replaced with the spare that is provided in the tool box. 


3.3.3


Ele t i it   e ui e e t: The ope ati g  oltage of the Cho  C eato s po e  adapte  is 


between 100-240V. An unstable voltage or exceeding the range of the operating voltage can 


damage the power adapter. A damaged power adapter will not light up when plugged in. 


3.3.4


Before printing, put a piece of paper on the platform and fasten it in place using the four 


magnets from the tool box. Displacement of the paper will affect the quality of printing. 


Additionally, try to avoid placing the magnets close to the metallic nozzle. Placing the four 


magnets on all four corners of the paper is the best option.  
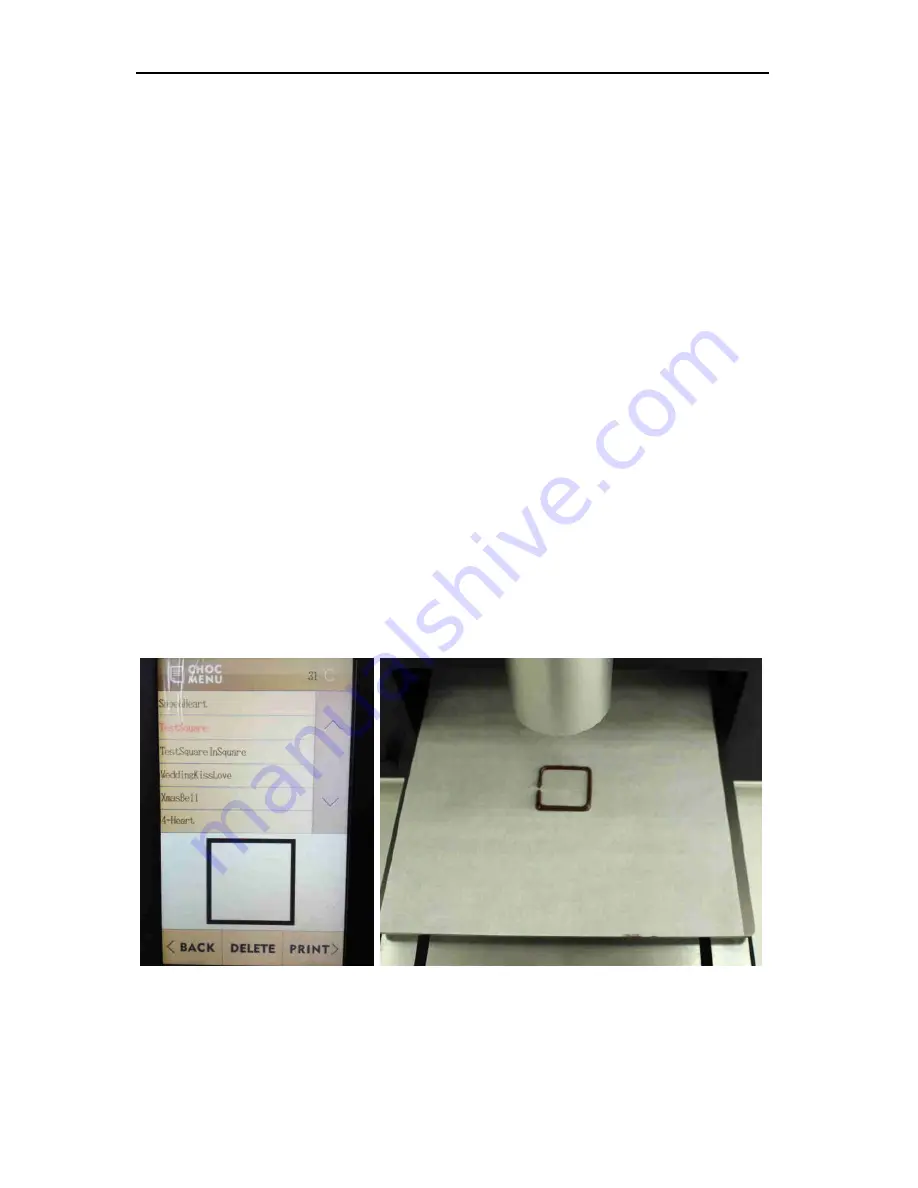


3.3.5

   When printing for the first time, test the machine by printing a square. A Test Square file is 


included as one of the pre-loaded design files. (see 

Figure 3.3.5

 below) 


Figure 3.3.5 

(Actual photographs) 

Summary of Contents for Choc Creator V2.0 Plus

Page 1: ...Choc Edge 1 ...

Page 2: ...Chocolate 5 8 1 Melting Process 2 Precautions Part 3 Printer Operation 9 22 1 Function Introduction 2 Operation Procedure 3 Precautions 4 Parts List Part 4 Software Installation and Use 22 40 1 Software Installation 2 Software Use 3 Frequently Asked Questions 4 Appendix A B Part 5 After Sales Service 41 ...

Page 3: ...roduction 1 1 Equipment Introduction Emergency Stop Button Power Switch Power Cord Connection USB Input Terminal Power Computer Cord Connection Touch Screen Stylus Holder 5 LCD Touch Screen Printing Platform Plastic Cup Holder Print Head ...

Page 4: ...Choc Edge 4 1 2 Product Specifications ...

Page 5: ...Recommended for Asia Pacific See image below 2 1 1 Prepare the melting pot chocolate callets and stirrer Note The amount of chocolate callets required will depend on the situation but approximately one fifth of a pot of chocolate callets should be adequate Be sure to cover the pot with the lid to maintain the temperature In an exhibition situation the chocolate beans may need to be melted quickly ...

Page 6: ...ng sure that the syringe piston is all the way down and there is no air inside the syringe Start slowly loading the melted chocolate into the syringe at a slow and steady pace Try not to let any air get into the syringe See Figure 2 1 4 below Note Try not to let any air get into the syringe when loading as this will affect the printing quality During the loading process a squeaking noise indicates...

Page 7: ...e details Important You should regularly examine your nozzles If you should damage your nozzles or you are unsure of their strength shape and integrity do not use them Replace them Figure 2 1 5 Nozzle Plunger 30ML Mark 15ML Mark Piston O shape Ring Syringe Additional The top part of the Syringe with the finger grip is referred to as the Flange Figure 2 1 4 Figure 2 1 5 2 ...

Page 8: ...h no granules visible when stirring any remaining granules can cause a blockage during printing 2 2 3 In order to increase the loading efficiency and achieve the best printing quality it is not recommended to continuously reuse the same chocolate 2 2 4 It is recommended that the syringe be cleaned immediately after use by using the provided brush in the tool box This is to prevent the rubber bung ...

Page 9: ...1 below Safety Note During the calibration the Print Head and Printing Platform will move Do not touch any parts of the printer during calibration and make sure there are no foreign objects on or around the printing platform upon starting up Note Make sure there is no syringe inside the print head when starting the machine Previously used syringes should be removed before starting the machine See ...

Page 10: ...en will be displayed 3 2 2 Press Next to move on to the next screen 3 2 3 Choose 15ML or 30ML depe di g o the amount of chocolate in the syringe with 30ml being maximum capacity a d the p i te s E axis will move and set itself to the selected height See Figure 3 2 3 below Figure 3 2 3 Press 15 ml for half a syringe Press 30 ml for a full syringe ...

Page 11: ...d keys 3 2 5 Open the print head cover pull the barrel forward and insert the syringe into the barrel 3 2 6 O the Cho Loadi g s ee elo Figure 3 2 6 press the key on the touch screen e t to Height o E axis and the E axis will move down 3 2 7 Afte the E a is ea hes the desi ed positio push the a el a k i to pla e a d lo k the top of the s i ge od i to pla e adjusti g the fit p essi g the ke if e ess...

Page 12: ...cessfully squeezed out or not After the chocolate stops dripping press Drop Retraction Squeeze Out a d then press Confirm ee Figure 3 2 9 below Figure 3 2 9 E axis connector Flange Connector Syringe Rod Piston Figure 3 2 7 Drop Retraction ueeze Out Flange of syringe D op Ret a tio p i es the ozzle by pushing the chocolate towards the ozzle s tip efo e et a ti g to the value of 0 5mm Depending on r...

Page 13: ...you can gently tap the key to fine tune to e g 42 This option may be more suitable for first time users Option 2 P ess the E te Value utto o e to e te the u e i al pad s ee See Figure 3 2 11 2 below Enter the value of 40 into the numerical window Note For Option 2 a value of no more than 40 can be entered at this time This is to prevent novice users from lowering the nozzle too close to the printi...

Page 14: ...ozzle should be positioned approximately 1 5mm above this disc If your nozzle touches the disc or is close to it your nozzle is too low Raise the nozzle up by 1mm or more Once the desired height is set press Save 3 2 13 After setting the height the screen will jump back to the home page automatically From here choose Pre stored design files select one of the 12 printing files and press Print to st...

Page 15: ...3 B p essi g Pause Stop Continue Reload and Temperature Setting functions can be selected See Figure 3 2 13 2 below Figure 3 2 13 2 The Reload process is that which has been introduced above in article 2 1 4 Pre stored designs ...

Page 16: ...e printed by sele ti g YOU DE IGN ee Figure 3 2 14 below Figure 3 2 14 3 2 15 If you want to move a file from a USB flash drive to the printer s i te al e o press Save and the Confirm The files will be automatically saved in CHOC MENU as pre stored files See Figure 3 2 15 below Figure 3 2 15 ...

Page 17: ...r or not you would like to Replace the file Choose Confirm to replace the file or Back to cancel the import and rename the file to import again See Figure 3 2 16 below 3 2 17 If the printing file exceeds the printing size you will be prompted that the File exceeds printing size in which case you can choose Retry to try again or press Back to return to the last screen See Figure 3 2 17 below Figure...

Page 18: ... p ess Retry to try again or go back to the last screen See Figure 3 2 18 below 3 2 19 If the system needs to be updated you can do so by pressing System update selecting the update file from a USB flash drive and p essi g Confirm The system will be updated within a few minutes All users will be notified if their system requires an update See Figure 3 2 19 below Figure 3 2 19 Figure 3 2 18 ...

Page 19: ... the tool box 3 3 3 Ele t i it e ui e e t The ope ati g oltage of the Cho C eato s po e adapte is between 100 240V An unstable voltage or exceeding the range of the operating voltage can damage the power adapter A damaged power adapter will not light up when plugged in 3 3 4 Before printing put a piece of paper on the platform and fasten it in place using the four magnets from the tool box Displac...

Page 20: ...puter G code files can then be printed either by connecting the computer to the printer or by placing them onto a USB flash drive When using a USB flash drive plug the U B flash d i e i to the p i te a d p ess U B files Choose the file ou a t to p i t a d p ess Print If ou a t to sa e the file to the p i te s i te al e o p ess Import a d Confirm a d the file ill e auto ati all sa ed i P e sto ed f...

Page 21: ...ther solution to an issue before resetting See Figure 3 3 11 below 3 3 12 If the chocolate you have loaded is not enough to completely finish a design you have chosen to print the printer will notify you of this If you would still like to print understanding that the design will not be 100 complete you can press Print Alte ati el p ess Reload to etu to the Loadi g s ee ee Figure 3 3 12 below Figur...

Page 22: ...oadi g Nozzle For loadi g ho olate lea l ri ge set Mai tool ho olate o tai er He ago al L re h M For adjusti g the platfor Plasti olle tio up For olle ti g purged ho olate t lus For operati g the tou h s ree U B Flash dri e 8GB Storage Pre Loaded Installation Software User Manual Choc Draw etc Mag ets For faste i g paper hile pri ti g Brush For lea i g the s ri ge arrel Note The specifications of ...

Page 23: ...and all higher systems 4 1 Install the software 4 1 1 Find Choc Print in the USB flash drive and double click to get to the hoose language screen 4 1 2 Choose your preferred language and start the installation process 4 1 3 Click Next 4 1 4 The system will automatically select these two programs Click Next ...

Page 24: ...Choc Edge 24 4 1 5 Install the driver and click Yes 4 1 6 Click Next 4 1 7 Confirm the installation and click Finish If the installation failed please check the solutions below ...

Page 25: ...Choc Edge 25 4 1 8 Click Next 4 1 9 Select the destination directory and click Next If the program has been installed before it is recommended that you overwrite the previous program 4 1 10 Click Next ...

Page 26: ...Choc Edge 26 4 1 11 Wait until the installation is complete and click Finish 4 1 12 Install the main program 4 1 13 A new shortcut will be created on your desktop after installation ...

Page 27: ...desired 4 2 1 is for Windows XP Vista 7 and 8 users who wish to connect via a USB cable 4 2 1 Connect to the printer by using the provided blue USB cable The first time your computer connects it will automatically install a driver This process will be shown in the bottom right hand corner of your screen as an icon and normally takes a less than a minute Double clicking on this icon allows you to c...

Page 28: ... box will appear To generate a G code choose your desired slicing profile and parameters and click Generate G code The ge e atio p o ess a take a few minutes depending on the complexity of the model Recommended settings can be found in 4 7 Printing Parameters You can also set your own parameters According to the requirement of a model choose 2D or 3D parameters refer to Appendix B Figure 4 2 4 ...

Page 29: ...e has been generated it can be found in the same folder as the 3D model Example Slicing Profile Do not select the first two settings Select from default printing parameters Generate G code Print O Matic Print O Matic Object infill quantity in Recommended 0 35 Layer Height in mm is determined by nozzle size 0 8mm nozzle For shells see 4 5 2 on page 33 Recommended 0 Feedrate in mm s is Speed 1 Speed...

Page 30: ... or contact after sales via info chocedge com 4 3 1 ȔDriver installation errorȕ You can request a driver from the Choc Edge technical support team and try to install it manually Less recent customers may find the drivers already in their USB flash drive as a zip file named U B d i e s a file Unzip the USB drivers rar file choose a suitable version of the driver and click install 4 3 2 Access Denie...

Page 31: ...during operation scroll the mouse wheel 4 4 1 Based on the method above import a model as illustrated in Figure 4 4 1 Example Figure 4 4 1 4 4 2 If necessary adjust the printing size of the model using Scale The model size can be changed by dragging the mouse or entering the desired value as shown in Figure 4 4 2 below Figure 4 4 2 Note Use Move to bring a model into the grid area Adjust front vie...

Page 32: ... odel is sitti g o the platfo as shown in Figure 4 4 4 below Figure 4 4 4 4 4 5 The model is ready to be converted into a G code Note If adjustments still need to be made use the related functions It is suggested ot to use Mirror as this function is for highly advanced editing only For multi prints we suggest the creation of a multi STL an STL with multiple parts objects Move to the center and put...

Page 33: ...head will move up in millimeters every time it finishes printing a layer Number of shells Depe di g o the alue e te ed e t a shells o alls ill e uilt around the boundaries of your design creating an additional structural support hells a e like ed to a ussia Doll effe t Moving speed while printing mm s The moving speed of X Y axis during printing Moving speed while not printing mm s The moving spee...

Page 34: ...ly connecting the computer with the printer open the software remain on the ho e page o the LCD tou h s ee of p i te a d li k Connect Whe the a eas i ed tu green the printer is connected and can be controlled remotely by computer Note While connecting to the printer via Wi Fi the computer cannot be connected to another network Name SN code Password SN code P i te s N ode CC2P1509 Connect The colou...

Page 35: ... successful and steps b and c should be repeated D P ess D a i g a d egi d a i g ith you fi ge i the s ua e g id The e a e so e additional tools and functions in the function menu to help you with your drawing When you have finished drawing be sure to adjust the height of E axis to the desired printing height This is very important as failure to do so can result in the Print Head hitting the platf...

Page 36: ... G code file onto a USB flash drive and insert it into the printer to print Alternatively you can move the G code file onto your computer and print using Choc Print Adjust line thickness Open G code files in your smart phone You can choose circle line and other drawing tools from here Print button Change IP address and pen color These settings do not generally need to be changed Printbed size opti...

Page 37: ...lebaut Belgian Dark Chocolate and the parameters below are for printing different models using a 0 8mm nozzle When printing 2D flat shallow models the p i te s temperature should be adjusted to 30 32 C and room temperature set at 19 22 C 2D flat shallow Chocolate Dark chocolate CALLEBAUT Room temperature C 19 22 Printing temperature C 30 32 Filling ratio 0 10 approx Save your G code to your device...

Page 38: ...o 15 approx Layer height mm 0 8 Number of Shells 0 Moving speed while printing 10 22 Moving speed while not printing 10 22 Nozzle diameter mm 0 8 Drive gear diameter 1000 1500 Infill pattern Line Thread sequence choice Infill perimeter loops When printing 3D models with no filling the inclination angle cannot be larger than 30 degrees The temperature of the chocolate needs to be precisely controll...

Page 39: ... 4 7 Nozzle diameter mm 0 8 Drive gear diameter 1000 1500 Infill pattern Line Thread sequence choice Infill perimeter loops When printing a 3D model the use of infill is recommended 3D with infill Chocolate Dark Chocolate CALLEBAUT Room temperature C 19 22 Printing temperature C 30 32 Filling ratio 10 25 Layer height mm 0 8 Number of Shells 0 Moving speed while printing 4 7 Moving speed while not ...

Page 40: ...0 4mm nozzle Chocolate Dark Chocolate CALLEBAUT Room temperature C 19 22 Printing temperature C 30 32 Filling ratio 0 10 Layer height 0 4 Number of Shells 0 Moving speed while printing 10 22 Moving speed while not printing 10 22 Nozzle diameter 0 4 Drive gear diameter 700 800 Infill pattern Line Thread sequence choice Infill perimeter loops When printing a 2 5D model with a 0 4mm nozzle Chocolate ...

Page 41: ...l perimeter loops 4 8 Q A 4 8 1 Fault Correction a Dripping Dripping means that the chocolate is not correctly retracted back into the syringe between extrusion points The chocolate will also d ag This a e e ause the temperature of the chocolate is too high or there is air inside the syringe Try emptying and reloading the syringe Alternatively you can increase the retraction suction b Air pockets ...

Page 42: ...due to vibration Tighten the four screws on the back and the screw on the top c Unusual noises Too much noise during printing means that the printer has been working for a long time and the screw rod has gotten dry The screw rod and possibly the sliding block needs to be lubricated in order to make the screw rod operate smoothly d Rubber bung stuck It is advisable to wash the syringe every time af...

Page 43: ...Choc Edge 43 ...

Page 44: ...Choc Edge 44 ...

Reviews: