1
2
3
2
to the right
to the left
3
brake
3-2
click
1-1
1-2
1-3
1-4
3
1 - HANDLEBAR ASSEMBLY
Insert the lower end of the handlebar with pressure in the opening in the deck until you hear a click
and the tube of the handle bar is in the respective opening.
To remove the handlebar, press the pin and draw the handlebar out.
2 - ADJUSTING THE HEIGHT OF THE HANDLEBAR – 3 positions
• Release the lever, which adjusts the height of the handlebar.
• Press the pin and move the tube of the handlebar in the desired height until you hear a click and the
pin shows through the respective opening.
• Tighten the lever, which adjusts the height of the handlebar.
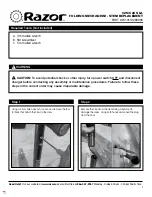
3 - SCOOTER MOVEMENT AND BRAKE USAGE
When you tilt the handlebar to the right, the wheels will turn RIGHT and the scooter will turn right.
When you tilt the handlebar to the left, wheels will turn LEFT and the scooter will turn left.
When in upright position, the scooter will move STRAIGHT.
The rear wheel has a BRAKE. To use the brake during movement, the child can step with its heel on
it and press it until the scooter stops.
CAUTION!
The brake must be used with only one foot!