background image


Assembly Diagram (2) 


console

Handle bar  

Console mast

Console crossbar

Main body

Motor cover 

Moving wheel 

Rear roller

Summary of Contents for CF-1306

Page 1: ...CF 1306 Treadmill Manual...

Page 2: ...ty Precautions 3 Assembly 4 Unpacking Assembly 5 Assembly Diagram 1 6 Parts List 1 7 Assembly Diagram 2 8 Assembly Instructions 9 Initial Use 10 Training Monitor 11 Maintenance 16 Important Notes 19 T...

Page 3: ...wing parts as far as included in the scope of delivery Frame cable electronic devices foam wheels The guarantee does not cover Damage effected by outer force Intervention by unauthorised parties Incor...

Page 4: ...esponding to the exercise programme Dizziness is a sign that you are exercising too intensively with the device At the first signs of dizziness lay down on the ground until you feel better 5 Ensure th...

Page 5: ...or interference voltage To limit the danger of damage to the treadmill it should be equipped with an over voltage protective device not included This appliance is designed for use with 220 240 Volt ra...

Page 6: ...iner is fully assembled Please consider that there is always the risk of injury when using tools and carrying out technical activities Please proceed with care when assembling the device Make sure you...

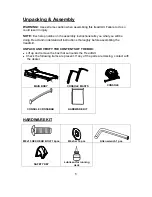
Page 7: ...instructions thoroughly before assembling the treadmill UNPACK AND VERIFY THE CONTENTS OF THE BOX z Lift up and remove the box that surrounds the Treadmill z Check the following items are present If a...

Page 8: ...Assembly Diagram 1 Most of the displayed parts in this diagram are shipped pre assembled For spare parts please do always specify parts numbers used on this diagram or in the following parts list 6...

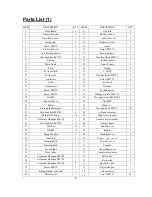
Page 9: ...1 19 Nut M4 4 59 Hexagon screw M10 120 1 20 connect wire set 1 60 Nut M10 2 21 Motor 1 61 Washer 4 22 Fixing bracket motor 1 62 Hex head bolt M8 15 20 23 Hex head bolt M8 80 2 63 Left console mast 1 2...

Page 10: ...Assembly Diagram 2 8 console Handle bar Console mast Console crossbar Main body Motor cover Moving wheel Rear roller...

Page 11: ...ide Step 3 attach the console to the console mast A connect the wire from the console to the wire in the right console mast B assemble the console to the console mast with two M4x15mm bolts and wrench...

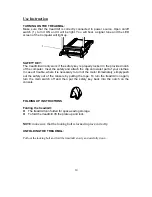
Page 12: ...t part of your clothes In case of trouble where it is necessary to turn of the motor immediately simply push out the safety out of the console by pulling the rope To turn the treadmill on again turn t...

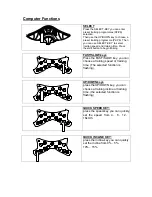
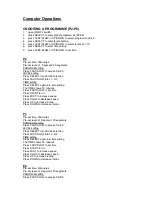
Page 13: ...ime 00 00 99 59 Min Speed 0 0 22 km h incline 0 20 Distance 0 00 99 9 km Calories 0 999 KCAL Pulse 70 200 Min Program P1 P6 Computer Functions START Press the START KEY to begin your exercise STOP Pre...

Page 14: ...the start button to begin training FAST SLOW keys Press the FAST SLOW key you can choose a training speed or training time The selected function is flashing UP DOWN keys press the UP DOWN key you can...

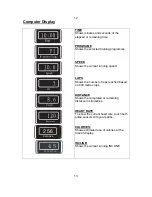
Page 15: ...SPEED Shows the current running speed LAPS Shows the number of laps reached based on 400 metres laps DISTANCE Shows the completed or remaining distance in kilometres HEART RATE To show the current hea...

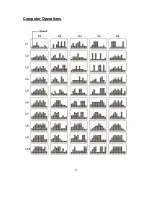
Page 16: ...again into time setting The TIME shows 30 minutes Press FAST SLOW to set time Press START to run Press FAST to increase speed Press SLOW to decrease speed Press UP to increase incline Press DOWN to de...

Page 17: ...LOW into L1 L10 TIME setting Press SELECT again into time setting The TIME shows 30 minutes Press FAST SLOW to set time Press START to run Press FAST to increase speed Press SLOW to decrease speed Pre...

Page 18: ...Computer Operations 16...

Page 19: ...the slipping is eliminated 4 Be careful not to tighten the running belt tension too much as you can create excessive pressure on the front and rear roller bearings An excessively tightened running bel...

Page 20: ...If traces of silicon spray are found lubrication is not necessary In case of a dry surface refer to the following instructions Only use oil free silicon spray Application of lubricant on the belt z P...

Page 21: ...safety standards The device is only suitable for home use Any other use is impermissible and possibly even dangerous We cannot be held liable for damages that were caused by improper usage Please cons...

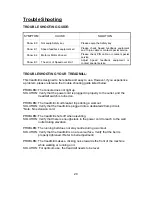
Page 22: ...he console does not light up SOLUTION Verify that the power cord is plugged in properly to the outlet and the treadmill switch is turned on PROBLEM The treadmill circuit breaker trips during a workout...

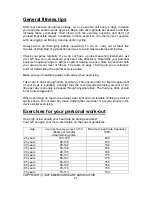
Page 23: ...rmining the optimal exercise pulse Make sure you breathe regularly and calmly when exercising Take care to drink enough while exercising This ensures that the liquid requirement of your body is satisf...

Page 24: ...d cooling down Please pay attention to the following points NECK EXERCISES Tilt your head to the right and feel the tension in your neck Slowly drop your head down to your chest in a semi circle and t...

Page 25: ...and repeat this exercise 2 times for each leg INSIDE UPPER THIGH Sit on the floor and place your feet in such a way that your knees are facing outwards Pull your feet as close as possible to your groi...

Page 26: ...ur right foot with your right arm Maintain this position for 30 40 seconds if possible EXERCISES FOR THE CALVES ACHILLES TENDON Place both hands on the wall and support your full body weight Then move...

Page 27: ......

Reviews: