


5
SET UP YOUR LCD MONITOR
Installation
Note
: Read the last section “Safety” before you install the LCD monitor.
Notes
Note the instructions below prior to installing your LCD monitor.
Installation Position
For the best image quality, choose a position away from any windows to minimize
reflection of light on the panel.
It is important to view the LCD monitor from at least 30 cm to minimize eyestrain.
Workstation Height
Position the LCD monitor slightly above your horizontal vision.
Angle of Vision
Tilt the LCD monitor either forward or backward for the most comfortable viewing
angle.
Quick Installation
This LCD monitor supports connection to a personal computer or workstation. The
steps are described as Quick Setup.
After installation, refer to “Auto Adjust” for automatic adjustment procedures.
Screen
Adjustments
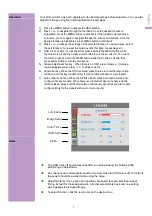
Auto Adjust
Though your computer system can automatically identify the new LCD monitor system, the
Auto Adjust function can enhance the display. To enter adjust mode, refer to “OSD Control”.
Turn the computer and LCD monitor on.
Press the ‘Auto’ button to start Auto Adjust.
The LCD monitor starts the Auto Adjust process. The process will continue for 10
seconds. You will notice the image change as the Auto Adjust is working.
Self Test Function
Check (STFC):
Your LCD monitor provides a STFC function, through which you can check whether
the LCD monitor is working properly.
If your LCD monitor is properly connected, but there is no image showing and the
indicator light remains orange, follow these steps to start STFC.
Shutdown computer and LCD monitor.
Unplug the signal connector from the back of computer.
Turn the LCD monitor on.
If the image connector is disconnected or damaged, the following message will
appear during normal operation.
Turn off the LCD monitor and reconnect the signal cable. Turn the computer and
LCD monitor on.
If the LED on the LCD monitor remains orange after completing the steps above,
check your VGA card, cable, and computer system. Your monitor should be
operating properly.
English
Summary of Contents for cmv946d
Page 1: ...60cm 23 6...