Installation Instructions
MAC-251
5
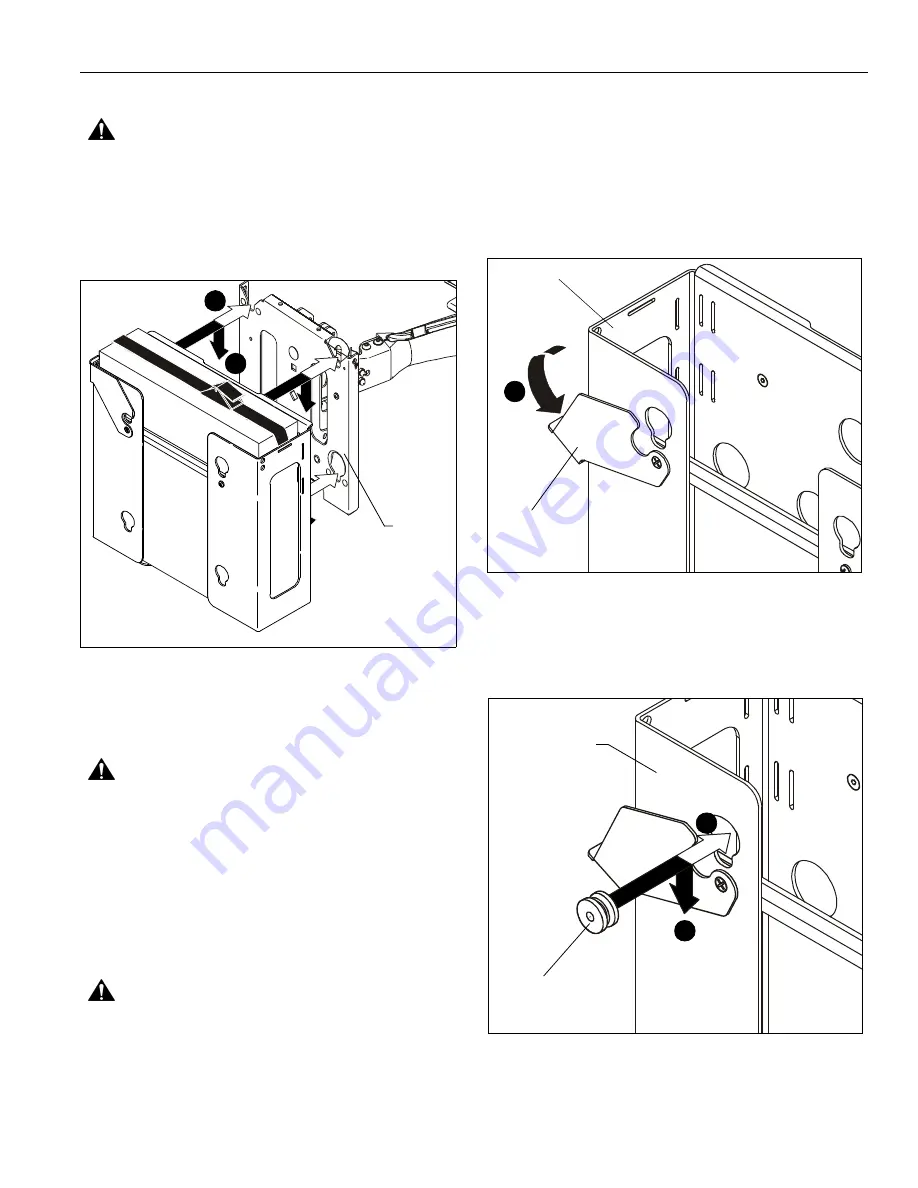
Install CPU Adapter with CPU to Mount
WARNING:
COMBINED WEIGHT OF CPU AND CPU
ADAPTER MAY WEIGH IN EXCESS OF 40 LBS. ALWAYS
use two people when lifting and follow proper lifting
techniques when installing!
1.
While supporting both sides of CPU adapter, align four
mounting buttons on CPU adapter with four mounting holes
in faceplate of mount. (See Figure 4)
Figure 4
2.
Lower CPU adapter into place listening for audible "click" to
ensure recessed area of mounting buttons are properly
seated in lower area of mounting holes and latching flag or
"click lock" mechanism on mount has engaged. (See
Figure 4)
WARNING:
IMPROPER INSTALLATION CAN LEAD TO
CPU ADAPTER FALLING! Make certain mounting buttons on
CPU adapter are fully engaged in teardrop holes in mount
and latching flag or "click lock" mechanism on mount is fully
closed before installing the display to other side of CPU
adapter.
3.
Route wires and cables following the instructions provided
with the mount.
Install Display
WARNING:
DISPLAY MAY WEIGH IN EXCESS OF 40
LBS. ALWAYS use two people when lifting and follow proper
lifting techniques when installing!
IMPORTANT ! :
The following procedure assumes that the
proper interface bracket for display has already been
installed on display, if required. If no interface bracket is
present on display, install bracket to display before
proceeding, using instructions included with interface
bracket.
1.
Make sure latching flag on CPU adapter is in the
UNLATCHED position (See Figure 5).
Figure 5
2.
While supporting each side of display, align four mounting
buttons on display or interface bracket with four teardrop
slots in CPU adapter (See Figure 6).
3.
Lower display firmly into place. (See Figure 6)
Figure 6
1
2
(MWR mount shown as example)
(MWR)
Latching Flag
UNLATCHED
1
(A)
(CPU not shown)
Mounting Button
(On interface bracket
2
or display)
3
(A)
(CPU not shown)


