background image

CMA473

Installation Instructions

6

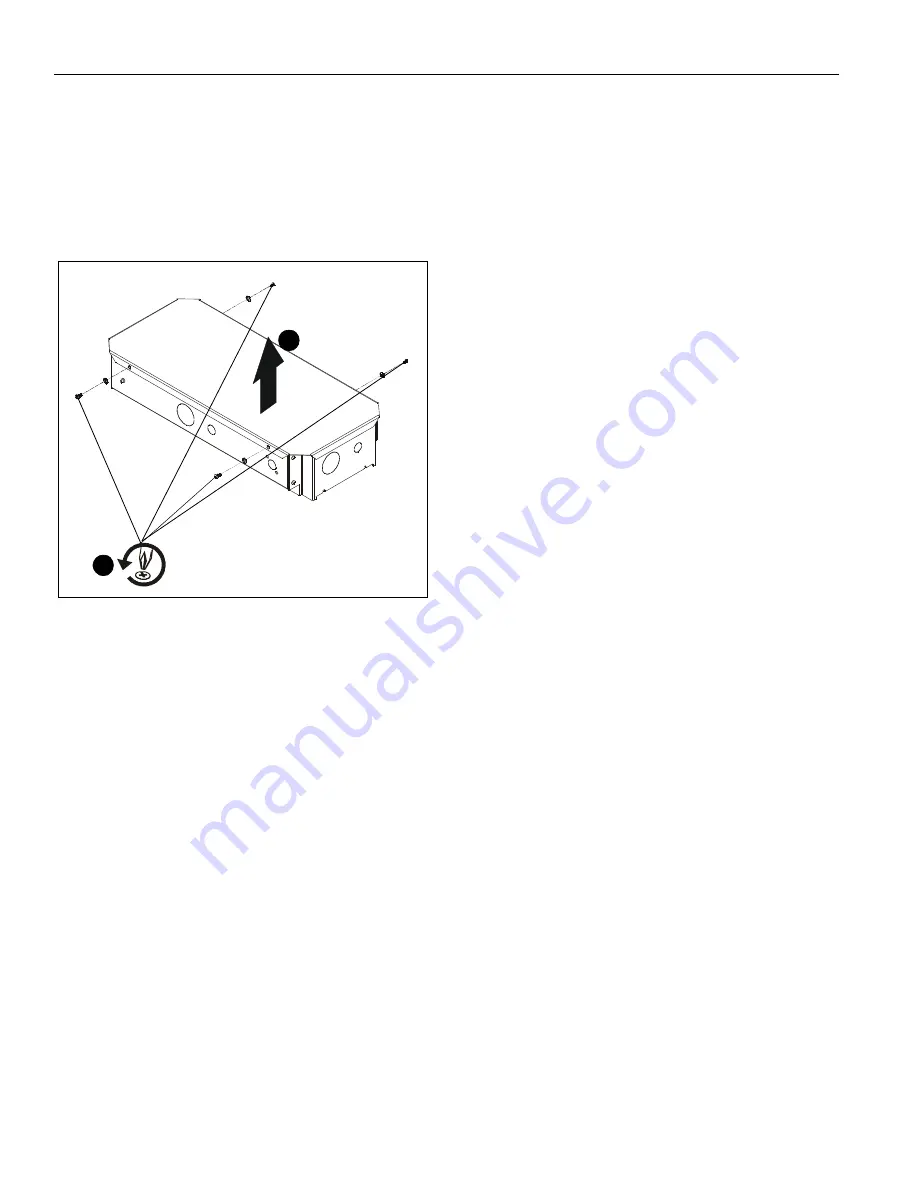
Cover Removal (Optional)

NOTE:

Top cover may be removed during installation process
if desired. However, it must be reinstalled before
installation is complete!

1.

Remove four screws holding top cover to CMA473 box (A).
(See Figure 4)

2.

Lift top cover up from CMA473 box (A). (See Figure 4)

Figure 4

x 4

1

2

Summary of Contents for CMA473

Page 1: ...I N S T A L L A T I O N I N S T R U C T I O N S Above Tile Suspended Ceiling Storage Kit CMA473 ...

Page 2: ...onsibility to make sure all components are properly assembled and installed using the instructions provided WARNING Use this mounting system only for its intended use as described in these instructions Do not use attachments not recommended by the manufacturer WARNING Never operate this mounting system if it is damaged Return the mounting system to a service center for examination and repair WARNI...

Page 3: ... vastdraaien Serrez les fixations Loosen Fastener Aflojar elemento de fijación Befestigungsteil lösen Desapertar fixador Allentare il fissaggio Bevestiging losdraaien Desserrez les fixations Phillips Screwdriver Destornillador Phillips Kreuzschlitzschraubendreher Chave de fendas Phillips Cacciavite a stella Kruiskopschroevendraaier Tournevis à pointe cruciforme 2 B 4 A 1 10 x 3 8 4 8mm x 9 5mm CMA...

Page 4: ...CMA473 Installation Instructions 4 DIMENSIONS 6X 0 875 22 23 KNOCKOUT 23 24 590 3 4X 1 970 50 04 KNOCKOUT 4 80 122 0 10 44 265 1 Measurements in millimeters inches ...

Page 5: ...MS 440 accessory not included See installation instructions included with the accessory 2 Install box A with four 10 X 3 8 Phillips tapping screws B See Figure 1 Tighten securely Figure 1 NOTE Box shown installed to CMS 440 CMA accessories similar 3 Connect ground wire not included to grounding screws if necessary See Figure 2 Figure 2 NOTE Knockouts are provided for ease of installation All open ...

Page 6: ... Top cover may be removed during installation process if desired However it must be reinstalled before installation is complete 1 Remove four screws holding top cover to CMA473 box A See Figure 4 2 Lift top cover up from CMA473 box A See Figure 4 Figure 4 x 4 1 2 ...

Page 7: ...Installation Instructions CMA473 7 ...

Page 8: ... Company www chiefmfg com 11 13 USA International A 6436 City West Parkway Eden Prairie MN 55344 P 800 582 6480 952 225 6000 F 877 894 6918 952 894 6918 Europe A Franklinstraat 14 6003 DK Weert Netherlands P 31 0 495 580 852 F 31 0 495 580 845 Asia Pacific A Office No 1 on 12 F Shatin Galleria 18 24 Shan Mei Street Fotan Shatin Hong Kong P 852 2145 4099 F 852 2145 4477 ...

Reviews: