background image

4

5

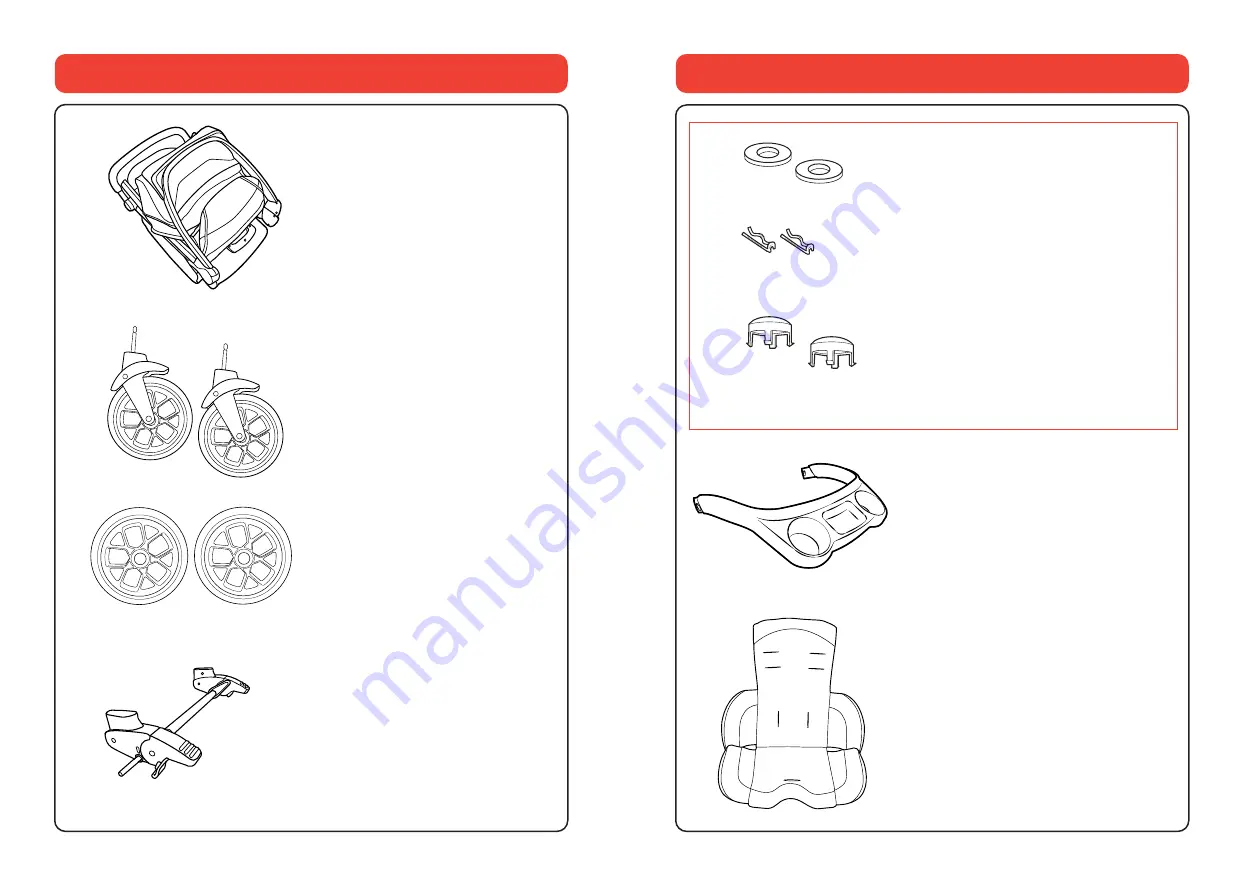
A. - Stroller Frame

B. - Front Wheels

C. - Rear Wheels

D. - Rear Axle Assembly

C.

B.

A.

D.

 Components

 Components

E.

E. - Washers

F. - Pins

G. - Hubcaps

H. - Child's Tray 

I. Soft Insert

F.

G.

H.

Note:  Parts E, F, and G are in a small red bag with the rear wheels.

I.

Summary of Contents for Bravo Primo

Page 1: ...Bravo Primo Stroller Owner s Manual ReadallinstructionsBEFORE assemblyandUSEofproduct KEEPINSTRUCTIONSFOR FUTUREUSE www chiccousa com IS0159E_03 2020 Artsana USA INC 09 20...

Page 2: ...ys use seat belt After fastening buckles adjust belts to get a snug fit around your child AVOID FINGER ENTRAPMENT Use care when folding and unfolding the stroller Be certain the stroller is fully open...

Page 3: ...ler Frame B FrontWheels C RearWheels D RearAxleAssembly C B A D Components Components E E Washers F Pins G Hubcaps H Child sTray I Soft Insert F G H Note Parts E F andG are in a small red bagwiththe r...

Page 4: ...A on end and unfoldtheframe as shown CLICK 1A 1B 1B Pressdownonthe seatto make surethatthe frame is locked How to Assemble Stroller How to Assemble Stroller WARNING WhenopeningtheStroller ensurethatyo...

Page 5: ...he snap buttons click intothe holes onthe RearAxle mount CLICK Snapbutton 2 3A Onone sideofthe RearAxle slide a RearWheel C andturnthe Wheel untilthe braketabfits into oneofthe groovesontheWheel 3A 3B...

Page 6: ...bly is securely attached totheframe 3C SecuretheWheeltothe RearAxle using a Pin F Pushthe straight side ofthe Pinthroughthe holeonthe RearAxle The curveonthe Pin must curve aroundtheoutsideofthe Rear...

Page 7: ...asethe Parent Handle Then rotatethe Parent Handle upordown tothedesired position CLICK 5 1 2 3 4 Attachthe FrontWheel B to theStroller Frame by lining up and insertingthe FrontWheel Pin intothe corres...

Page 8: ...into an upright position push uponthe Backrest until it locks intothedesired position 6 How to Use the Recline Panel How to Recline the Seat 7 To revealthe meshonthe recline panel unzipthe zippersdow...

Page 9: ...anel reveals a covered mesh panel Reversethis stepto closetheCanopy 8B TheCanopy also has an additional extension paneltucked underthefront panel Locate and pulloutthe additional panel as shown 8B 8A...

Page 10: ...s as shown To adjusttheShoulder Harness pullthe strapthroughthe correct buttonhole Always usethe same buttonhole heightfor both straps 10B 10B 10A How to Use Safety Harness How to Use the Brakes WARNI...

Page 11: ...epeatfortheother side Then slide bothWaistClips intotheCrotch Strap Buckle as shown Pullon both sidesto make suretheClips are securedtothe Buckle 12 12 TheSafety Harness can be released by pressingthe...

Page 12: ...istStrapClip and pullonthe straptotightenor loosen to better fityour child 13 How to Use the Soft Insert How to Use Safety Harness 14 PlacetheSoft Insert I intothe Stroller seat andthreadtheShoulder S...

Page 13: ...heStroller Frame To releasetheChild sTray press inon the buttons located atthe sidesofthe Child sTray as shown 15B CLICK How to Use the Basket 16A Insidethe Basketonthe back panel locate 2 storage poc...

Page 14: ...Pocket 18 To removetheAccessory Pocket flipoutthe plastictabfromthe groove underthefrontofthe Parent Tray 18 17 To accesstheAccessory Pocket lift uponthefront edge and undothe hook and loopfastener H...

Page 15: ...hicco infant car seatwiththis product Make sureto properly installtheChild sTray priorto usingtheChicco infant car seat Always make sure child is properly harnessed inthe car seat Only usethis product...

Page 16: ...as shown And at the sametime pullthe FrontWheel offoftheStroller Frame Repeatfor theother side 22 How to Remove Front Wheels Using the Chicco Infant Car Seat 21 Squeezethe Release Handleon the backoft...

Page 17: ...sed stroller 24 How to Close the Stroller 23 If attached removethe infant car seat Lift uptheSeat Fabric and locatethe Fold Handle as shown Slidethe Handle Release button over and lift uponthe Fold Ha...

Page 18: ...ricClipfrom Stroller Frame Repeatfortheother side 26A FabricClips How to Remove the Seat 25 PulltheCanopy Zipper up and aroundtheoutsideoftheCanopy as shown Then pulloutontheCanopy Clipsto removetheCa...

Page 19: ...uckle undertheSeat Pan Reach underthe Seat Pan and undo both Buckles 27 How to Remove the Seat 26B Thefabric will still be attached tothe ParentTray as shown Lift up and removethe FlexibleTabfromthe g...

Page 20: ...eStroller Frame Note StrollerCanopy can be used in this Modefor additional coverageof the infant Car Seat Carrier Only Mode How to Use Car Seat Carrier Mode 28 Locatetwo Release Buttons atthe backofth...

Page 21: ...5 27 in reverse CLICK 30C How to Attach the Seat 30A Foldthe bottomofthe seat pad upto exposeSeat Bracket Fromthe backofthe stroller insertthe seat betweenthe strollerframe andtilt theSeat Bracketto l...

Page 22: ...tructionson cleaningthefabric partsofthe stroller Periodicallywipe clean plastic partswith a softdamp cloth Alwaysdrythe metal partsto preventtheformationof rust ifthe stroller has come into contact w...

Page 23: ...www chiccousa com...

Reviews: