SKU 43753
For technical questions, please call 1-800-444-3353.
Page 4
REV 01e, 08l
Unpacking
When unpacking, check to make sure all of the parts listed on the parts list on
page 7 are included. If any parts are missing or broken, please call Harbor Freight
Tools at the number on the cover of this manual.
Assembly
The only assembly required is the addition of the
Adjustment Screw (#6)
and
Safety Ring (#20)
.
Insert the
1.
Adjustment Screw (6)
with the Hex Nut up, through the hole in the
center of the
Plain Axle (13)
.
Add (by sliding on) the
2.
Safety Ring (20)
to the
Adjustment Screw (6)
before
continuing through the center hole on the
Threaded Axle (10)
.
Secure Adjustment Screw (6) with two Nuts (15).
3.
Operation
Warning:
MacPherson struts must be removed from the vehicle before attempt-
ing repairs. Make sure to put the struts in a MacPherson Strut Vise prior to
using the Strut Spring Compressor.
Warning:
Only use hand tools with the Strut Spring Compressor. Never use
any air, electric, or impact tools with this tool. Only operate this tool with a
3/4”socket and ratchet, 3/4” combination wrench, or other applicable hand
tool. Power, air, or electric tools may compress the spring, leading to injury.
Note:
The Strut Spring Compressor should be periodically inspected by
a qualified service technician.
Removing a MacPherson Strut from a vehicle.
Position the strut into a strut vise.
1.
Shut the vise and tighten.
2.
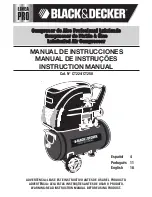
Attaching the Spring Compressor
Open the Spring Compressor approximately 8
3.
inches. Do not open more than 8” or a long strut
may slip off of the tool.
Make sure the hex nut on top of the
4.
Adjustment
Screw (#6)
is facing up.
Before clamping the spring, slip the
5.
Safety Block
(#19)
over the
Hook (#5)
and
Hook (#7)
as a
safety precaution should the strut break loose.
Center Axis
Figure 1
8” Max.