background image

SKU 99702 

For technical questions, please call 1-800-444-3353. 

Page 7

double insulated tools: tools 

with two prong plugs

Tools marked “Double Insulated” do 

1. 

not require grounding.  They have 

a special double insulation system 

which satisfies OSHA requirements 

and complies with the applicable 

standards of Underwriters Labora

-

tories, Inc., the Canadian Standard 

Association, and the National Electri-

cal Code.  

(see Outlets for 2-prong 

plug.)

Double insulated tools may be used 

2. 

in either of the 120 volt outlets shown 

in the preceding illustration.  

(see 

Outlets for 2-prong plug.)

extension cords

Grounded

1. 

 tools require a three wire 

extension cord.  

Double Insulated


tools can use either a two or three 

wire extension cord.
As the distance from the supply outlet 

2. 

increases, you must use a heavier 

gauge extension cord.  Using exten-

sion cords with inadequately sized 

wire causes a serious drop in voltage, 

resulting in loss of power and pos-

sible tool damage. 

(see table A.)

The smaller the gauge number of the 

3. 

wire, the greater the capacity of the 

cord.  For example, a 14 gauge cord 

can carry a higher current than a 16 

gauge cord.  

(see table A.)

When using more than one exten-

4. 

sion cord to make up the total length, 

make sure each cord contains at 

least the minimum wire size required.  

(see table A.)

If you are using one extension cord 

5. 

for more than one tool, add the 

nameplate


amperes and use the sum 

to determine the required minimum 

cord size.  

(see table A.)

If you are using an extension cord 

6. 

outdoors, make sure it is marked with 

the suffix “W-A” (“W” in Canada) to 

indicate it is acceptable for outdoor 

use.
Make sure the extension cord is prop-

7. 

erly wired and in good electrical con-

dition.  Always replace a damaged 

extension cord or have it repaired by 

a qualified electrician before using it.

Protect the extension cords from 

8. 

sharp objects, excessive heat, and 

damp or wet areas.

Summary of Contents for 99702

Page 1: ...ual Copyright 2008 by Harbor Freight Tools All rights reserved No portion of this manual or any artwork contained herein may be reproduced in any shape or form without the express written consent of Harbor Freight Tools Diagrams within this manual may not be drawn proportionally Due to continuing improvements actual product may differ slightly from the product described herein Tools required for a...

Page 2: ...ert symbol indicates a hazardous situation which if not avoided could result in minor or moderate injury NOTICE is used to address practices not related to personal injury CAUTION without the safety alert symbol is used to address practices not related to personal injury General Power Tool Safety Warnings WARNING Read all safety warnings and instructions Failure to follow the warnings and instruct...

Page 3: ...n skid safety shoes hard hat or hearing protection used for appropri ate conditions will reduce personal injuries Prevent unintentional starting c Ensure the switch is in the off po sition before connecting to power source and or battery pack pick ing up or carrying the tool Carry ing power tools with your finger on the switch or energizing power tools that have the switch on invites acci dents Do...

Page 4: ...y Warnings 1 Injection Hazard The high pressure jet produced by this tool can cut skin or cause injury to hands or eyes Do not allow spray to strike you and do not spray toward people or animals Do not spray the tool itself or any electrical source Maintain labels and nameplates on 2 the tool These carry important safety information If unreadable or miss ing contact Harbor Freight Tools for a repl...

Page 5: ... State of California to cause cancer and birth defects or other reproductive harm Wash hands after handling Califor nia Health Safety Code 25249 5 et seq The warnings precautions and in 14 structions discussed in this instruction manual cannot cover all possible con ditions and situations that may occur It must be understood by the operator that common sense and caution are factors which cannot be...

Page 6: ... facility before use If the plug will not fit the outlet have a proper outlet installed by a qualified electrician Grounded Tools Tools with Three Prong Plugs Tools marked with Grounding Re 1 quired have a three wire cord and three prong grounding plug The plug must be connected to a properly grounded outlet If the tool should electrically malfunction or break down grounding provides a low resista...

Page 7: ... with inadequately sized wire causes a serious drop in voltage resulting in loss of power and pos sible tool damage See Table A The smaller the gauge number of the 3 wire the greater the capacity of the cord For example a 14 gauge cord can carry a higher current than a 16 gauge cord See Table A When using more than one exten 4 sion cord to make up the total length make sure each cord contains at l...

Page 8: ...2 0 18 18 18 18 16 2 1 3 4 18 18 18 16 14 3 5 5 0 18 18 16 14 12 5 1 7 0 18 16 14 12 12 7 1 12 0 18 14 12 10 12 1 16 0 14 12 10 16 1 20 0 12 10 TABLE A Based on limiting the line voltage drop to five volts at 150 of the rated amperes Symbology Double Insulated Canadian Standards Association Underwriters Laboratories Inc V Volts Alternating Current A Amperes n0 xxxx min No Load Revolutions per Minu...

Page 9: ...e of this product To prevent serious injury from accidental operation Turn the Power Switch of the tool to its OFF position and unplug the tool from its electrical outlet before assembling or making any adjustments to the tool Note For additional information regarding the parts listed in the following pages refer to the Assembly Diagram near the end of this manual Assembly Turn the knobs on the ha...

Page 10: ...tube onto the inlet valve Press the return tube onto the return 7 tube fitting Suction tube connection to inlet valve Return tube on return tube fitting Operating Instructions Read the entire Important Safety Information section at the beginning of this manual including all text under subheadings therein before set up or use of this product Tool Set Up To prevent serious injury from accidental ope...

Page 11: ...ng Instructions Fill the pump with oil Oil Cap Lubrication Button Hose Connection Priming Button Lay the pump on its back and remove 1 the oil cap Fill with a good quality hydraulic oil Replace the cap and set the unit upright Push the lubrication button on the 2 face of the unit ten times to lubricate the system before each use Press the lubrication button every 3 eight hours of use Purge and pri...

Page 12: ...r switch of the Sprayer to the ON position Turn the PRIME SPRAY knob to the 16 SPRAY position and hold the Trig ger down until all air and impurities are cleansed from the Hose and the paint runs pure Release the Trigger Turn the 17 PRIME SPRAY knob to the PRIME position Squeeze the Trigger once to make sure that pressure is released Attach the Spray Tip Turn the Sprayer off 18 Pull out and turn t...

Page 13: ...before ending the stroke Paint using short even strokes Keep the spray gun at a right angle to the painting surface Keep the tip of the spray gun paral lel to the ground Overlap each stroke by about 30 to ensure an even coat When finished turn the Power Switch 25 to its OFF position Point the Gun into the waste container and squeeze the Trigger to discharge Gun and Hose pressure Lock the Gun Disco...

Page 14: ...ip assembly Submerge the Suction Tube in a b container with the appropriate clean ing solution Place the waste material container c next to the paint container Aim the Spray Gun into the paint d container and pull the trigger Turn the Power switch to the ON e position and the PRIME SPRAY knob to SPRAY Purge the paint into the original container until the cleaning solution starts coming out Move th...

Page 15: ...Gun from the hose p Remove the filter from the spray q gun Clean with a soft brush and ap propriate cleaning solution Remove the spray tip from the gun r and clean with a soft brush and the appropriate cleaning solution Clean the washer and spray tip s seat Reassemble the Gun t 3 WARNING If the supply cord of this power tool is damaged it must be replaced only by a qualified service technician ...

Page 16: ... close to surface 4 Add undiluted paint to thicken 1 Decrease pressure 2 Increase speed of stroke 3 Move gun back from surface 4 Paint coverage poor Paint not diluted enough 1 Paint is grainy 2 Dilute paint more 1 Filter paint 2 Follow all safety precautions whenever diagnosing or servicing the tool Disconnect power supply before service PLEASE READ THE FOLLOWING CAREFULLY The manufacturer and or ...

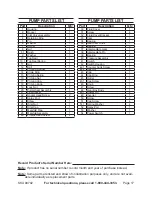
Page 17: ...29 Phillips Head Screw 2 Pump Parts List Part Description Qty 30 Fluid Cover 1 31 Screw 4 32 Fluid Cover Bracket 1 33 Cam 1 34 Bearing 1 35 Gear Cam Shaft 1 36 Bearing 3 37 Intermediate Gear 1 38 Intermediate Pin 1 39 Bearing 2 40 Pressure Assembly 1 41 Switch 1 42 Switch Housing 1 42 1 Counter Sunk Screw 1 42 2 Hex Nut 3 43 Cap 1 44 Cap Ring 1 45 Outlet 1 45 1 Cap Screw 1 46 Knob 1 47 Screw 1 48 ...

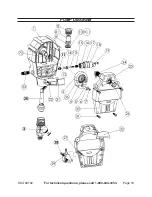
Page 18: ...SKU 99702 For technical questions please call 1 800 444 3353 Page 18 Pump diagram ...

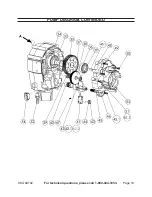
Page 19: ...SKU 99702 For technical questions please call 1 800 444 3353 Page 19 Pump diagram Continued ...

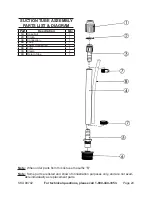
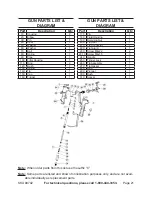
Page 20: ...art Description Qty 1B Hose Nut 1 2B Circlip 1 3B Connection 1 4B Tube 1 5B Lower Connection 1 6B Filter 1 7B Clamp 2 8B Return Tube 1 Note When order parts from this list use the suffix B Note Some parts are listed and shown for illustration purposes only and are not avail able individually as replacement parts ...

Page 21: ...6C Trigger 1 Gun PARTS LIST Diagram Part Description Qty 17C Pin 1 18C Fluid Housing 1 19C Retaining Nut 1 20C Tip Seat 1 21C Tip Connector 1 22C Tip Guard 1 23C Screw M4x22 2 23 1C Screw M4x15 3 24C Handle 1 25C Trigger Lock 1 26C Tip Assembly 1 27C Tip Gasket 1 28C Ring 1 29C Plunger 1 30C Bush 1 31C Socket 1 Note When order parts from this list use the suffix C Note Some parts are listed and sh...

Page 22: ...ome states do not allow the exclusion or limitation of incidental or consequential damages so the above limitation of exclusion may not apply to you This warranty is express ly in lieu of all other warranties express or implied including the warranties of merchantability and fitness To take advantage of this warranty the product or part must be returned to us with transportation charges prepaid Pr...

Reviews: