Chicago Electric 93179 Assembly And Operating Instructions Manual Download Page 8

SKU 93179

For technical questions, please call 1-800-444-3353

Page 8

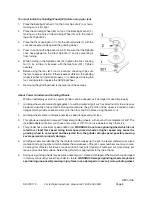
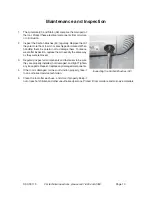
You must install the Grinding Wheel (54) before using your tool.

1.

Place the Backing Washer (2) on the Arbor Spindle (7) as shown,

making sure it fits tight.

2.

Place the Grinding Wheel (54) on top of the Backing Washer (2),

making sure the bore of the Grinding Wheel fits onto the step of
the Arbor Spindle (7).

3.

Place the Disc Locking Nut (1) onto the Arbor Spindle (7) with the

concave recessed side against the grinding wheel.
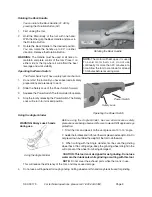
4.

Press in and hold the Spindle Lock (22). Be sure that the Spindle

Lock has engaged in the Arbor Spindle (7) and is preventing it
from turning.

5.

While holding in the Spindle Lock (22) tighten the Disc Locking

Nut (1) by turning it clockwise with the Spanner (501). Tighten
securely.

6.

Before using the tool, let it run for a minute, checking to be sure

there is no excess vibration. If there is excess vibration, the grinding
wheel is either not installed properly, or is damaged. Unplug the
tool, and reinstall or replace the Grinding Wheel.

7.

Removing the grinding wheel is the reverse of these steps.

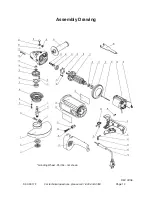
About Power Grinders and Grinding Wheels

While an extremely useful tool, power grinders can be dangerous if damaged or used improperly.

1.

Grinding wheels are made of aggregates of a cutting material (grit) such as Aluminum Oxide, an epoxy

binder and usually a fabric matrix. During manufacture, the grit portion of the wheel is bonded to steel
flanges which provide an area to slide onto the arbor and fix in place using the arbor nut.

2.

Grinding wheels come in dimensional sizes, speed ranges and grit sizes.

3.

This grinder is designed to accept 9” diameter grinding wheels, with an arbor hole diameter of 5/8”. The

included adapter will allow you to use arbor sizes of 7/8”. Do not use wheels of any other size.

4.

This grinder has a maximum speed of 6500 rpm. WARNING: Do not use a grinding wheel which is not

rated for at least this speed. Using lower speed rated wheels at higher speed may cause the
grinding wheel to come apart and be ejected from the grinder at high speed, possibly causing
severe personal or property damage.

5.

Grinding wheels are identified by the material which makes up the grit, the recommended work piece

material, and a grit number which indicates the coarseness of the grit. Lower numbers are more coarse.
Coarse grits cut faster, but leave a rough surface. Finer grits (higher grit numbers) cut more slowly, but
leave a more finished surface. Select the grit which is appropriate to the job at hand.

6.

During use, grinding wheels may become unevenly worn, cracked or chipped. Wheels which are damaged

in this way will usually cause the grinder to vibrate. WARNING: Damaged grinding wheels may break
apart during use, possibly causing injury. Never use a damaged or unevenly worn grinding wheel.

REV 02/06

54

Summary of Contents for 93179

Page 1: ...ight com Copyright 2005 by Harbor Freight Tools All rights reserved No portion of this manual or any artwork contained herein may be reproduced in any shape or form without the express written consent of Harbor Freight Tools For technical questions and replacement parts please call 1 800 444 3353 93179 Due to continuing improvements actual product may differ slightly from the product described her...

Page 2: ... electricity away from the user 5 Double insulated tools are equipped with a polarized plug one blade is wider than the other This plug will fit in a polarized outlet only one way If the plug does not fit fully in the outlet reverse the plug If it still does not fit contact a qualified electrician to install a polarized outlet Do not change the plug in any way Double insulation eliminates the need...

Page 3: ... will do the job better and safer at the rate for which it is designed 18 Do not use the power tool if the Power Switch does not turn it on or off Any tool that cannot be controlled with the Power Switch is dangerous and must be replaced 19 Disconnect the Power Cord Plug from the power source before making any adjustments changing accessories or storing the tool Such preventive safety measures red...

Page 4: ...ion cord away from moving parts on the tool 6 Always use 2 hands during use 7 WARNING All accessories for this tool must be rated for at least 6500 RPM Grinding wheels and other accessories running over their rated speed can fly apart and cause injury 8 Use only 9 diameter grinding wheels having a 5 8 or 7 8 if using included arbor adaptor center mounting hole Never disable or modify the wheel gua...

Page 5: ...path to carry electricity away from the user reducing the risk of electric shock See Figure A 2 The grounding prong in the plug is connected through the green wire inside the cord to the grounding system in the tool The green wire in the cord must be the only wire connected to the tool s grounding system and must never be attached to an electrically live terminal See Figure A 3 Your tool must be p...

Page 6: ...gauge cord See Figure C 4 When using more than one extension cord to make up the total length make sure each cord contains at least the minimum wire size required See Figure C 5 If you are using one extension cord for more than one tool add the nameplate amperes and use the sum to determine the required minimum cord size See Figure C 6 If you are using an extension cord outdoors make sure it is ma...

Page 7: ... Side Handle 24 before using your Angle Grinder 1 You can install the Side Handle 24 in either the left or right side or the top of the Gear Housing 19 2 Decide which position is best for you providing the firmest grip while working Pry out the Rubber Plug 23 which is covering the threaded hole you have selected Place the Rubber Plug in a safe place where you can find it again if you need it 3 Ali...

Page 8: ...Oxide an epoxy binder and usually a fabric matrix During manufacture the grit portion of the wheel is bonded to steel flanges which provide an area to slide onto the arbor and fix in place using the arbor nut 2 Grinding wheels come in dimensional sizes speed ranges and grit sizes 3 This grinder is designed to accept 9 diameter grinding wheels with an arbor hole diameter of 5 8 The included adapter...

Page 9: ...rinder Before using the Angle Grinder be sure all work area safety precautions are being observed Be sure to wear ANSI approved eye protection 1 Start the tool and place it on the work piece at a 10 to 15 angle 2 Guidethetoolbackandforthovertheworkpieceinasteadymotion Do not press down but allow the weight of the tool to do the work 3 When cutting with the Angle Grinder first be sure the grinding ...

Page 10: ...to damage them To reduce wear after inspection replace them in exactly the same way as they were removed 3 Regularly inspect all components and fasteners to be sure they are properly installed not damaged and tight Tighten any loose parts Repair or replace any damaged components 4 If the tool is damaged or does not function properly take it to an authorized service technician 5 Clean the tool afte...

Page 11: ...DE HANDLE 24 ROTATION SPRING 52 NUT M8X1 25 ROTATION BUTTON 53 PINION 26 SPANNER 501 BALL BEARING 6202RS 27 GRINDING WHEEL 502 Parts List NOTE Some parts are listed and shown for illustration purposes only and are not available individually as replacement parts PLEASE READ THE FOLLOWING CAREFULLY THE MANUFACTURER AND OR DISTRIBUTOR HAS PROVIDEDTHE PARTS DIAGRAM INTHIS MANUAL AS A REFERENCE TOOL ON...

Page 12: ...SKU 93179 For technical questions please call 1 800 444 3353 Page 12 Assembly Drawing Grinding Wheel Part 54 not shown REV 02 06 ...

Reviews: