Chicago Electric 91494 Assembly And Operating Instructions Manual Download Page 12

SKU 91494

Page 12

For technical questions, please call 1-800-444-3353.

OPERATING INSTRUCTIONS

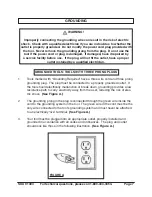
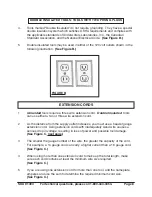
When the unit is loaded with fasteners and you are ready to begin,
plug the Nailer / Stapler Power Cord (7) into a power outlet.

1.

Hold the tool with both hands, so that the Nose (19) is flat against
the workpiece, making sure that the Safety (21) is also firmly
against the workpiece.

2.

Gently squeeze the Trigger (13) to fire the tool.

3.

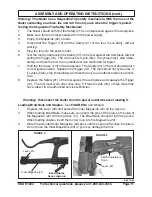
If you need a deeper driving depth, adjust the Depth Adjustment
Knob.   See

 FIGURE 3

 on page 11 and 

FIGURE 4

 to the right.

Note:

Practice depth adjustment on scrap material first.

4.

If more depth is needed, and you are nailing or stapling into a
hard surface, you may apply pressure on the top of the unit.  See

FIGURE 1

 on page 10.   On soft surfaces do not apply excessive

pressure or the Brad Nail or Staple may penetrate the workpiece
too deeply.

Note:

Each time you fire the Nailer / Staple Gun, the Safety (21) must
be pressed firmly against the workpiece.

Removing  Jammed Staples or Brad Nails

1.

First, unplug the Nailer / Stapler.

 If a nail is jammed in the discharge area, simply

remove it with pliers.

2.

If a nail is jammed in the Magazine (22), depress the Lever (29) and extend the
Inner Magazine (24) all the way out. See 

FIGURES 2 

and

 3

.   Use a flat screwdriver

and/or needle nose pliers to free the Brad Nail or Staple.

INSPECTION, MAINTENANCE, AND CLEANING

1.

        WARNING! 

 Make sure that the tool is unplugged from its electrical outlet

before performing any inspection, maintenance, or cleaning procedures.

2.

BEFORE EACH USE,

 inspect the general condition of the Nailer / Stapler.

Check for loose screws, misalignment or binding of moving parts, cracked or
broken parts, damaged electrical wiring, and any other condition that may affect
its safe operation.  If abnormal noise or vibration occurs, have the problem cor-
rected before further use.

Do not use damaged equipment.

3.

Wipe tool clean with a lint free cloth and inspect it for damage.  Do not use the
tool if you find damage.  Have it repaired by an authorized service technician.

4.

Keep all screws tight.  Loose screws may damage the tool and cause personal
injury.

5.

Make sure the Nose (19) is clear of all dirt or debris.

FIGURE 4

Summary of Contents for 91494

Page 1: ...ight 2004 by Harbor Freight Tools All rights reserved No portion of this manual or any artwork contained herein may be reproduced in any shape or form without the express written consent of Harbor Freight Tools For technical questions and replacement parts please call 1 800 444 3353 TO PREVENT SERIOUS INJURY READ AND UNDERSTAND ALL WARNINGS AND INSTRUCTIONS BEFORE USE ...

Page 2: ...nd other debris 2 Do not operate power tools in explosive atmospheres such as in the presence of flammable liquids gases or dust Power tools create sparks which may ignite the dust or fumes 3 Keep bystanders children and visitors away while operating a power tool Distractions can cause you to lose control Protect others in the work area from debris such as chips and sparks Provide barriers or shie...

Page 3: ... contact with grounded surfaces such as pipes radiators ranges and refrigerators There is an increased risk of electric shock if your body is grounded 7 Do not expose power tools to rain or wet conditions Water entering a power tool will increase the risk of electric shock 8 Do not abuse the Power Cord Never use the Power Cord to carry the tools or pull the Plug from an outlet Keep the Power Cord ...

Page 4: ...table and may lead to loss of control 17 Do not force the tool Use the correct tool for your application The correct tool will do the job better and safer at the rate for which it is designed 18 Do not use tool if switch does not turn it on or off Any tool that cannot be controlled with the switch is dangerous and must be repaired Any tool that can not be controlled with the Trigger is dangerous a...

Page 5: ...ler Stapler unattended when it is plugged into an electrical outlet Turn off the tool and unplug it from its electrical outlet before leaving 6 Always keep your hands away from the workpiece when firing Brad Nails and Staples This Nailer Stapler has enough power to force Brad Nails or Staples through skin causing serious injury 23 Use only accessories that are recommended by the manufacturer for y...

Page 6: ... are lead from lead based paints crystalline silica from bricks and cement or other masonry products arsenic and chromium from chemically treated lumber Your risk from these exposures varies depending on how often you do this type of work To reduce your exposure to these chemicals work in a well ventilated area and work with approved safety equipment such as those dust masks that are specially des...

Page 7: ...arked with Grounding Required have a three wire cord and three prong grounding plug The plug must be connected to a properly grounded outlet If the tool should electrically malfunction or break down grounding provides a low resistance path to carry electricity away from the user reducing the risk of elec tric shock See Figure A 2 The grounding prong in the plug is connected through the green wire ...

Page 8: ... Double Insulated tools can use either a two or three wire extension cord 2 As the distance from the supply outlet increases you must use a heavier gauge extension cord Using extension cords with inadequately sized wire causes a serious drop in voltage resulting in loss of power and possible tool damage See Figure C next page 3 The smaller the gauge number of the wire the greater the capacity of t...

Page 9: ... cords from sharp objects excessive heat and damp or wet areas SYMBOLOGY Double Insulated Canadian Standards Association Underwriters Laboratories Inc Volts Alternating Current Amperes No Load Revolutions per Minute RPM noxxxx min A V RECOMMENDED MINIMUM WIRE GAUGE FOR EXTENSION CORDS 120 VOLT NAMEPLATE AMPERES At Full Load EXTENSION CORD LENGTH 25 FEET 50 FEET 75 FEET 100 FEET 150 FEET 0 2 0 18 1...

Page 10: ... AND OPERATING INSTRUCTIONS NOTE For additional information regarding the parts listed in the following pages refer to the Assembly Diagram on page 14 Warning This Nailer Stapler is not suited for nailing or stapling into concrete masonry bricks or metal Warning Do not fire if Brad Nails or Staples are jammed in the Nose 19 section Unplug the unit and follow the Removing Jammed Staples or Brad Nai...

Page 11: ...essed against the workpiece 2 Make sure the tool is disconnected from the power supply 3 Empty the Magazine 22 of nails 4 Check that the Trigger 13 and the Safety 21 of the tool move freely without sticking 5 Plug the tool into the power outlet 6 Test the tool by depressing the Safety 21 of the tool against the workpiece without pulling the Trigger 13 The tool must not cycle fire If it cycles fire...

Page 12: ...aples or Brad Nails 1 First unplug the Nailer Stapler If a nail is jammed in the discharge area simply remove it with pliers 2 If a nail is jammed in the Magazine 22 depress the Lever 29 and extend the Inner Magazine 24 all the way out See FIGURES 2 and 3 Use a flat screwdriver and or needle nose pliers to free the Brad Nail or Staple INSPECTION MAINTENANCE AND CLEANING 1 WARNING Make sure that th...

Page 13: ... PARTS REPLACEMENTS SHOULD BE UNDERTAKEN BY CERTIFIED AND LICENSEDTECHNICIANS AND NOT BYTHE BUYER THE BUYER ASSUMES ALL RISK AND LIABILITY ARISING OUT OF HIS OR HER REPAIRS TO THE ORIGINAL PRODUCT OR REPLACEMENT PARTS THERETO OR ARISING OUT OF HIS OR HER INSTALLATION OF REPLACEMENT PARTS THERETO PARTS LIST PLEASE READ THE FOLLOWING CAREFULLY Part No Description 1 Stop 2 Striking Pad 3 Blade 4 Spri...

Page 14: ...91494 Page 14 For technical questions please call 1 800 444 3353 NOTE Some parts are listed and shown for illustration purposes only and are not available individually as replacement parts ASSEMBLY DIAGRAM ...

Reviews: