background image

Page 6

For technical questions, please call 1-800-444-3353.

Item 68099


SAFET

y

Op
ERA
TION

M

AINTENANCE

SETU
p

Grounding

TO pREVENT ELECTRIC SHOCK AND DEATH FROM INCORRECT GROUNDING 

WIRE CONNECTION:

Check with a qualified electrician if you are in doubt as to whether the outlet is properly 

grounded.  Do not modify the power cord plug provided with the tool.  Never remove the 

grounding prong from the plug.  Do not use the tool if the power cord or plug is damaged.  If damaged, have 

it repaired by a service facility before use.  If the plug will not fit the outlet, have a proper outlet installed by 

a qualified electrician.

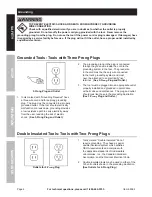
Grounded Tools: Tools with Three prong plugs

3-prong plug and Outlet

1. Tools marked with “Grounding Required” have 

a three wire cord and three prong grounding 

plug.  The plug must be connected to a properly 

grounded outlet.  If the tool should electrically 

malfunction or break down, grounding provides 

a low resistance path to carry electricity away 

from the user, reducing the risk of electric 

shock.  

(See 3-prong plug and Outlet.)

2. The grounding prong in the plug is connected 

through the green wire inside the cord to the 

grounding system in the tool.  The green wire 

in the cord must be the only wire connected 

to the tool’s grounding system and must 

never be attached to an electrically “live” 

terminal.  

(See 3-prong plug and Outlet.)

3. The tool must be plugged into an appropriate outlet, 

properly installed and grounded in accordance 

with all codes and ordinances.  The plug and outlet 

should look like those in the preceding illustration.  

(See 3-prong plug and Outlet.)

Double Insulated Tools: Tools with Two prong plugs

Outlets for 2-prong plug

1. Tools marked “Double Insulated” do not 

require grounding.  They have a special 

double insulation system which satisfies 

OSHA requirements and complies with 

the applicable standards of Underwriters 

Laboratories, Inc., the Canadian Standard 

Association, and the National Electrical Code.

2. Double insulated tools may be used in either of the 

120 volt outlets shown in the preceding illustration.


(See Outlets for 2-prong plug.)

Summary of Contents for 68099

Page 1: ......

Page 2: ...on which if not avoided could result in minor or moderate injury Addresses practices not related to personal injury IMpORTANT SAFETy INFORMATION General power Tool Safety Warnings Read all safety warnings and all instructions Failure to follow the warnings and instructions may result in electric shock fire and or serious injury Save all warnings and instructions for future reference The term power...

Page 3: ...s alcohol or medication A moment of inattention while operating power tools may result in serious personal injury 2 Use personal protective equipment Always wear eye protection Safety equipment such as dust mask non skid safety shoes hard hat or hearing protection used for appropriate conditions will reduce personal injuries 3 prevent unintentional starting Ensure the switch is in the off position...

Page 4: ... power tool live and could give the operator an electric shock 2 The amount of actual torque may vary depending on the cleanness and condition of the threads and other factors If tightening critical components check the actual torque applied to the fastener with a mechanical torque wrench not supplied 3 Maintain labels and nameplates on the tool These carry important safety information If unreadab...

Page 5: ...ion to the hand past hand injuries nervous system disorders diabetes or Raynaud s Disease should not use this tool If you feel any symptoms related to vibration such as tingling numbness and white or blue fingers seek medical advice as soon as possible 2 Do not smoke during use Nicotine reduces the blood supply to the hands and fingers increasing the risk of vibration related injury 3 Wear suitabl...

Page 6: ... to carry electricity away from the user reducing the risk of electric shock See 3 prong plug and Outlet 2 The grounding prong in the plug is connected through the green wire inside the cord to the grounding system in the tool The green wire in the cord must be the only wire connected to the tool s grounding system and must never be attached to an electrically live terminal See 3 prong plug and Ou...

Page 7: ...e it is marked with the suffix W A W in Canada to indicate it is acceptable for outdoor use 7 Make sure the extension cord is properly wired and in good electrical condition Always replace a damaged extension cord or have it repaired by a qualified electrician before using it 8 Protect the extension cords from sharp objects excessive heat and damp or wet areas TABLE TABLE T A RECOMMENDED MINIMUM W...

Page 8: ...No Load Speed 2100 RPM 2500 BPM Maximum Torque 230 ft lbs Drive Size 1 2 E194601 Setup Before Use Read the ENTIRE IMpORTANT SAFETy INFORMATION y INFORMATION y section at the beginning of this manual including all text under subheadings therein before set up or use of this product Functions Forward Setting Reverse Setting Trigger Brush Cover Anvil Figure A ...

Page 9: ...ing Instructions The Impact Wrench is equipped with a rocker type Trigger that can switch between clockwise forward rotation to counterclockwise reverse rotation 1 Press the desired Socket sold separately onto the Anvil 2 Plug the Power Cord into a 120V 60Hz grounded outlet 3 Press the LOWER part of the Trigger for clockwise FORWARD rotation or the UPPER part of the Trigger for counterclockwise RE...

Page 10: ...al surfaces of the tool with clean cloth 3 WARNING If the supply cord of this power tool is damaged it must be replaced only by a qualified service technician 4 CARBON BRUSH MAINTENANCE The carbon brushes may require maintenance when the motor performance of the tool decreases or stops working completely To maintain the brushes a Remove the Carbon Brush Cover on each side of the motor housing b Re...

Page 11: ...cord is needed use one with the proper diameter for its length and load See Extension Cords in Grounding section on page 6 Performance decreases over time 1 Accessory dull or damaged 2 Carbon brushes worn or damaged 1 Keep cutting accessories sharp Replace as needed 2 Replace Carbon Brushes Excessive noise or rattling Internal damage or wear Carbon brushes or bearings for example Have technician s...

Page 12: ...NAL PRODUCT OR REPLACEMENT PARTS THERETO OR ARISING OUT OF HIS OR HER INSTALLATION OF REPLACEMENT PARTS THERETO parts List part Description Description Qty Qty 1 Self tapping screw Self tapping screw 4 2 Head module 1 3 Seal ring Seal ring 1 4 Slide bearing Slide bearing 1 5 Anvil 1 6 Retaining ring Retaining ring 1 7 Rubber ring Rubber ring 1 8 Impact plate Impact plate 1 9 Steel ball 1 10 Washer...

Page 13: ... please call 1 800 444 3353 Item 68099 SAFETy OpERATION MAINTENANCE SETUp Assembly Diagram 1 1 2 3 4 6 5 7 8 9 10 11 12 13 14 15 16 17 18 19 20 20 21 32 23 24 22 25 25 26 27 28 29 30 31 33 47 44 34 35 36 37 45 46 38 39 41 40 42 42 43 ...

Page 14: ...e Note If product has no serial number record month and year of purchase instead If product has no serial number record month and year of purchase instead Note Some parts are listed and shown for illustration purposes only Some parts are listed and shown for illustration purposes only and are not available individually as replacement parts ...

Page 15: ...states do not allow the exclusion or limitation of incidental or consequential damages so the above limitation of exclusion may not apply to you THIS WARRANTY IS EXPRESSLY IN LIEU OF ALL OTHER WARRANTIES EXPRESS OR IMPLIED INCLUDING THE WARRANTIES OF MERCHANTABILITY AND FITNESS To take advantage of this warranty the product or part must be returned to us with transportation charges prepaid Proof o...

Page 16: ...3491 Mission Oaks Blvd PO Box 6009 Camarillo CA 93011 800 444 3353 ...

Reviews: