background image

INSTRUCTION MANUAL

BUTTON CONTROL

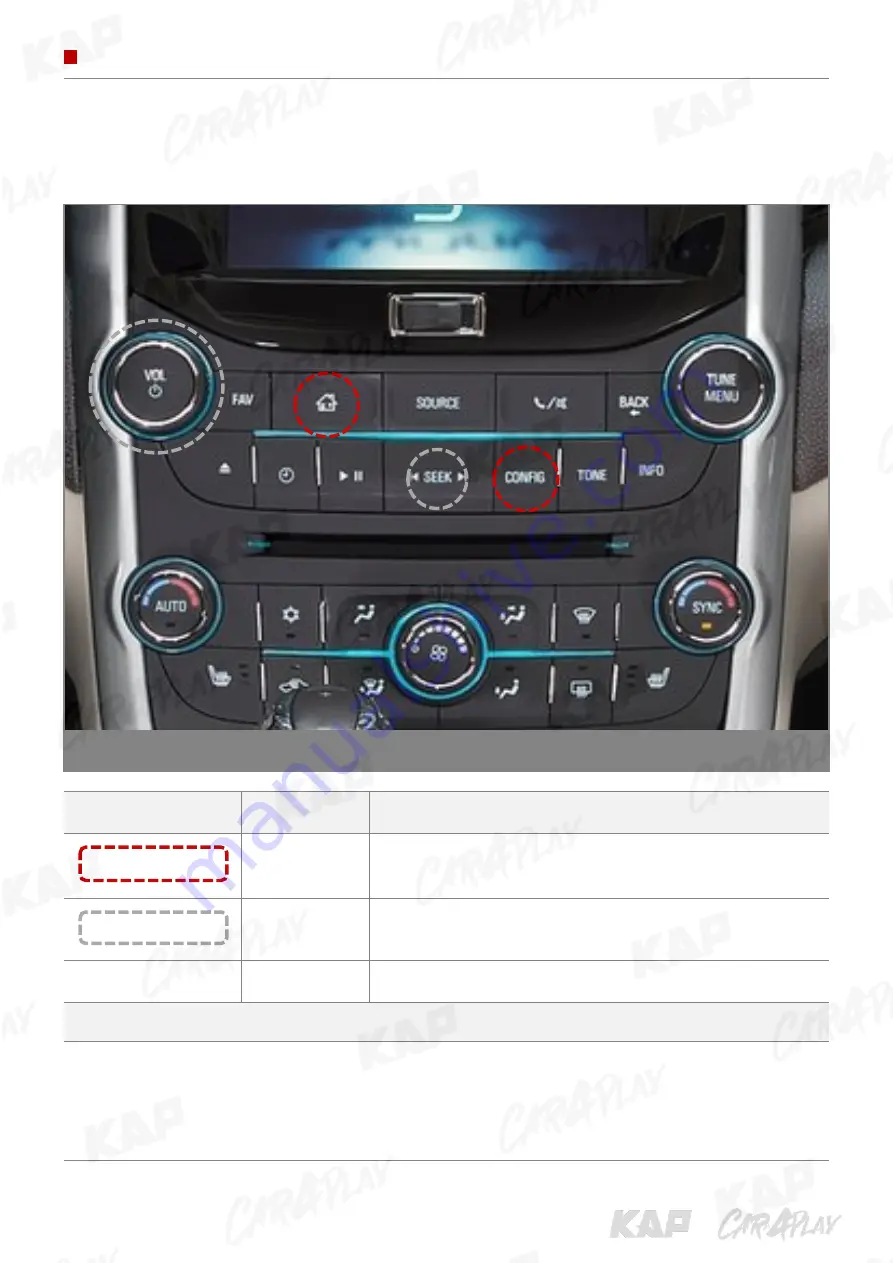
Change Mode to Interface Screen

CHEVROLET MALIBU BUTTON

BUTTON

PRESS

FUNCTION

HOME / CONFIG

Short press

OEM screen to interface screen
Interface screen to the OEM screen

VOL / SEEK

Long press

Show OEM screen for 3 seconds

Other Button

Short press

to OEM screen

Warning

Screen change sequence : 

OEM > NAVI > AV1 > AV2 > OEM

To use the HOME / CONFIG buttons, Either "HOME" or "CONFIG" or "NAV" must be activated 
in the "Mode Button" of the OSD menu

To use the VOL / SEEK buttons, "ScrChg-Btn" must be "ON" in the OSD menu

Summary of Contents for 2012 TDC

Page 1: ...INSTRUCTION MANUAL WEBSITE https kaptrader com DATA kap kaptrader com https www car4play kr sales car4play kr SHOP CHEVROLET BUICK HOLDEN VIEDO INTERFACE CHEVROLET 2012 TDC 2021 05 28 ...

Page 2: ...STRUCTION MANUAL CAR COMPATIBILITY SHEET BRAND MODEL SCREEN YEAR CHEVROLET Malibu 7 2012 2016 Alpheon 7 2011 2016 Orlando BUICK LaCrosse 7 2012 2016 Regal 7 2012 2016 GL8 7 2012 2016 HOLDEN Commodore 2015 ...

Page 3: ...AL COMPONENT Warning Please contact your dealer if any component is missing Warning Please contact your dealer if any component is missing INTERFACE MODE SWITCH RGB NAVI CABLE OSD BOARD A V CABLE POWER CABLE LVDS CABLE ...

Page 4: ...Cam In X 1 LVDS In Command System X 1 2 OUTPUT CVBS Video Out X 2 CVBS Audio Out X 1 LVDS Out Operation X 1 4 POWER Input Power 8VDC 24VDC Consumption Power 12Watt Max 5 SWITCH INPUT MODE Video source control via Dip Switch Vehicle model selection via Dip Switch Mode change with OEM button using CAN 3 TOUCH Virtual Analog Touch UART Digital Touch ...

Page 5: ...DIP SWITCH 1 LCD IN OUT 6 POWER CAN 7 RESISTIVE TOUCH 8 DIGITAL RGB 3 IMAGE 6 7 8 3 1 2 4 4 PROGRAM 9 10 9 ALNALOG RGB 10 AUDIO VIDEO OSD connection 4PIN Touch NAVI IN 5 5 LED Interface error check AUDIO VIDEO IN FRONT CAMERA IN REAR CAMERA IN VIDEO OUT ...

Page 6: ...nge CAN1 HIGH 7 Purple CAN2 LOW 8 White CAN2 HIGH 9 Yellow CAN3 LOW 10 Purple CAN3 HIGH 11 Green SWC 12 Red REAR VCC 13 Red FRONT VCC 14 Green MODE 15 Black GND 16 Black GND 1 3 5 7 9 11 13 15 2 4 6 8 10 12 14 16 No Color Signal Assignment 1 Red Y 2 Green X 3 Blue Y 4 White X 1 2 3 4 No Color Signal Assignment 1 Red R DATA 2 Green G DATA 3 Blue B DATA 4 White SYNC 5 Black GND 6 Green DVB T IR 7 Or...

Page 7: ...Do not use 3 AV2 DVD USE Do not use 4 No function 5 6 Car Type 7 8 ON 1 ON 1 2 2 3 3 ON 6 7 8 CHEVROLET MALIBU 7 2012 2016 ON 6 7 8 CHEVROLET ALPHEON 7 2011 2016 ON 6 7 8 BUICK GL8 7 800X480 2012 2016 ON 6 7 8 BUICK REGAL 7 800X480 2012 2016 ON 6 7 8 BUICK LACROSSE 7 800X480 2012 2016 ON 6 7 8 HOLDEN COMMODORE 2015 ...

Page 8: ...to interface screen Interface screen to the OEM screen HANG UP MUTE Double click SRC UP DOWN Long press Show OEM screen for 3 seconds Warning Screen change sequence OEM NAVI AV1 AV2 OEM To use the CALL VOICE HANG UP MUTE buttons SteeringWheelBtn must be ON in the OSD menu To use the SRC UP DOWN buttons SteeringChannel must be ON in the OSD menu ...

Page 9: ...screen Interface screen to the OEM screen VOL SEEK Long press Show OEM screen for 3 seconds Other Button Short press to OEM screen Warning Screen change sequence OEM NAVI AV1 AV2 OEM To use the HOME CONFIG buttons Either HOME or CONFIG or NAV must be activated in the Mode Button of the OSD menu To use the VOL SEEK buttons ScrChg Btn must be ON in the OSD menu ...

Page 10: ...creen Interface screen to the OEM screen VOL TRACK Long press Show OEM screen for 3 seconds Other Button Short press to OEM screen Warning Screen change sequence OEM NAVI AV1 AV2 OEM To use the CONFIG NAV buttons Either HOME or CONFIG or NAV must be activated in the Mode Button of the OSD menu To use the VOL TRACK buttons ScrChg Btn must be ON in the OSD menu ...

Page 11: ...reen Interface screen to the OEM screen TRACK Long press Show OEM screen for 3 seconds Other Button Short press to OEM screen Warning Screen change sequence OEM NAVI AV1 AV2 OEM To use the CONFIG NAV buttons Either HOME or CONFIG or NAV must be activated in the Mode Button of the OSD menu To use the TRACK buttons ScrChg Btn must be ON in the OSD menu ...

Page 12: ...terface screen to the OEM screen TRACK POWER Long press Show OEM screen for 3 seconds Other Button Short press to OEM screen Warning Screen change sequence OEM NAVI AV1 AV2 OEM To use the CONFIG buttons Either HOME or CONFIG or NAV must be activated in the Mode Button of the OSD menu To use the TRACK POWER buttons ScrChg Btn must be ON in the OSD menu ...

Page 13: ...xecute Cancel IR Ctrl Calibration Execute Cancel Utility Version Interface version or Select OSD menu Utility Calibration Press and hold the display for longer than 10 seconds Touch according to the shape coordinates On interface Screen NAVI AV1 AV2 Warning Touch control icon in DVBT DVD ...

Page 14: ...INSTRUCTION MANUAL PARKING CONTROL Parking Line OPS Display Parking Line ON Screen Parking Line OFF Screen 1 Parking Line Display Parking Line ON Screen Parking Line OFF Screen 2 OPS Display ...

Page 15: ...reen Parking OEM or Interface Screen REAR Camera Screen FRONT Camera Screen OEM or Interface Screen Displays the front camera screen for the set time 1 30second 2 FrontCam RcvOpt OFF 0s MENU Option NAVI Config FronrCam RcvOpt 0s Option Image Screen Parking OEM or Interface Screen REAR Camera Screen FRONT Camera Screen OEM or Interface Screen ...

Page 16: ...UT INSTALL MANUAL DIGITAL NAVIGATION No 1 OFF ON 1 2 3 4 5 6 7 8 HDMI HDMI NAVIGATION LVDS OUT POWER MENU Option NAVI Config NAVI RGB NAVIGATION MODEL Option DVB T DMB Image DVD Screen RearCam Parking FrontCam MENU Option NAVI Config NAVI COM GU Option Reset Image Screen Parking Please set in the OSD menu ...

Page 17: ...AUDIO VIDEO IMAGE LCD IN OUT No 1 OFF CONNECTION DIAGRAM ANALOG NAVIGATION ON 1 2 3 4 5 6 7 8 MENU Option NAVI Config NAVI RGB NAVIGATION MODEL Option DVB T DMB Image DVD Screen RearCam Parking FrontCam Please set in the OSD menu ANALOG NAVIGATION ANALOG RGB RESISTIVE TOUCH POWER ...

Page 18: ...N OUT DMB MODEL No 2 OFF CONNECTION DIAGRAM DVB T DMB ON 1 2 3 4 5 6 7 8 MENU Option NAVI Config NAVI RGB Option DVB T DMB DMB MODEL Image DVD Screen RearCam Parking FrontCam Please set in the OSD menu DVB T IR MENU Option NAVI Config Option Image Screen UI DVB T DMB On Off Parking UI DVD ANALOG RGB AV1 ...

Page 19: ...CD IN OUT CONNECTION DIAGRAM DVD No 3 OFF ON 1 2 3 4 5 6 7 8 DVD IR MENU Option NAVI Config NAVI RGB Option DVB T DMB Image DVD DVD MODEL Screen RearCam Parking FrontCam Please set in the OSD menu MENU Option NAVI Config Option Image Screen UI DVB T DMB Parking UI DVD On Off DMB MODEL ANALOG RGB AV2 ...

Page 20: ...OWER CAN LED TOUCH AUDIO VIDEO IMAGE LCD IN OUT CAR REAR CAMERA CONNECTION DIAGRAM REAR CAM MENU Option NAVI Config NAVI RGB AVM Option DVB T DMB AVM DIGITAL Image DVD Default Screen RearCam Parking FrontCam Please set in the OSD menu REAR POWER REAR DETECT REAR ...

Page 21: ...n the OSD menu FRONT POWER FRONT DETECT ON OFF SWITCH MENU Option NAVI Config FrontCam RcvOpt 0s Option Image Screen Parking MENU Option NAVI Config NAVI RGB AVM Option DVB T DMB AVM DIGITAL Image DVD Default Screen RearCam Parking FrontCam ML2012 TDC2 DIGITAL RGB DIP_S W PROGRAM POWER CAN LED TOUCH AUDIO VIDEO IMAGE LCD IN OUT FRONT ...

Page 22: ...INSTRUCTION MANUAL INSTALL MANUAL INSTALLATION LACROSSE FRONT COVER Desorption Screw removal Connect the supplied GVIF cable to the OEM cable Connect the provided GVIF cable to the monitor CAN CAN ...

Page 23: ...INSTRUCTION MANUAL INSTALL MANUAL INSTALLATION REGAL ...

Page 24: ...INSTRUCTION MANUAL INSTALL MANUAL INSTALLATION REGAL CAN CAN ...

Page 25: ...INSTRUCTION MANUAL INSTALL MANUAL INSTALLATION GL8 ...

Page 26: ...INSTRUCTION MANUAL INSTALL MANUAL INSTALLATION GL8 CAN CAN ...

Page 27: ...INSTRUCTION MANUAL INSTALL MANUAL INSTALLATION GL8 ...

Page 28: ...INSTRUCTION MANUAL INSTALL MANUAL INSTALLATION GL8 CAN CAN SWC ...

Page 29: ...n Display Board Control 7 MENU The OSD screen can be switched ON OFF Return to previous menu 8 SEL Select the currently active item If the OSD screen is off mode changes can be made 9 UP Move up from the menu Increase the selected item value 10 DOWN Move down from the menu Decrease the selected item value 10 9 8 7 OSD On Screen Display Menu 1 MENU 2 Mode State 3 Interface Status 4 First Menu 5 Sec...

Page 30: ...ription Config NAVI RGB DIGITAL Setting the Connected NAVI Model DVB T DMB Default Setting the Connected DVB T Model DVD Default Setting the Connected DVD Model RearCam Default Setting the Connected RearCam Model Reset Execute Cancel Reset to default value of Config menu ...

Page 31: ...V supply only in Rear camera mode Off 12V off RearCam Det CAN Detected by CAN WIRE Detected by Rear Det Wire Off Disable feature FrontCam Type OEM Original Camera ExtDevice Equipped with external camera FrontCam Power On 12V continuous supply Auto 12V supply only in Front camera mode Off 12V off FrontCam Det CAN Detected by CAN ExtDevice Detected by Front Det Wire FrontCam RcvOpt On The time 1 30 ...

Page 32: ...tton You must select the ON button in the menu Off Disable feature Steering Channel On Use DVB T Channel Up Down with Steering wheel button Off Disable feature Mode Button HOME Switching screen by using HOME button CFG Switching screen by using CONFIG button NAV Switching screen by using NAV button OFF Disable feature UI DVB T DMB On DVB T device control UI output function Off Disable feature UI D...

Page 33: ...AV REAR FRONT DVD DVBT MENU Adjust the value of Saturation Hue AV REAR FRONT DVD DVBT MENU Adjust the value of Hue Sharpness AV REAR FRONT DVD DVBT MENU Adjust the value of Sharpness Color RED NAVI MENU ONLY Adjust the value of RED Color GREEN NAVI MENU ONLY Adjust the value of GREEN Color BLUE NAVI MENU ONLY Adjust the value of BLUE Reset Execute Image Menu all Reset Image ...

Page 34: ...nu Description Screen Horizontal Output screen horizontal movement Vertical Output screen vertical movement Scale X Up Reduce increase output screen width Scale X Down Scale Y Up Reduce Increase Output Screen Height Scale Y Down Reset Screen menu all reset Screen ...

Page 35: ...On Show OPS Off Do not show OPS Line Display On Show parking line Off Do not show parking lines Warnings Lang Set warning text language Horizontal Moving a parking line horizontally Vertical Moving a parking line vertically Transparency Parking line transparency Reset Parking menu all reset Parking ...

Page 36: ...Description OSD Horizontal value OSD Menu Horizontal Shift Vertical value OSD menu vertical Shift Display Time value OSD Menu Display Time in seconds Transparency value OSD menu transparency Language OSD menu display language Reset Execute Initialize OSD settings OSD ...

Page 37: ...function a separate IR cable is required 1 In DVB T DVD menu select User in Sys OSD list or User learned contents 2 Select Learn from the OSD menu 3 Before using IR learning function select All Clear to delete existing stored data 4 Press the remote control button to be used in each ICON once in New Code press once again in Cfm Code to confirm it is the same and save it IR Ctrl ...

Page 38: ...libration Execute Touch calibration mode Version P5D300KRX 200534 Check for future upgrades P 5 D 3 0 0 K R X 2 0 0 5 3 4 Motor Model FD FORD BM BMW BE BENZ MA MASERATI LX LEXUS PIP Model S3 Sync3 PP PIP V LVDS Hardware Version National CN CHINA KR KOREA JP JAPAN US U S A Special Version Software Year Software Month Software Version ...

Page 39: ...witched Check CAN connect Q If the screen size ratio is not displayed properly Check the DIP switch vehicle settings Caution The device must not be installed in where it interferes driving brake pedal steering wheel airbag etc LVDS cable must be connected correctly according to the manual Insulate the end of wire by using electrical tape The installation should be done by expert Q If you cannot sw...

Page 40: ......

Reviews: