background image

If  the  knife  is  not  yet  shaving  sharp,  repeat  steps  a  and  b  above.  Again  test  the  blade  for 
sharpness. In the event the knife still is not sufficiently sharp it will be faster to first pre-hone it
in Stage 1 as follows:

USING THE HONING STAGE 1

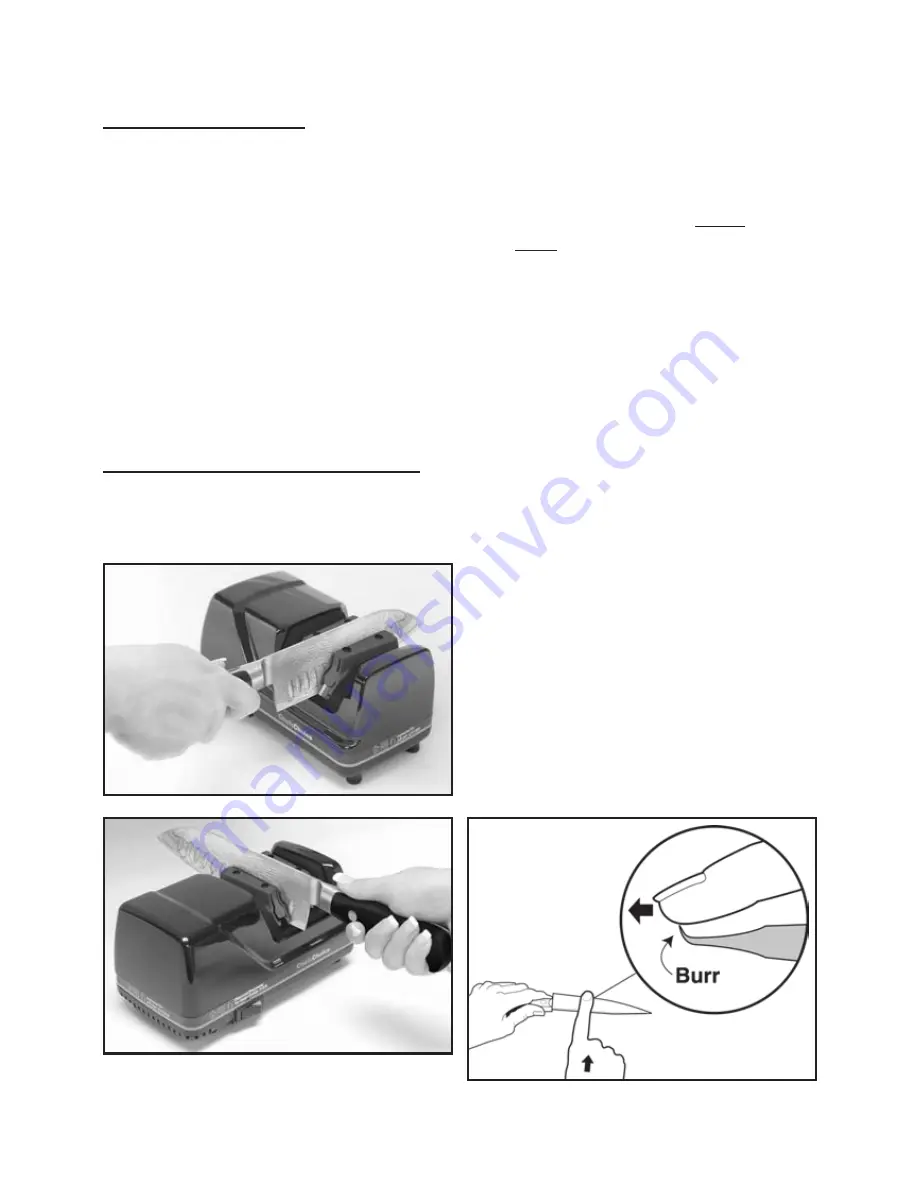
a. Pull the blade alternately through the left and right slots (see Figure 3) of Stage 1, making

about  3  pair  of  pulls,  taking  about 3 seconds  for each pull.  Check the  edge  carefully  to 
confirm the presence of a burr (see Figure 4), which will be quite small since the Stage 1
abrasive is quite fine. To check for the burr, move your forefinger carefully across the edge
as  shown  in  Figure  4.  (Do  not  move  your  finger  along the  edge—to  avoid  cutting  your 
finger). If the last pull was in the right slot, the burr would appear only on the right side of
the blade (as you normally hold it) and vice versa. The burr, when present, feels like a rough
and  bent  extension  of  the  edge;  the  opposite  side  of  the  edge  feels  very  smooth  by 
comparison. When a burr exists along the entire edge, proceed to strop and polish again in
Stage 2.

b. If there is no burr continue honing in Stage 1, alternating left and right slots until a light burr

develops. When a burr is present along the entire blade length proceed as below to polish
again in Stage 2. 

RETURN TO STROPPING/POLISHING STAGE 2 

a. Make 3 pairs of pulls, alternating pulls in the left and right slots, taking 3 seconds per pull

for a 5” blade. Make 3 pairs of faster pulls, alternating left and right slots, taking 1 second
per pull. Test the blade for sharpness.

Figure 4. W hen you create a distinct burr along the

blade edge,

 it can be detected by sliding finger across

and aw ay from  the edge.

 Caution! See text.

Figure 3. Santoku knife in right slot of Stage 1.

Figure 2. Santoku knife in left slot Stage 2 (double facet

Santoku blade).

5

Summary of Contents for 315S

Page 1: ...MODEL 315S I NSTRUCTI ONS Sharpener For Asian Knives Read these instructions before use It is essential that you follow these instructions to achieve optimum results 2011 EdgeCraft Corp ...

Page 2: ...ufac turer because special tools are required Please consult your Chef sChoice distributor 7 CAUTION This appliance may be fitted with a polarized plug one blade is wider than the other To reduce the risk of electric shock this plug will fit in a polarized outlet only one way If the plug does not fit fully in the outlet reverse the plug If it still does not fit contact a qualified electrician Do n...

Page 3: ...cets and the smaller angled facets of Asian blades reduces the amount of effort needed to cut or slice Asian type blades are ideal for preparing slicing and chopping vegetables for filleting fish and for preparing the popular sushi and sashimi For more information on the design of Asian knives refer to the Description of Euro American and Asian blades page 9 UNDERSTANDING THE CHEF SCHOICE ASIAN KN...

Page 4: ...eft slot between the left angle guide of Stage 1 and the plastic knife holding spring Do not twist the knife Move the blade down in the slot until you feel it contact the diamond disk Pull it towards you lifting the handle slightly as you approach the tip This will give you a feel for the spring tension Remove the knife and read the instructions specific to the type of knife you will be sharpening...

Page 5: ...old it and vice versa The burr when present feels like a rough and bent extension of the edge the opposite side of the edge feels very smooth by comparison When a burr exists along the entire edge proceed to strop and polish again in Stage 2 b If there is no burr continue honing in Stage 1 alternating left and right slots until a light burr develops When a burr is present along the entire blade le...

Page 6: ...back side microfacet Figure 10 can be easily seen only with a hand magnifier The back face is ground flat at the factory or more commonly it is slightly hollow ground to ensure that an effective microfacet can be formed there as part of the cutting edge Because of the lack of standard ization commonly the manual approach used to sharpen these knives has proven difficult laborious and time consumin...

Page 7: ...irmed proceed to Step 3 STEP 3 FORMING THE FINAL EDGE RIGHT HANDED BLADE a Make five 5 regular pulls 3 4 seconds only in the left slot of Stage 2 and then proceed to step b below to remove any burr b Make one 1 regular pull in right slot of Stage 2 along the back side of the edge c Make several pairs of fast pulls one 1 second each in Stage 2 alternating in the left and right slots of Stage 2 The ...

Page 8: ...is thick and its thickness at the top of its edge facets is already large some of the advantage of the Asian edge will not be realized Consequently the blade must be very thin where the facets are honed in order to realize the advantage of the Asian edge You might consider this change first for one of your thinnest blades such as a thin utility blade or perhaps a thin paring knife To convert from ...

Page 9: ...f this type blade is the sashimi knife also called Yanagi and Takohiki designed as shown to the right This lengthy slicing blade is ideal for preparing very thin slices of raw tuna or salmon The back of this blade is commonly slightly hollow ground A small single cutting edge facet of about 15 to 20 is created along the front of the edge of the sashimi blade as shown in Figures 9b and 10 in order ...

Page 10: ... abrasive surface wearing the disks out prematurely If that should occur factory replace ment of the disks will become necessary If you clean your knives regulary before sharpening you should need to clean or dress the Stage 2 disks only about once a year or less frequently SUGGESTIONS 1 Always clean all food fat and foreign materials from knife before sharpening or resharpening If soiled carefull...

Page 11: ...he honing or stropping disk as each section along the curved length of the edge is being sharpened 6 To increase your proficiency with the Chef sChoice Model 315S learn how to detect a burr along the edge as described on page 5 While you might be able to sharpen well without using this technique it is the best and fastest way to determine when you have sharpened sufficiently in the preliminary ste...

Page 12: ... dust that will accumulate inside the sharpener from repeated sharpenings Remove the small rectangular clean out cover Figure 12 that covers an opening on the underside of the sharpener You will find metal particles adhered to a magnet attached to the inside of that cover Simply rub off or brush off accumulated filings from the magnet with a paper towel or tooth brush and reinsert the cover in the...

Reviews: