Chefman RJ21 User Manual Download Page 12

USA

9

AFTER SALES SUPPORT

888-315-8407

[email protected]

MODEL: RJ21-IN

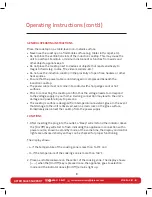
3.  Press the corresponding function keys to start operation. Stop the operation and 

switch to standby mode by pressing [On/Off] key after cooking.

2.1.    Timer  Function:  User can set the cooking time when specific cooking mode is 

selected. Press the [FUNCTION] key once until the [Timer] indicator light up. 

Display will show the default time [00:00], user can press [+] or [–] key to set for 

the desired time; [+] and [–] key to set the minute and hour(press and hold for 3 

seconds to access quick adjustment), the time can be adjusted from 1 minute to 2 

hours and 59 minutes.  


After setting, user can wait until the display stop flashing. After the "Beep" signal, 

the appliance will stop the operation and change to standby mode automatically 

when the end of the countdown. To cancel this function, user can either press the 

[On/Off] key to return to standby mode or hold the [FUNCTION] key to resume the 

desired power or temperature operation. 

2.2.  Temperature/ Power Function: Press the [FUNCTION] key until the indicator of 

[TEMP] lights up, display willshow [420] representing that the default power 

is 420°F. It can be adjusted by pressing the [+] or [–] key to set the desired 

Fahrenheit level. There are 8 Fahrenheit levels in total (140°F, 180°F, 212°F, 

260°F, 300°F, 360°F, 420°F, 465°F). To cancel this mode, press [FUNCTION] key  

to switch to other cooking modes or [On/Off] key to stop the operation.  


Power: Press the [FUNCTION] key until the indicator of  [POWER]  lights  up,  

display will  show  [1200] representing that the default power is 1200W. It can be 

adjusted by pressing the [+] or [–] key to set the desired power.  


There are 8 power levels in total (300W, 500W, 700W, 1000W, 1200W,1400W, 

1600W, 1800W). To cancel this mode, press [FUNCTION] key to switch to other 

cooking modes or [On/Off] key to stop the operation.

2.3.  Lock function: Press the [+] and [-] key together once, the induction cooker will 

enter safety lock mode. Expect the [On/Off] key, other mode will be in lock mode 

status. It is suggested to lock the inductioncooker when there is no need of 

frequency  adjustment of the cooking function due to safety concern. Press [+] and 

[-] key together around 3 seconds or press [On/Off] key to cancel the lock setting.

Operating Instructions (cont'd)

Summary of Contents for RJ21

Page 1: ...labor warranty you have the added peace of mind of dedicated helplines and web support USA AFTER SALES SUPPORT 888 315 8407 customerwarranty rjbrands com MODEL RJ21 IN READ ALL INSTRUCTIONS BEFORE USE...

Page 2: ......

Page 3: ...SUPPORT 888 315 8407 customerwarranty rjbrands com MODEL RJ21 IN 1 Introduction 2 Safety Instructions 6 Features 7 Operating Instructions 10 Cleaning and Maintenance 11 Terms and Conditions 12 Warrant...

Page 4: ...If you require technical support or in the unlikely event that your purchase is faulty please telephone our Helpline for immediate assistance Faulty product claims made within the 3 year warranty peri...

Page 5: ...h hot surfaces 10 Do not place on or near a hot gas or electrical burner or inside a heated oven 11 Extreme caution must be exercised when moving an appliance containing hot oil or other liquids 12 To...

Page 6: ...tenance work on the induction cooktop using authentic Hearthware replacement and accessory parts Never attempt to disassemble or repair the cooktop without professional assistance This product is not...

Page 7: ...ct the interference by one or more of the following measures Reorient or relocate the receiving antenna Increase the separation between the equipment and receiver Connect the equipment into an outlet...

Page 8: ...utlet 4 Before each use inspect the line cord for cuts and or abrasion marks If any are found this indicates that the appliance should be serviced and the line cord replaced Please return it to an aut...

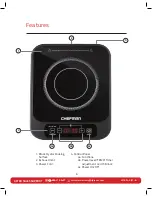
Page 9: ...5 8407 customerwarranty rjbrands com MODEL RJ21 IN 2 Features 1 Black Crystal Cooking Surface 2 Exhaust Vent 3 Power Cord 4 Control Panel 4a Functions 4b Power level TEMP Timer adjustment and Childloc...

Page 10: ...You may use pansmeasuring up to the total width of the cooktop which measures 12 inches howeverin these situations heat will transfer more slowly to the outer edges Do not use pans larger than 12 inc...

Page 11: ...cting the cooktop confirm that the voltage needs to correspond to the voltage supply in your home A wrong connection may lead to the unit s damage and possible injury to persons The cooktop s surface...

Page 12: ...ion Press the FUNCTION key until the indicator of TEMP lights up display willshow 420 representing that the default power is 420 F It can be adjusted by pressing the or key to set the desired Fahrenhe...

Page 13: ...ll Soft cloth for slight stain For greasy dirt blot by using a clean damp cloth with neutral detergent Wipe casing and operating panel with a soft cloth dampened with water or a mild detergent Do not...

Page 14: ...the serial number on the product has been removed or the equipment has been altered or modified During the warranty period the authorized service dealer at its option will repair or replace any part...

Page 15: ...ranty card Name Address E mail Description of malfunction Location of purchase Return your completed warranty card to RJ Brands 873 Route 45 Suite 101 New City New York 10956 Phone lines available Mon...

Page 16: ...Visit us at www mychefman com...

Reviews: