Step Three
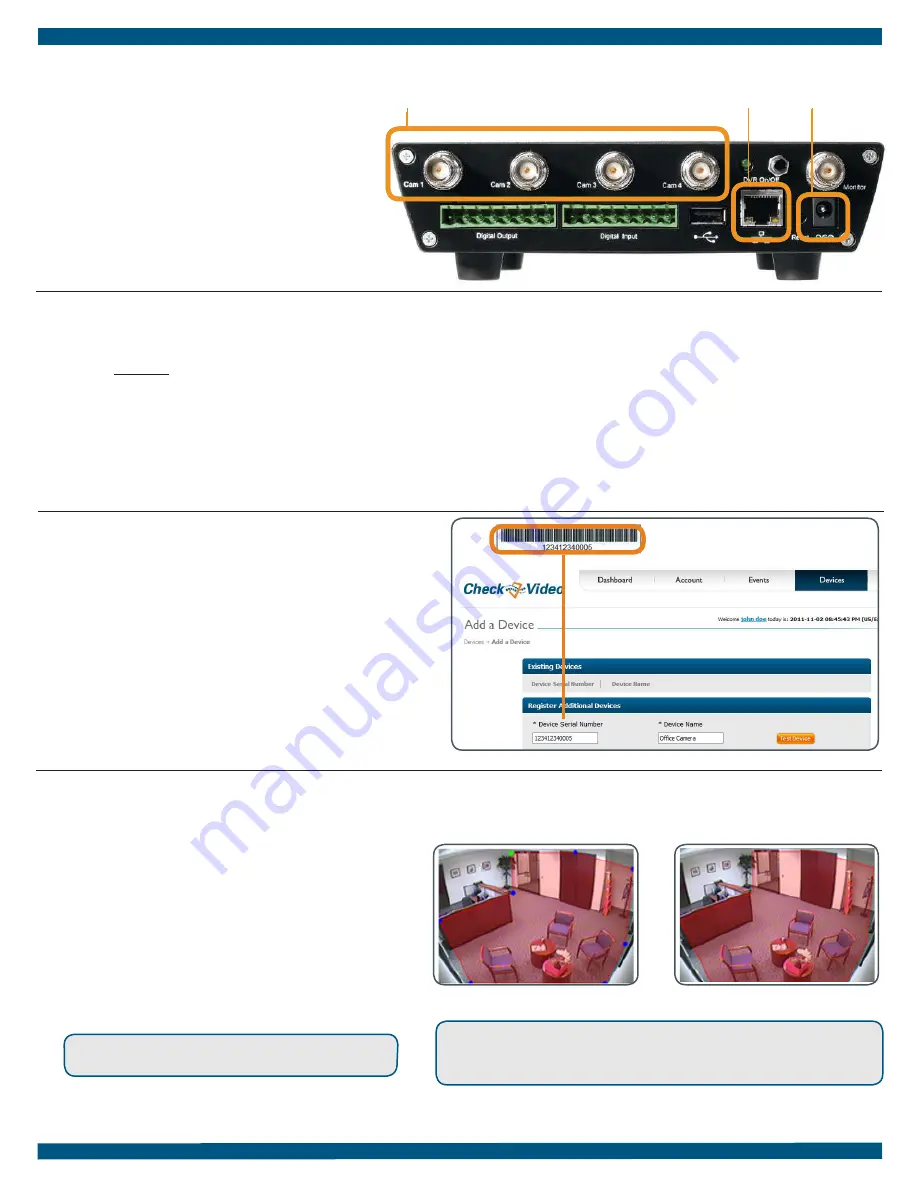
Connect CheckVideo Gateway
Cameras
Ethernet
Power
Step Six
Configure Device
A zone, defined by eight end points (first
point is green; other points are blue)
A completed zone
1.
Connect each camera’s video cable to the camera
connections on the back of the Gateway.
2. Use an Ethernet cable to connect the Gateway to
your network.
3.
Connect the Gateway power supply to the Gateway
and plug it in.
4. Wait a few minutes for the power light on the front
of the Gateway to flash rapidly.
5. When the flashing slows to one second per pulse,
your device is ready for registration.
1.
O
n the CheckVideo Dashboard, click on Devices > Configure
Device.
2. Select Device: Select the device and video resolutions for
event clips and DVR. CheckVideo will default both resolutions
to 240p. You may wish to start with these settings. Your
chosen resolution settings will depend upon the upload
capacity of your Internet provider.
3.
Configure Events: Click the Edit button to create a zone for a
particular object type. Then use your mouse to draw the zone
by clicking the left mouse button wherever you want to define
a point of the zone. The zone should cover the entire area
where you want to detect an event. Enter a time span, event
type, zone, and duration and click Add Event button.
4. Select Notification Method - Central Stations:
Select a Central
Station type that should receive alert metadata.
5. Select Notification Method - Users: Click the checkbox next to
For more detailed information, refer to the
CheckVideo Gateway for
Broadband Networks Installation Guide
(available at
www.checkvideo.com
under the Support tab.)
CheckVideo Gateway back panel
© 201
7
CheckVideo, LLC.
CheckVideo is a registered trademark of CheckVideo, LLC. All rights reserved.
7CVCAQ
C
000-08.01
Step Four
Create/Access Your Account
1.
Go to the CheckVideo Dashboard login page:
portal.checkvideo.net
Click the Start here link to create your account.
If you have an existing account, log in and skip to the next
section to register your CheckVideo devices.
2. Complete the User Information section.
3.
In the Define Notification Methods section, for Contact
Information enter the email addresses that may receive
event notifications. For MMS notifications to mobile phones,
the address format will vary by carrier (ex: mobile number@
Enter the serial number from the bottom of the CheckVideo Gateway device
1.
If camera will be monitored by a central station, contact them to
add the device to their account.
2. If self-monitored:
•
On the CheckVideo Dashboard, click on Devices > Add Device.
•
In the Register Device section, enter the serial number found
on the underside of the camera and a Device Name.
•
Click the Test Device button to make sure the CheckVideo
Software Service (CVSS) can communicate with the device.
•
(Professional Service only) Authorize service fees.
•
If prompted, update the device firmware.
Step Five
Add Gateway Device
mms.att.net). Check your carrier’s website for more information.
4. Choose a maximum Video Resolution for each email address.
If you
intend to use MMS to send video to a mobile phone, do not select a
resolution higher than 480p.
For 720p or 1080p, send the notifications
as an attached video clip to a traditional email address (ex: jdoe@gmail.
com). Use the Test button to confirm that the video resolution is valid
for your device/carrier.
5. In the Billing Preferences, choose your Service option. If you choose
Central Service, complete the form and CheckVideo Support will contact
you directly.
6.
(Professional Service only) Specify method of payment, authorize service
fees, and accept the License Agreement.
Make sure
your browser is set to 100% when drawing
your zone.
any user(s) who should receive notifications for this camera and their
method of notification.
6.
Click Save.


