


Page 5 of 12
Setup
W-DMX Micro T-1 TRX G5 User Manual Rev. 1
3. Setup
AC Power
To determine the power requirements for the W-DMX Micro T-1 TRX G5, refer to the label affixed to the
product. You can also refer to the
chart in this manual.
The listed current rating indicates the maximum current draw during normal operation. For more
information, download Sizing Circuit Breakers from the Chauvet website:
AC Plug
The W-DMX Micro T-1 TRX G5 comes with a 5 V power adapter terminated with micro USB connector on
one end and an Edison plug on the other end (U.S. market). If the power input cord that came with your
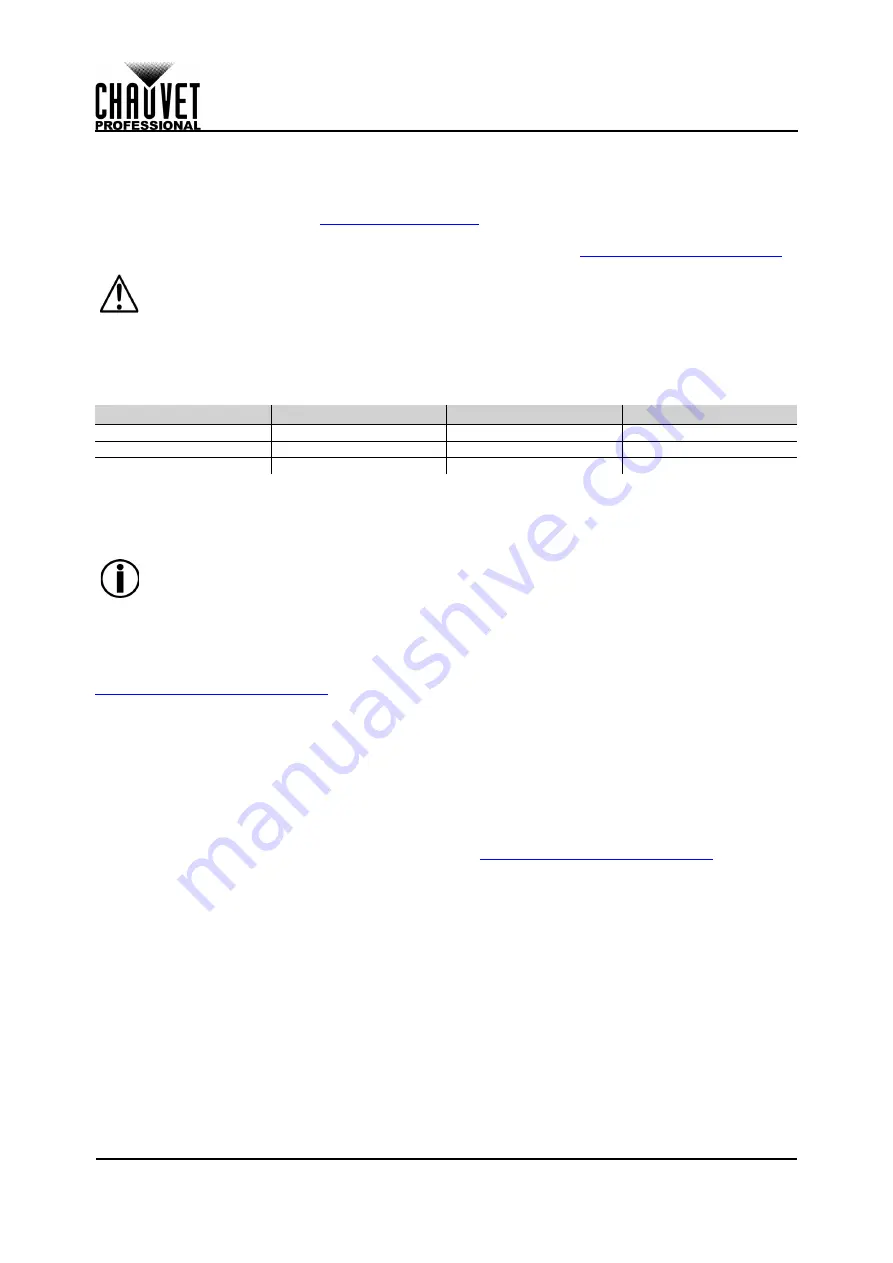
product has no plug, or if you need the change the plug, use the table below to wire the new plug.
Battery Notes
•
The W-DMX Micro T-1 TRX G5 works with (4) AAA batteries.
•
The W-DMX Micro T-1 TRX G5 also accepts rechargeable batteries but does not recharge them
when plugged to its USB power supply.
5 GHz
The W-DMX Micro T-1 TRX G5 comes with 5 GHz disabled from front-interface control. To scroll through
and use all the modes available for the W-DMX Micro T-1 TRX G5, the 5 GHz must be enabled first. This
can be done with the W-DMX Dongle and the downloadable W-DMX Configurator software available at:
https://wirelessdmx.com/download/
To enable 5 GHz in the W-DMX Configurator software interface:
1. Go to the
Device Settings
tab.
2. Choose
Enable 5.8 GHz
and click the drop-down box next to it.
3. Choose
On
.
RDM
Remote Device Management (RDM) is a standard for allowing DMX-enabled devices to communicate bi-
directionally along existing DMX cabling. The W-DMX Micro T-1 TRX G5 comes with RDM disabled by
default. The RDM on the W-DMX Micro T-1 TRX G5 can be enabled using the W-DMX Dongle and the
downloadable W-DMX Configurator software available at:
https://wirelessdmx.com/download/
To enable RDM in the W-DMX Configurator software interface:
1. Go to the
Device Settings
tab.
2. Choose
Downstream RDM
and click the drop-down box next to it.
3. Choose
On
.
• Always connect the product to a protected circuit (a circuit breaker or fuse). Make sure
the product has an appropriate electrical ground to avoid the risk of electrocution or fire.
• To eliminate unnecessary wear and improve its lifespan, during periods of non-use
completely disconnect the product from power via breaker or by unplugging it.
Connection
Wire (U.S.)
Wire (Europe)
Screw Color
AC Live
Black
Brown
Yellow or Brass
AC Neutral
White
Blue
Silver
AC Ground
Green/Yellow
Green/Yellow
Green
Battery life: 8 hours on Receive Mode, 4 hours on Transmit Mode


