background image


24


(13)


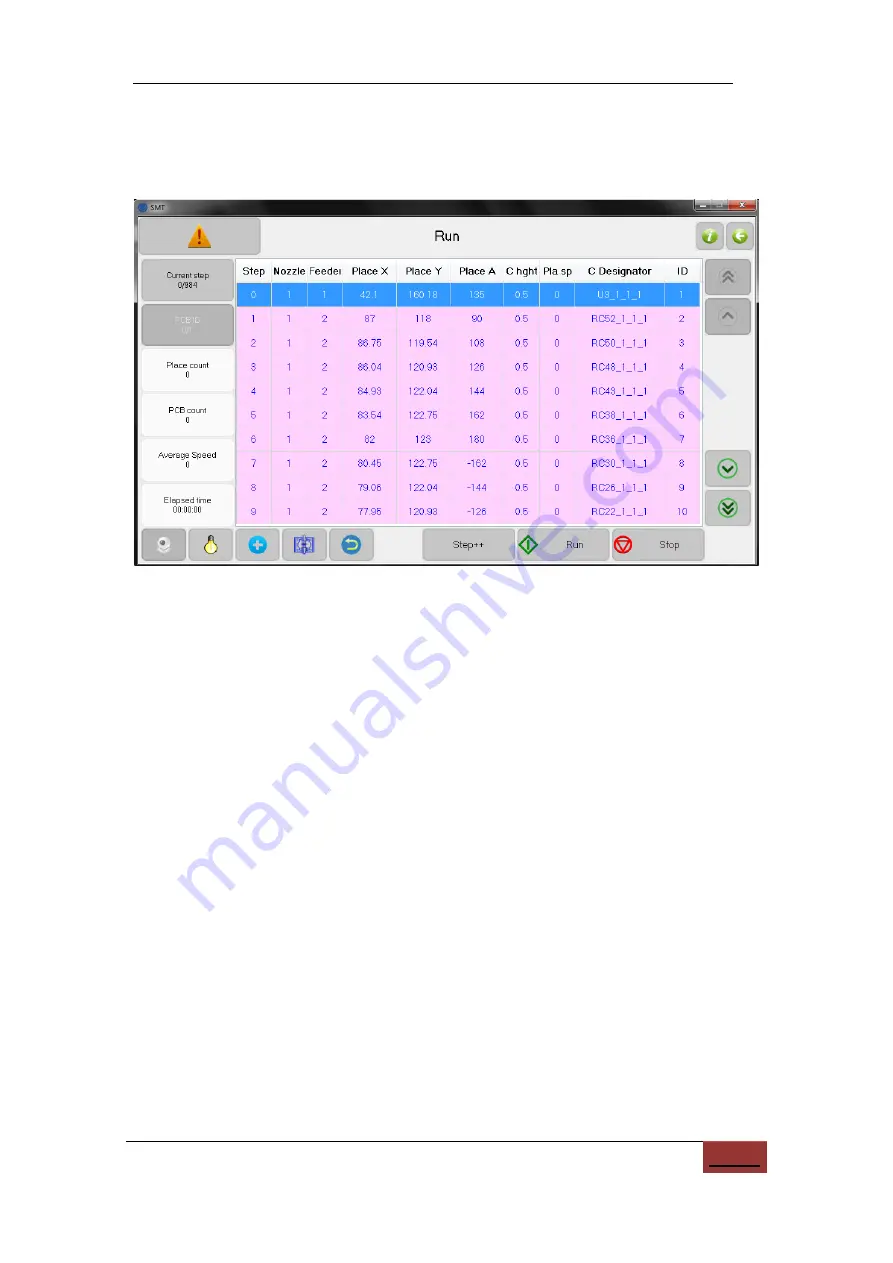
Step++: 

Place components one step and operation at a time. Used for testing;


(14)


Run: 

Run normally;


(15)


Stop: 

Stop placement; 


Figure 

10.18.


Window 

after “Run / Load”, to run work file. 

11.

 Diagnostics 

The test window is used for testing modules to check for proper operation. 

(1)


Nozzle 1\2 down: 

Nozzle lowers when button pressed;


(2)


Nozzle 1\2 vacuum: 

Nozzle vacuum turned on;


(3)


Nozzle 1\2 rotate: 

Nozzle rotates 180º anticlockwise when button pressed;


(4)


Nozzle 1\2 air: 

Nozzle air turned on;


(5)


UpLight\DownLight \toggle:

 Light toggled on and off with each click;


(6)


Tape-cover collect: 

Click to advance collector of tape cover;


(7)


Needle down: 

Needle pushed down to tape when button pressed;


(8)


Needle to tape pull…: 

Enter feeder number entered and move needle to pull 

position of tape;


(9)


DownCamera\

Nozzle to feeder …: 

Move down camera or nozzle to feeder 

number.


(10)


DownCamera\Nozzle to PCB origin: 

Move down camera or nozzle to PCB origin 

at front-left;


(11)


DownCamera: 

Images down camera, with movement buttons;


Summary of Contents for CHM-T36VA

Page 1: ...长沙常衡机电设备有限公司 http www charmhigh net 1 Automatic Chip Mounter CHM T36VA Operating Manual 2016 ...

Page 2: ...ICAL STRUCTURE 8 9 BOOTING THE MACHINE 9 10 RUN 10 10 1 EDIT WORK FILE 10 10 1 1 Component 11 10 1 2 Feeder 14 10 1 3 IC Tray 19 10 1 4 Batch 20 10 1 5 PCB 22 10 2 LOAD WORK FILE 23 11 DIAGNOSTICS 24 12 SET 25 12 1 SYSTEM SET 26 12 2 VACUUM DETECTION SET 29 12 3 BACKUP RESTORE 30 13 FILES 30 13 1 GENERATING THE CSV FILE 31 13 1 1 Altium Designer 31 13 1 2 Protel 33 13 2 FILE CONVERT 36 13 2 1 Feed...

Page 3: ...3 16 FEEDER HARDWARE 42 17 NOZZLE HARDWARE 44 18 PCB CLAMPS 44 19 WORK FLOW 45 20 MAINTENANCE 46 21 WARRANTY 46 ...

Page 4: ...ew menu descriptions have been created in the file smt_English_OpenSource1p0 qm which can be renamed to smt_English qm and copied into the SmtMain folder for use by the SmtMain control program 2 Install the Machine Open the packing cases take out the SMT machine and place it on a strong table Check if the machine is in good condition and the product list If you have any questions please contact us...

Page 5: ...chine or may be led to the decrease of the accuracy or machine damage 4 Don t use hand to touch the moving parts otherwise it may damage the machine or cause personal injury 5 New machine components containing volatile substances it need to maintain good ventilation in the first few days using 6 The power cord can only be used for the machine otherwise may damage the other electrical appliances 7 ...

Page 6: ...ossary and Software Parameters Component electrical part placed on PCB Component ID software identification number Component height used to program displacement of nozzle Component size used for visual centering system Component skip used for no component placement Component designator PCB silkscreen identification Component comment information used to sort into feeders Component place offset offs...

Page 7: ...ras centers x y stage coordinate system to cameras Calibrate component fine tunes alignment of components Calibrate feeder fine tunes position of feeders Calibrate PCB finds position of 2 or 3 points on PCB Calibrate cameras centers Up Camera to Down Camera Calibrate nozzle centers nozzle in vision system Up Camera used to measure offset of component center with vision Down Camera used to align fe...

Page 8: ...ray PCB clamping area Used for mounting a user supplied IC tray 6 PCB clamping area Used for fixing PCB Use the PCB stop on the left with spring clamp on the top 7 Feeders Feeds tapes of component parts for nozzle for pick up 8 Belt receiving wheel Used for collecting cover film after separated from tape 9 Tape placing area Used for placing tape and reels 10 IC Tray Fixed tray used for placing lar...

Page 9: ...e machine to load the operating system self check and perform an origin reset When the machine start is complete the display screen is shown below Figure 9 1 Top level window showing high level functions 1 Alarm Located upper left View current alarm and cause 2 Run Load working files and running the machine 3 Diagnostics Diagnostic tests of module functions 4 Set Set various parameters of the mach...

Page 10: ...he work file The single or double arrows on the right are used to select a previous line or page 2 New Create a new work file 3 Delete Delete the selected work file 4 Edit Edit the selected work file 5 Load Load the selected work file to run 6 Back Click left arrow button on the upper right corner of the screen to return to the previous level window All windows behave similarly 10 1 Edit Work File...

Page 11: ... vision centering disabled Green vacuum checks disabled and vision centering enabled Purple vacuum checks enabled and vision centering enabled 1 Add Add a component to the end of the list 2 Insert Insert a new component before the currently selected row 3 Delete Delete the selected component 4 Edit Edits the selected component see below for details 5 Save If you edit a component in the list the sa...

Page 12: ...rds The nozzle displacement depends on height for the pick operation at the IC tray and place on the PCB but not during the feeder pick and vision Height must be less than 5 mm 5 Place angle Set placement rotation angle of component on PCB Counterclockwise is positive clockwise is negative 6 Component designator Designator on silkscreen such as R1 C2 U1 etc Here the text Component comment is in er...

Page 13: ...coordinate for placement is normally assigned by software when importing the CSV file A more accurate alignment can be made by checking align component which sets the position on the PCB using the down camera or nozzle Its window is shown below Figure 10 4 Visual alignment for components Here shown after component placement to check for placement accuracy 1 X Y The component coordinate offsets are...

Page 14: ...typically a silk screen pattern must image cleanly and be closed Positioning with the silk screen is not always accurate so the alignment should also be checked manually with the footprint iii Auto Center Move to the center of target if target was captured 7 Nozzle mode The selected nozzle is placed at the component coordinate No image is shown i Nozzle 1 2 down When pressing this button the nozzl...

Page 15: ...on is not displayed in this list but can be accessed from Edit 2 Add Add a new row to the end of the list 3 Insert Insert a new row before the present selected row 4 Delete Delete selected row Note that all components using this feeder in the component list will also be deleted 5 Edit Edit selected material stack as shown as below 6 Modify ID Changes feeder number When changing parameters in this ...

Page 16: ...al value 0 is used for auto detection of size 6 Nozzle 7 Pick angle Defines orientation angle of part being picked up typically in 90 degree increments Counterclockwise position is positive 8 Component comment Component annotation such as C0 1uF 0805 used by this software to sort into feeder numbers 9 Feeder advance Distance between two successive components in the tape units in mm Typically set t...

Page 17: ...a image to align by hand the tape hole red circle against the feeder edge blue line as shown below This gives an initial alignment of the pull needle to the pull hole which is good enough for a tape pull Figure 10 8 Image from down camera to align feeders Nozzle mode By clicking the Nozzle button the image will disappear and the nozzle will be centered over the component Click the pull needle icon...

Page 18: ...y clicking on the vision button the image again appears The arrow buttons can now be used to accurately center the image crosshairs over the component in the tape Clicking set stores the pick offset parameters which can be seen on the edit page after closing this window Figure 10 10 Window to align nozzle to feeder for the pick operation ...

Page 19: ...re 10 11 Window after Run Edit IC tray tab for listing IC trays The edit commands see below are 1 Feeder IC tray number 2 First IC center X Y IC center coordinate in the left bottom of IC array The number can be input manually or determine by location 3 Last IC center X Y IC center coordinate in the top right of IC array 4 Number X Y number of components in X Y direction 5 Start IC ICs are numbere...

Page 20: ...e damaged The figure below shows how to clamp properly Figure 10 13 Photograph of user IC tray and method for proper clamping 10 1 4 Batch Batch enables the population of a number of identical PCBs on the same PCB panel which can then be cut apart after manufacture Only one component list is needed for each sub board Note that each PCB must be parallel to each other ...

Page 21: ...ffset ignoring the Place coordinate X Y value Figure 10 14 Window after Run Edit batch tab listing batch steps The second batch method defines with an array where each origin is calculated automatically from the row and column spacing and count Parameters can change Figure 10 15 Widow for editing array parameters with the Edit popup window as show below 1 PCB ID Only used in coordinate not array m...

Page 22: ...lects components and obtains their coordinates from the PCB file In the designator column the number after P indicates the batch PCB ID E gives the component ID and the string after is the component designation Alignment then uses these components 2 Marks The user selects two specific coordinates of the PCB Fiducials on the PCB or board corners are typically used here 3 Calibrate As show below the...

Page 23: ...CB number which will mount next 3 Place count Show total count of placed components 4 PCB count For batch mode show total count of PCB boards 5 Average speed Show average mounting speed in chips per hour 6 Elapsed time Run time 7 Adjust Tray Start When feeders are defined in the IC tray this button appears Click to set the start IC number 8 Up camera bottom left Click to watch image of up camera 9...

Page 24: ... rotates 180ºanticlockwise when button pressed 4 Nozzle 1 2 air Nozzle air turned on 5 UpLight DownLight toggle Light toggled on and off with each click 6 Tape cover collect Click to advance collector of tape cover 7 Needle down Needle pushed down to tape when button pressed 8 Needle to tape pull Enter feeder number entered and move needle to pull position of tape 9 DownCamera Nozzle to feeder Mov...

Page 25: ... Visual component detection Click to toggle on and off If checked when a component is not detected on nozzle then new material will be re picked After 6 times not detecting a component the machine alarms and stops 4 Detect Z Axis Check to start Z axis detect If checked the Z axis is found to be lost when the stick is attached then the Z axis is automatically returned to the origin This feature can...

Page 26: ...osing the software 11 Serial number The lower left corner displays the hardware serial number Figure 12 1 Window after Set showing setting choices 12 1 System Set After clicking the system set button and entering the code 123456 the system set window is displayed It is used to set system parameters and perform calibrations Some calibrations and functions are similar to described previously in the ...

Page 27: ...s shown below ii Place the calibration board on the up camera Manually adjust its position to center on the crosshairs iii Click Set to next view the down camera iv With arrows position of the down camera to center on the calibration board v Click Set to finish the calibration Figure 12 3 Up camera image of the calibration board ...

Page 28: ...gs 5 Calibrate PCB points Chooses 2 or 3 point calibration for PCB 6 Pick offsets used Button toggles on and off to enable offsets to the feeders for the pick operation as defined as the feeder offset in the Run Edit section When selected red text is shown in Feeder Edit window 7 Vacuum detection set View and set parameters of the vacuum setpoints see section below for details 8 Backup Restore Bac...

Page 29: ...hange in pressure A bigger number indicates a larger pressure difference 3 Nozzle 1 2 threshold1 Lower limit of vacuum If below this value no component is detected to be held by the nozzle and pick up will be retried Otherwise the vacuum will be tested for threshold high 4 Nozzle 1 2 threshold2 Higher limit of vacuum A bad component is detected if below this value and will be thrown away Otherwise...

Page 30: ...t Restore all of system parameters 3 Restore factory set Restore all of system parameters to factory 4 USB Import Export The button is enabled when the USB storage device is connected Note the imported parameters will not change the system settings directly only when executing restore system set 13 Files Used for managing work files and production files which are generated by PCB software The wind...

Page 31: ...mport Export Import or export CSV file or work file Buttons valid when USB storage device is connected 13 1 Generating the CSV File 13 1 1 Altium Designer 1 In the PCB design identical components must have the same comment as the feeder is sorted by the comment field 2 Set the PCB origin as shown below by setting the top layer origin at the bottom left corner of the PCB For the bottom layer set th...

Page 32: ...32 Figure 13 2 Image of Altium program showing setting the origin 3 Altium showing File Assembly Output Generates pick and place files Figure 13 3 Image of Altium program making a pick and place file ...

Page 33: ... CSV output format with mm units 6 RefX Y is the user defined reference point Pad X Y is the pad 1 coordinate 13 1 2 Protel 1 Open existing PCB file note same component must have same designator otherwise one component may occupy more than one material stack since convert tool identifies different material stack by designator of component 2 Selecting Edit Origin Set in menu bar to setting PCB orig...

Page 34: ...34 Figure 13 5 4 See figure below select Pick Place and then click Next in popup dialog box Figure 13 6 5 See figure below input file name then click Next ...

Page 35: ... figure below select CSV then click Next Figure 13 8 7 See figure below select Metric then click Next Figure 13 9 8 See figure below right click the file just generated in the list select Generate CAM Files from popup menu ...

Page 36: ...re 13 10 9 See figure below right click the CAM folder just generated select Export from popup menu to finish Figure 13 11 13 2 File Convert After selecting Convert File the CSV files are listed as show below ...

Page 37: ...s 1 Open Open selected CSV file 2 Delete Deletes selected CSV file The read in file is shown below Click Settings and then convert Figure 13 13 Window after File Open showing CSV entries 1 Edit Edit information of selected CSV item 2 Delete Delete selected CSV item ...

Page 38: ...the Run Edit menu The height listing of 50 seems to be an error as it is set to 0 5 when loaded to run Useful functions here are setting the angle orientation of the picked components 1 Rotate 180 For the selected feeder the component is rotated 180 degrees 2 Rotate 90 For the selected feeder rotated 90 degrees 3 Save Save converted work file Figure 13 14 Window after File Convert File Open Conver...

Page 39: ... will be picked at one time by two nozzles from the same feeder 2 Use dual nozzle2 Check indicates that two components will be picked at one time by two nozzles from different feeders 13 2 3 Batch Setting up a batch is illustrated in the window show below The functions are similar to that described previously in the Run section ...

Page 40: ...rt File Open Convert Batch tab 14 Log The log window is show below Figure 14 1 Window after Log showing past work jobs 1 Log list Each line records information of running one time 2 Sum Shows component count mounted for each feeder in table ...

Page 41: ...41 Figure 14 2 Window after Log Sum showing more detailed statistics 15 System Log System log is used to view records generated by the system Figure 15 1 Window after System Log showing system records ...

Page 42: ...ve different part spacing typically 4 8 and 12 mm so the feeder advance must be entered to specify this parameter Tapes are loaded on the left side of the machine with the following procedure i If the tape is on a reel place it on the three disks with the tape feed and cover film on the top See Fig 16 1 below ii Thread the tape under the rod Figure 16 1 Image of tape reel on 3 disks with tape thre...

Page 43: ...lt receiving wheel v Manually align the round hole of the tape to the edge of the batten as shown as red hole and blue line in Fig 16 2 2 Fixed IC tray Feeders 60 74 are used to load individual parts typically ICs from fixed trays located at the front of the machine Numbering starts at the front left and continues to the right and then back and then to the rightmost two trays For position and angu...

Page 44: ...mponent size Typical choices and pictures are shown below Nozzle Component size 502 0401 503 0603 504 0805 1206 SOT23 etc 505 SOP8 SOP14 etc 506 QFN TQFP etc Figure 16 4 Nozzle types 502 504 505 and 506 left to right 18 PCB Clamps The printed circuit board is held by clamps in the center of the machine aligned to the front left corner Standard PCB thickness is 1 6 mm 0 062 inches Default height pa...

Page 45: ...arameters for proper feeder advance and pick angle iii Place tapes and parts in corresponding feeders 16 iv Perform a needle pull to calibrate position of tape in feeders and check pick location using Run Edit Feeder tab Edit Calibrate 10 1 2 1 b PCB tab Define calibration locations on the PCB i Calibrate with 2 or 3 points in set systems parameters 12 1 ii Define the calibration points in PCB cal...

Page 46: ...id damage to machine or will lose your warranty If accessories are breakdown we will send a new one to you after receiving the break one During warranty period freight of send back to us is paid by user freight of send to user is paid by us Problems caused by below we provide paid repair during warranty period Faulty operation disassembly without permission Using beyond specification Crash or impr...

Reviews: