


2
3
About Your Kamado
Dating back 4000 years ago archaeologists discovered
large clay vessels thought to be early incarnations of
the Kamado ceramic cooker. Since then it has evolved in
many ways; removable lid, added draft door for better
heat control and the switch from wood to charcoal as the
primary fuel. In Japan the Mushikamado was a round clay
pot with a removable domed lid designed for steaming
rice. The name ‘Kamado’ is, in fact, the Japanese word for
’stove’ or ‘cooking range’. This name was adopted by the
Americans and has now become a generic term for this
style of ceramic cooker.
Kamado cookers are extremely versatile. Not only can
they be used for grilling or smoking but also pizzas,
bread, pies and cookies can be baked effortlessly inside
them. Due to their excellent heat retention properties,
high temperatures can be achieved and maintained by
precise contol of airflow via the top and bottom vents.
High temperatures are ideal for fast cooking burgers and
sausages whilst low heats will cook larger joints over a
longer period of time. Why not try adding some wood
chips to the charcoal or try combining different flavour
wood chips to make your meats even more flavoursome.
Curing The Kamado
• To start a fire place rolled up newspaper with some
lighter cubes or solid firelighters on the charcoal plate
(7) in the base of the Kamado. Then place 2 or 3
handfuls of lump charcoal over the top of the
newspaper.
• DO NOT use petrol, white spirit, lighter fluid, alcohol
or other similar chemicals for lighting or relighting.
• Open the bottom vent and light the newpaper using a
long nosed lighter or safety matches.
• DO NOT overload the unit with fuel – if the fire is too
intense this could damage the Kamado.
• Leave until all the fuel is used and extinguished.
• If the fire burns too high it could damage the felt
gasket seal before it has had the chance to mature
properly.
• After first use inspect all fasteners for tightness. The
metal band connecting your lid to the base will
expand from the heat and this could become loose. It
is recommended you check and if neccessary tighten
the band with a spanner.
• You can now use your Kamado as normal.
Extinguishing
• To extinguish unit – stop adding fuel and close all the
vents and the lid to allow the fire to die naturally.
• DO NOT use water to extinguish the charcoal as this
could damage the ceramic Kamado.
Care & Safe Use Guidelines
WARNING:
• Read all safety warnings and instructions carefully
before assembling and operating your Kamado
barbecue.
• This product is intended FOR OUTDOOR USE ONLY.
• NEVER leave a burning fire unattended.
• DANGER of carbon monoxide poisoning – NEVER
light this product or let it smoulder or cool down in
confined spaces.
• DO NOT overload the unit with fuel.
• FIRE HAZARD – Hot embers may emit while in use.
• CAUTION - DO NOT use petrol, white spirit, lighter
fluid, alcohol or other similar chemicals for lighting
or relighting.
• It is highly recommended that you use lump charcoal
in your Kamado. It burns for longer and produces
less ash which can restrict the airflow.
• IMPORTANT: When opening the lid at high
temperatures it is essential to lift the lid only
slightly, allowing air to enter slowly and safely,
preventing any backdraft or flare-ups that may
cause injury.
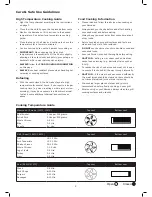
• ALWAYS follow the FOOD COOKING
INFORMATION stated on page 4 of this instruction
manual.
• DO NOT use the Kamado on decking or any other
flammable surfaces such as dry grass, wood chips,
leaves or decorative bark.
• Ensure that the Kamado is positioned at least 2
metres away from flammable items.
• DO NOT use this Kamado as a furnace.
• DO NOT handle or move the Kamado whilst alight
as it will be hot.
• ALWAYS USE heat resistant gloves when handling
hot ceramics or cooking surfaces.
• Allow the unit to cool down completely before
moving or storing.
• ALWAYS keep children and pets at a safe distance
from the oven when in use.
• Always inspect the unit prior to use for fatigue and
damage and replace as and when necessary.
Summary of Contents for Kamado CM155-024
Page 8: ...8 ...