background image

C H A R B R O I L.C O M

Page 

24

ASSEMBLY / ASAMBLEA

2ND

OR

1ST

1ST

Summary of Contents for 463246218

Page 1: ...ase call 1 800 448 2177 Si tiene alguna pregunta o si Necesita ayuda durante el Ensamblado llámenos Al 1 800 448 2177 2017 Char Broil LLC Columbus GA 31904 Printed in China Imprimé en Chine Impreso en China 10 12 16 G251 001 020801 MODULAR OUTDOOR KITCHEN OUTDOOR STOVE TOP COCINA MODULAR EXTERIOR ESTUFA AL AIRE LIBRE 8998521 Tools needed for assembly Adjustable wrench not provided Screwdriver not ...

Page 2: ... and prevent property damage The statements are defined below TH I S G R I L L I S F O R O UT D O O R U S E O N LY If you smell gas 1 Shut off gas to the appliance 2 Extinguish any open flame 3 Open lid 4 If odor continues keep away from the appliance and immdiately call your gas supplier or your fire department WARNING Indicates a potentially hazardous situation which if not avoided could result in ...

Page 3: ...sition Turn the tank valve on PRIOR to turning on the control knobs to avoid ignition prob lems and low flames Perform a leak check as documented in the Leak Checking Your Grill section Check burner tubes for spider nests per the Care and Mainentance of your Grill section For residential use only Do not use for commercial cooking Read and follow all safety statements assembly instructions and use ...

Page 4: ...wing require ments Use LP cylinders only with these required measurements 12 30 5cm diameter x 18 45 7 cm tall with 20 lb 9 kg capacity maximum LP cylinders must be constructed and marked in accordance with specifications for LP cylinders of the U S Department of Transportation DOT or for Canada CAN CSA B339 cylinders spheres and tubes for transportation of dangerous goods Transport Canada TC See ...

Page 5: ...th the cylinder valve Other types Of caps or plugs may result in leakage of propane Connecting the Grill Regulator to the LP Cylinder When LP cylinder is connected to grill store outdoors in a well ventilated space and out of reach of children 1 LP cylinder must be properly secured onto grill Refer to assembly section 2 Turn all control knobs to the OFF position 3 Turn LP cylinder OFF by turning h...

Page 6: ...reign objects into the cylinder valve opening as this could damage the rubber seal The leak check procedure outlined in the product guide assembly manual MUST be followed each time the LP gas cylinder is connected to the appliance Consult the product guide assembly manual for the proper procedure and locations for leak checking Leak Testing Valves Hose and Regulator Do not use grill until leak tes...

Page 7: ... away from the LP cylinder appliance and call your fire department If during operation the flames go out You smell gas or cannot see the flame 1 Turn the burner controls OFF 2 Open lid 3 Wait 5 minutes and repeat the lighting procedure If the burner goes out gas will continue to flow out of the burner and could accidently ignite with risk of injury Putting out grease fires by closing the lid is no...

Page 8: ...epeat the lighting procedure 6 Repeat steps 4 and 5 to light the other burner Main Burner Match Lighting Do not lean over the grill while lighting 1 Turn gas burner control valves to OFF 2 Open lid during lighting or re lighting Note that the lid should ALWAYS be open during use 3 Turn ON gas at LP cylinder 4 Place match into match holder hanging from side panel of grill Light match then light bur...

Page 9: ... cylinder valve check the coupling nut for tightness When grill is not in use turn off all control knobs and LP cylinder valve Never move grill while in operation or still hot Some surfaces will be hot during use Use long handled barbecue utensils and oven mitts to avoid burns and splatters If you notice grease or other hot material dripping from grill onto valve hose or regulator turn off gas sup...

Page 10: ... hose to force air into the burner tube and out the burner ports Check each port to make sure air comes out each hole 6 Wire brush entire outer surface of burner to remove food residue and dirt 7 Clean any blocked ports with a stiff wire such as an open paper clip 8 Check burner for damage due to normal wear and corrosion some holes may become enlarged If any large cracks or holes are found replac...

Page 11: ...ones para ayudar a garantizar la seguridad y prevenir daños en el equipo Las declaraciones se definen a continuación ESTA PARRILLA SOLO ES PARA USO EN EXTERIORES Si huele gas 1 Apague la alimentación de gas del aparato 2 Apague cualquier llama expuesta 3 Abra la tapa 4 Si el olor persiste aléjese del aparato y llame inmedia tamente a su proveedor de gas o su departamento de bomberos ADVERTENCIA In...

Page 12: ... del tanque ANTES de girar las perillas de control para evitar problemas de encendido y llamas bajas Realice una comprobación de fuga según lo docu mentado en la sección Comprobación de fugas de su parrilla Revise los tubos del quemados para detectar nidos de arañas de acuerdo con la sección Cuidado y mantenimiento de su parrilla Sólo para uso residencial No usar para cocina comer cial Lea y siga ...

Page 13: ...uisitos Utilice únicamente cilindros de gas LP con las siguientes medidas obligatorias 12 30 5cm diámetro x 18 45 7 cm altura con 20 lb 9 kg de capacidad máxima Los cilindros de gas LP deben construirse y marcarse de conformidad con las especificacio nes para cilindros de gas LP del Departamento de Transporte DOT de los EE UU o para Canadá CAN CSA B339 cilindros esferas y tubos para el transporte ...

Page 14: ...a válvula del cilindro suministrada con la válvula del cilindro El uso de otros tipos de tapas o tapones podría resultar en una fuga de propano Conexión del regulador de la parrilla al cilindro de gas LP Cuando un cilindro de gas LP está conectado a la parrilla guárdela en exteriores en un espacio bien ventilado y fuera del alcance de los niños 1 El cilindro de gas LP debe ser asegurado adecuadame...

Page 15: ...e goma El procedimiento de comprobación de fugas descrito en el manual de ensamblaje guía del producto DEBE seguirse cada vez que el cilindro de gas LP se conecta al aparato Consulte el manual de ensamblaje guía del producto para ver el procedimiento y las ubicaciones correctas para la comprobación de fugas Pruba de fugas de las válvulas manguera y regula dor No utilice la parrilla hasta que haya ...

Page 16: ...r hacia la posición OFF 2 Abra la tapa 3 Espere 5 minutos y repita el procedi miento de encendido Si el quemador no se enciende el gas seguirá fluyendo fuera del quemador y podría encenderse accidentalmente con riesgo de provocar lesiones No es posible apagar incendios producidos por grasa cerrando la tapa Las parrillas están bien ventiladas por motivos de seguridad No use agua en un incendio prod...

Page 17: ...y repita el procedimiento de encendido 6 Repita los pasos 4 y 5 para encender el otro quemador Encendido con fósforo del quemador principal No se incline sobre la parrilla cuando la esté encendiendo 1 Gire las válvulas de control del quemador de gas hacia la dirección OFF 2 Abra la tapa durante el encendido o el reencendido Tenga en cuenta que la tapa SIEMPRE debe abrirse durante el uso 3 Encienda...

Page 18: ...las perillas de control y la válvula de cilindro de gas LP hacia la posición de apagado off Nunca mueva la parrilla mientras está en funcionamiento o todavía caliente Algunas superficies estarán calientes durante el uso Use utensilios largos para parrillas y guantes para hornos a fin de evitar quemaduras y salpicaduras Si nota que hay grasa u otro material goteando de la parrilla hacia la válvula ...

Page 19: ...r y hacia fuera de los puertos del que mador Revise cada puerto para asegurarse de que el aire salga de cada orificio 6 Pase el cepillo de alambre por toda la superficie externa del quemador para eliminar la suciedad y los residuos de comida 7 Limpie los puertos bloqueados con un alambre rígido como un clip abierto 8 Verifique si el quemador presenta daños debido al desgaste normal y la corro sión...

Page 20: ... COM Page 20 REPLACEMENT PARTS DIAGRAM DIAGRAMA DE PIEZAS DE REPUESTO 49 48 47 46 45 1 40 3 4 5 10 7 2 11 12 9 8 17 6 14 13 15 27 28 18 19 20 24 25 41 23 42 43 16 21 22 29 31 37 46 36 35 34 44 30 39 26 32 33 38 ...

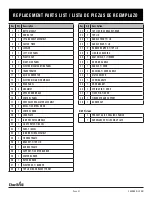
Page 21: ...E 22 1 LIGHT SWITCH F BEZEL 23 1 WIRE F BEZEL 24 1 IGNITION WIRE ASSEMBLY 25 1 FIREBOX FRAME 26 2 BRACKET F TOP LID 27 1 BURNER FRAME 28 1 SUPPORT F CENTER BURNER 29 1 CENTER BURNER 30 1 OUTER BURNER 31 1 ELECTRODE F BURNER 32 2 TOP LID HINGE BRACKET FRONT Key Qty Description 33 2 TOP LID HINGE BRACKET REAR 34 1 TOP LID 35 1 HANDLE FRONT F LID 36 1 HANDLE REAR F LID 37 4 RUBBER BUMPER F TOP LID 38...

Page 22: ...LE DE ENCENDIDO 25 1 BASTIDOR DE LA CÁMARA DE COMBUSTIÓN 26 2 SOPORTE P TAPA SUPERIOR 27 1 BASTIDOR DEL QUEMADOR 28 1 SOPORTE P QUEMADOR CENTRAL 29 1 QUEMADOR CENTRAL 30 1 QUEMADOR EXTERNO 31 1 ELECTRODO P QUEMADOR 32 2 SOPORTE DE LA BISAGRA DE LA TAPA SUPERIOR PARTE DELANTERA Clave Cant Descripción 33 2 SOPORTE DE LA BISAGRA DE LA TAPA SUPERIOR PARTE POSTERIOR 34 1 TAPA SUPERIOR 35 1 MANIJA FRONT...

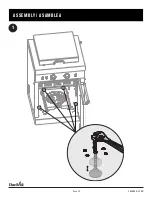
Page 23: ...CHARBROIL COM Page 23 ASSEMBLY ASAMBLEA 1 ...

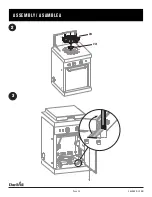
Page 24: ...CHARBROIL COM Page 24 ASSEMBLY ASAMBLEA 2ND OR 1ST 1ST ...

Page 25: ...CHARBROIL COM Page 25 ASSEMBLY ASAMBLEA 2 3 44 49 ...

Page 26: ...hose to be damaged in operation resulting in the risk of fire Una vez que el tanque haya quedado in stalado la válvula del tanque debe quedar orientada como se ilustra Si no se instala correctamente el tanque se puede dañar la manguera de gas durante el suministro lo que puede ocasionar el riesgo de incendio 1st 3rd LP Cylinder Not included Cilindro de LP No incluido ...

Page 27: ...CHARBROIL COM Page 27 ASSEMBLY ASAMBLEA 6 ...

Page 28: ...e 28 ASSEMBLY ASAMBLEA 7 A 6 B 6 C 6 D 2 A B C D A B C Replace plastic cap with included grommet when connecting two modules together Reemplace la tapa de plástico con la arandela incluida al conectar dos módulos juntos ...

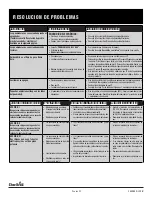
Page 29: ...ean food particles and excess grease from inside firebox area grease tray and other surfaces TROUBLESHOOTING EMERGENCIES If a gas leak cannot be stopped or a fire occurs due to gas leakage call the fire department TROUBLESHOOTING PROBLEM POSSIBLE CAUSE PREVENTION SOLUTION Burner s will not light using ignitor See Electronic Ignition Troubleshooting also Continued on next page GAS ISSUES Trying to ...

Page 30: ... cleaning Care and Maintenance Section of this guide IGNITION PROBLEM POSSIBLE CAUSE CHECK PROCEDURE PREVENTION SOLUTION SECTION I No sparks appear at any electrodes when Electronic Ignition Button is pressed no noise can be heard from spark module No power to spark module Button assembly not installed properly Faulty spark module Verify transformer is plugged in and all wires in cabinet are conne...

Page 31: ...s del enfriamiento limpie las partículas de alimentos y la grasa excesiva desde el interior del área de la cámara de combustión bandeja de grasa y otras superficies RESOLUCION DE PROBLEMAS EMERGENCIAS Si no es posible detener la fuga de gas o ocurre un incendio debido a la fuga de gas llame al departamento de bomberos RESOLUCION DE PROBLEMAS PROBLEMA CAUSA POSIBLE PREVENCIÓN SOLUCIÓN Los quemadore...

Page 32: ...s del quemador están bloqueados Gire las perillas a la posición de apagado OFF Limpie el quemador y o los tubos del quemador Consulte la limpieza del quemador en la sección de cuidad y mantenimiento de esta guía PROBLEMAS DE ENCENDIDO CAUSA POSIBLE COMPROBAR EL PROCEDIMIENTO PREVENCIÓN SOLUCIÓN SECCIÓN I No aparecen chispas en ninguno de los electrodos cuando se presiona el botón de encendido elec...

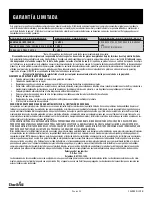
Page 33: ...cturer reserves the right to substitute like or similar parts that are equally functional Manufacturer will not be responsible for any consequential or incidental damages arising from the breach of either this limited warranty or any applicable implied warranty or for failure or damage resulting from acts of God improper care and maintenance grease fire accident alteration replacement of parts by ...

Page 34: ...iezas el fabricante se reserva el derecho de sustituirlas con piezas equivalentes o similares que sean igualmente funcionales El fabricante no será responsable de ningún daño conse cuente o incidental derivado del incumplimiento de esta garantía limitada o de cualquier garantía implícita aplicable o por falla o daño resultante de actos de Dios cuidado y mantenimiento incorrectos incendio producido...

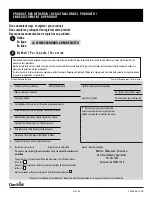
Page 35: ... Adresse Dirección Apt No No d appt No de appart City Ville Ciudad State Etat Estado Zip Code Code post Código post 2 E mail Address Adresse e mail Dirección de correo electrónico 3 Phone Number Numéro de téléphone Número de Teléfono 5 Attach copy of your sales receipt here Joignez une copie de votre reçu de vente ici Adjunte una copia de su recibo de venta aquí 4 Model Number Numéro de modèle Núm...

Page 36: ...mpreso en China 2017 Char Broil LLC Columbus GA 31904 Imprimé en China Impreso en China 2017 Assembly instructions 2017 Instrucciones de ensamblado The product associated with this guide was manufactured in China Tel producto asociado con esta guía ha sido fabricado en China ...

Reviews: