background image

2

1

ASSEMBLY

Page 8

2

1

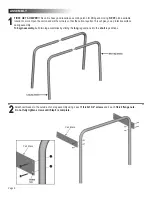
FIRST, GET A HELPER! 

This unit is heavy and requires a second person for lifting and moving. 

NEXT,

 pick a suitable 

location to work. Open the carton and slit the corners so that the carton lays flat. This will give you a protective surface 
during assembly.

To begin assembly, 

build two leg assemblies by sliding the

 long

 leg sections into the

 short

 leg sections.

Attach cart braces to the outside of one leg assembly using 4 each 

1/4-20x1 3/4" screws

 and 4 each 

1/4-20 flange nuts.


Do not fully tighten screws until Step 6 is complete.

Cart Brace

Cart Brace

Summary of Contents for 10301565-26

Page 1: ...Trentino U Wild WestTradition and the following marks Protected under one or more of the following U S Patents 5 421 319 5 458 309 5 579 755 5 996 573 6 135 104 6 279 566 6 331 108 6 484 900 6 526 876 6 595 197 6 640 799 6 640 803 6 729 873 6 739 473 6 749 424 6 792 935 6 951 213 7 047 590 7 516 693 D364 535 D372 637 D373 701 D377 735 D383 035 D397 910 D405 643 D406 005 D406 009 D413 043 D413 229 ...

Page 2: ... products produced when using this product contains chemicals known to the State of California to cause cancer birth defects or other reproductive harm 2 This product contains chemicals including lead and lead compounds known to the State of California to cause cancer birth defects or other reproductive harm Wash your hands after handling this product WARNING All surfaces can be hot during use Use...

Page 3: ...ended however wood or a combination of both may be used as the fuel source for grilling with the fuel source placed and ignited on the ash pan Do not build too large of a fire We recommend starting a fire with no more than 4 pounds of charcoal approximately 60 briquettes and adding more as needed during cooking After allowing the fire to burn down place the cooking grate on the unit Failure to rea...

Page 4: ...id to hot or warm coals as flashbacks may occur causing injury 5 You are ready to begin cooking when the pile of briquettes ashes over and produces a red glow approximately 12 15 minutes 6 Depending on your cooking method either leave the briquettes in a pile or spread evenly across the charcoal grate using a long handled poker Always use caution when handling hot coals to prevent injury Know When...

Page 5: ...er the drip pan This injects a little extra moisture into the cooking environment and also catches dripping juices which makes clean up a little easier and reduces the possibility of flare ups Remember to keep a spray bottle filled with water on hand to extinguish any flare ups Once you get used to the indirect method you may prefer to use it for more grilling tasks Although it may take a little l...

Page 6: ...ailure or damage resulting from acts of God improper care and maintenance grease fire accident alteration replacement of parts by anyone other than Manufacturer misuse transportation commercial use abuse hostile environments inclement weather acts of nature animal tampering improper installation or installation not in accordance with local codes or printed manufacturer instructions THIS LIMITED WA...

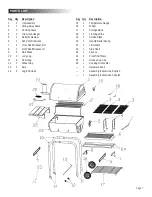
Page 7: ...Long Leg 11 2 Short Leg 12 2 Wheel Cap 13 1 Axle 14 2 Leg End Caps PARTS LIST Page 7 26 Key Qty Description 15 1 Temperature Gauge 16 2 Wheel 17 1 Storage Rack 18 2 Lid Hinge Pins 19 1 Smoke Stack 20 1 Handle Barrel Spring 21 1 Lid Handle 22 1 Side Shelf 23 1 Firebox 24 2 Front Shelf Slats 25 1 1 Hardware Pack 1 Assembly Instructions English 1 Assembly Instructions Spanish Grease Cup Clip 26 1 Coo...

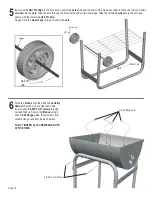
Page 8: ...ners so that the carton lays flat This will give you a protective surface during assembly To begin assembly build two leg assemblies by sliding the long leg sections into the short leg sections Attach cart braces to the outside of one leg assembly using 4 each 1 4 20x1 3 4 screws and 4 each 1 4 20 flange nuts Do not fully tighten screws until Step 6 is complete Cart Brace Cart Brace ...

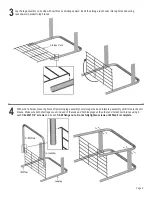
Page 9: ...egs are at one end of the rack and both long legs at the other end Attach cart braces using 4 each 1 4x20x1 3 4 screws and 4 each 1 4 20 flange nuts Do not fully tighten screws until Step 6 is complete Lay the leg assembly on its side with cart braces pointing upward insert the storage rack hooks into leg holes and swing rack upward parallel to leg braces Storage Rack ...

Page 10: ...e with the remaining Hair Pin Clip Finally Push the wheel caps onto each end of the axle Place the firebox onto the cart The butterfly damper should be on you right hand side Insert 4 each 1 4 20X1 3 4 screws through cart and firebox Secure the firebox using 4 each 1 4 20 flange nuts Insert screws from outside flange nuts from inside chamber FULLY TIGHTEN ALL SCREWS AND NUTS AT THIS TIME Wheel Cap...

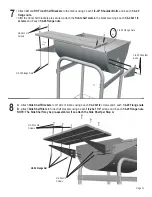
Page 11: ...nuts 1 4 20 Flange Nuts 1 4 20x1 1 4 Screws 1 4 20 Shoulder Bolts 1 4 20 Flange Nuts 1 4 20 Flange Nut 1 4 20 Flange Nut 1 4 20x1 1 4 Screws 1 4 20x1 2 Screws Page 11 A Attach Side Shelf Brackets to LH side of firebox using 4 each 1 4 20x1 2 screws and 4 each 1 4 20 Flange nuts B Attach Side Shelf Slats to Side shelf brackets using 6 each 1 4 20x1 1 4 screws and 6 each 1 4 20 flange nuts NOTE The ...

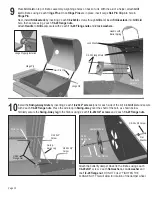
Page 12: ...ing 1 each 1 4 20x3 4 screw 2 each flat washers 1 lock washer and one 1 4 20 flange nut DO NOT FULLY TIGHTEN THE FLANGE NUT This will allow for rotation of the damper wheel 1 4 20x2 Screw 1 4 20x3 4 Screw 1 4 20 Flange Nuts Hinge Properly Installed Lock Washer Swing Away Leg Wire Loop Lock Washer Place Grill Lid on top of firebox assembly Align hinge holes on back of unit With the aid of a helper ...

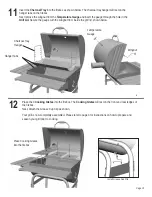
Page 13: ...ith the wingnut from inside the grill lid shown below Charcoal Tray Hanger Hanger Tabs Temperature Guage Place Cooking Grates into the firebox Place the 3 Cooking Grates into the firebox The Cooking Grates will rest on the front and rear ledges of the firebox Next Attach the Grease Cup Clip as shown Your grill is now completely assembled Please refer to page 3 for instructions on how to prepare an...

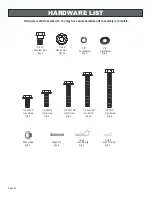
Page 14: ...e Nut Qty 33 1 4 Lock Washer Qty 3 1 4 20x1 2 Hex Screw Qty 4 1 4 20x3 4 Hex Screw Qty 5 1 4 20x1 1 4 Hex Screw Qty 4 1 4 20x1 3 4 Hex Screw Qty 12 1 4 20x2 Hex Screw Qty 2 Wheel Cap Qty 2 Hinge Pin Qty 2 Hair Pin Clip Qty 2 Page 14 1 4 20 Shoulder Bolt Qty 4 1 4 Flat Washer Qty 2 Large Hair Pin Clip Qty 2 Small ...

Page 15: ......

Page 16: ...REGTEMP REV02 Warranty Registration Department P O Box 1240 Columbus GA 31902 1240 ...

Reviews: