Page 1
B
C
TM
120V 50/60Hz 300W
Multiplex Technology Inc.
MADE IN CHINA DESIGNED IN
USA
MODEL MDS-6
MULTI-ZONE
CAUTION
RISK OF ELECTRIC SHOCK
DO NOT OPEN
AVIS:
RISQUE DE CHOC ELECTRIQUE-NE PAS OUVRIR.
WARNING:
SHOCK HAZARD - DO NOT OPEN.
IR REMOTE OUTPUTS
1
SOURCE OUTPUT
PAGE
A
B
DOORBELL STATUS
S
G
+5v G +5v G
AUDIO
INPUT
SWITCH
INPUT
UNIT
ON
TRIG
ON
IN
OUT
SOURCE 1
IN
OUT
SOURCE 2
IN
OUT
SOURCE 3
IN
OUT
SOURCE 4
IN
OUT
SOURCE 5
IN
OUT
SOURCE 6
INPUT SOURCES
ZONE CONTROLLERS
1 8
OUT
L
R
ZONE 1
L
R
LEFT
- + RIGHT
- +
ZONE 2
L
R
LEFT
- + RIGHT
- +
ZONE 3
L
R
LEFT
- + RIGHT
- +
ZONE 4
L
R
LEFT
- + RIGHT
- +
ZONE 5
L
R
LEFT
- + RIGHT
- +
ZONE 6
L
R
LEFT
- + RIGHT
- +
LINE OUT / SPEAKER OUT
20W/8 OHM X2
20W/8 OHM X2
20W/8 OHM X2
20W/8 OHM X2
20W/8 OHM X2
20W/8 OHM X2
LINE OUT
LINE OUT
LINE OUT
LINE OUT
LINE OUT
LINE OUT
SUM OUTPUT
1 8
1 8
1 8
1 8
1 8
1 8
1 8
IN
1
2
3
4
5
6
MASTER
INDIVIDUAL ZONES
A
2
B
3
C
4
D
MDS-6 Music Distribution System
Active
On
TM
G
H
I
F
E
D
Power
A
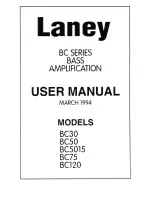
D.) Output Section -
This section is the output section. It provides the speaker terminals and line
outputs.
E.) Distribution Section -
This section is the line level input/output section. It provides the inputs from
your sources and the outputs for stacking additional units.
F.) Controller Section -
This section is where the wall controller in each zone connect. This section
includes the party mode master controller input.
G.) Paging/Control Voltage Section -
This section is the paging and control voltage input and output
section. It provides the inputs from your phone system and door bells (front and back). It also has a
control voltage input and output for the unit controlling or being controlled by additional equipment.
H.) Infrared (IR) Section -
This is the IR section. It provides outputs for the IR emitters.
I.) AC Power Cord -
This is where the AC power cord connects to the unit. It is a detachable 3 prong
I.E.C. plug.
A.) Power Switch
- Left on, the MDS-6, when not being used, will go into a sleep mode, ready to
turn back on when an input signal is applied from any of the six sources. In the off position, the unit
will not function.
B.) On LED
- With the power switch on, this LED indicates that the unit is powered up and awake.
C.) Standby LED
- This LED indicates that the unit is plugged into the wall.
Summary of Contents for CHANNELPLUS MDS-6
Page 3: ......