background image

NORRISEAL-WELLMARK 

REVISION 2021-5-14 

Configuring Communication Settings


Enabling Communication 

1.


Before Starting: 

a.


Ensure power is supplied and controller is turned on. 

b.


Press  any  button to  ‘wake  up’  the  device  if  no  display  is 

shown. 

 
NOTE: Communication is enabled by default 


2.


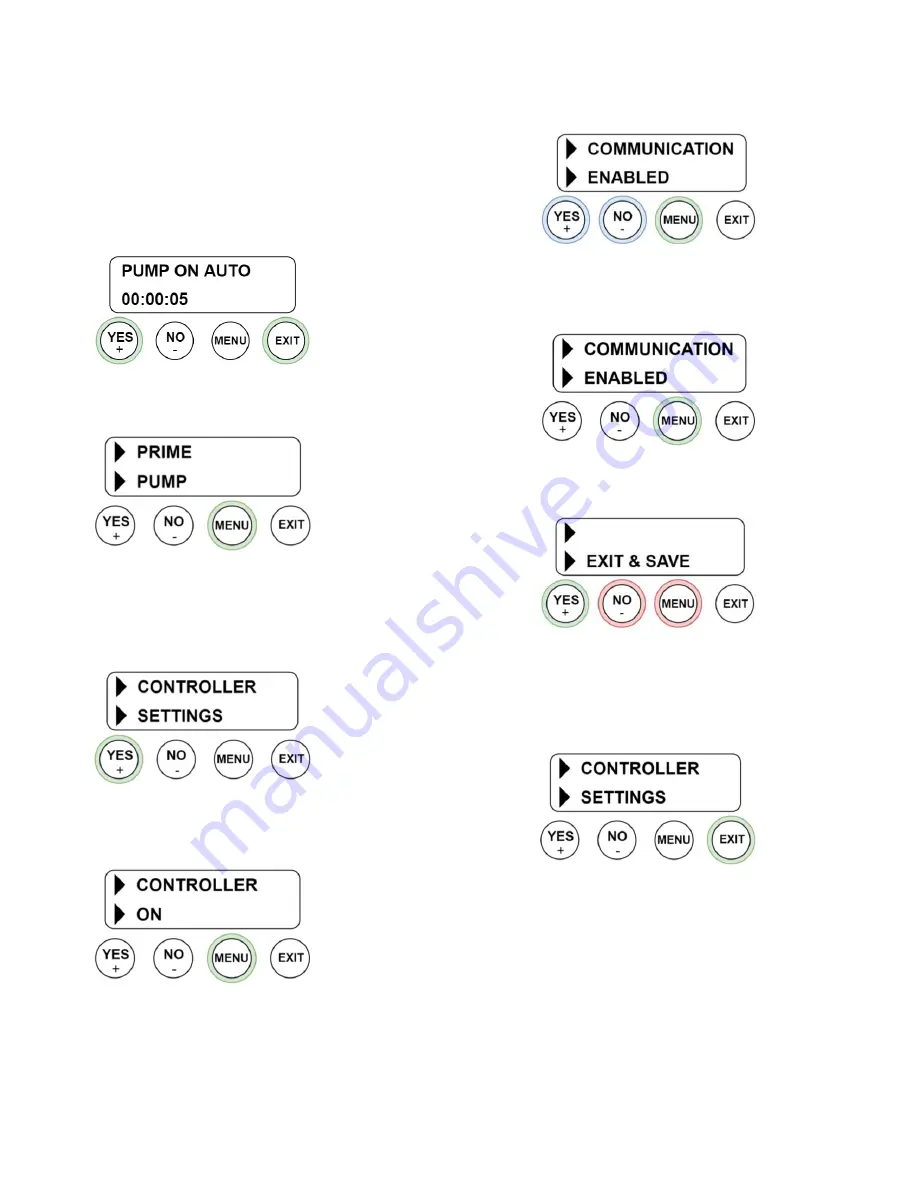
While on any idle screen, press left and right buttons (YES+ and EXIT) 
on end of controller to enter programming menu. 


3.


Press MENU to scroll through programming options until 
CONTROLLER SETTINGS is shown 


NOTE:


While in programming mode, output will be disabled and 

two arrows will be shown on the left hand side of the screen. 


4.


When CONTROLLER SETTINGS is shown, press YES to enter sub-
menu. 


5.


The screen below will be shown when entering the controller 
settings sub-menu, press MENU to scroll through options until 
COMMUNICATION is shown. 


6.


When COMMUNICATION is shown, use the YES/NO buttons to scroll 
through options until ENABLED is shown.  


7.


When ENABLED is shown, press MENU to lock in setting and advance 
through the controller settings sub-menu until you reach the SAVE & 
EXIT screen. 


8.


Press YES to Exit & Save if the values entered were correct.  This will 
return you to the top level programming menu. 


Pressing MENU or NO will scroll through other options to exit without 
saving, or cancel exiting and return to the beginning of the sub-menu. 


9.


Press  EXIT  to  exit  the  top  level  programming  menu  and  resume  
normal operation. 


Summary of Contents for DigiUltra

Page 1: ...ation 2 Adjusting Serial Port Settings 3 Serial Connections 4 Connecting to Serial Radios 4 Critical Radio Network Settings 4 Converting to RS232 Communication 4 Modbus TCP IP Connections 5 Tiny Gateway Connections 5 Critical Device Settings 5 Overview This document will assist with configuring the serial communications on the DigiUltra pump controller Comm Specifications Protocol Modbus RTU Conne...

Page 2: ...reen 4 When CONTROLLER SETTINGS is shown press YES to enter sub menu 5 The screen below will be shown when entering the controller settings sub menu press MENU to scroll through options until COMMUNICATION is shown 6 When COMMUNICATION is shown use the YES NO buttons to scroll through options until ENABLED is shown 7 When ENABLED is shown press MENU to lock in setting and advance through the contr...

Page 3: ...nu NOTE Communication is enabled by default but if COMMUNICATION SETTINGS is not available as a programming menu option see section on ENABLING COMMUNICATION 5 Use the buttons to adjust the MODBUS ADDRESS to the desired address Press MENU to advance when the desired address is shown default address is 16 6 Use YES NO Keys to adjust the desired baud rate of the controller Allowable options are 4800...

Page 4: ...s are set the same on all radios in the network Frequency Key Mininum Packet Size Maximum Packet Size Network ID RF Data Rate If using parallel repeaters Frequency Key setting may differ between devices Call book may be used in place of Network ID but the appropriate serial number must be listed in the Call Book for each radio Converting to RS232 Communication The DigiUltra controller comes with M...

Page 5: ...Connections Adding a Tiny Gateway or other Serial to Ethernet device server allows the DigiUltra controller to communicate via Modbus TCP IP To connect a Tiny Gateway device such as a TGW 715 or TGW 718 see the wiring diagram below Critical Device Settings DHCP Enabled Disabled IP Address Default Gateway Subnet Mask Baud Rate Baud rate set on device server for serial communication must match the D...

Page 6: ...485 disabled 1 RS 485 enabled COIL 11 Head Configuration 0 Single head 1 Dual head COIL 12 Batch Mode 0 manual intermittent 1 auto qpd COIL 14 Timing Mode 0 intermittent 1 real time COIL 15 Cycle Mode 0 manual 1 auto COIL 16 Real Time Mode 0 TOD on on time 1 TOD on TOD off COIL 17 Low Voltage Scaling 0 disabled 1 enabled COIL 18 Solar Output 0 disabled 1 enabled COIL 19 Override Input Enable 0 dis...

Page 7: ...changed DISC INPUT 10007 RTC Low Battery 1 RTC battery is below 2 3 volts DISC INPUT 10008 Digital Input 1 Signal Detected 0 No Signal Status of Digital Input processor pin RB15 DISC INPUT 10014 Motor Output 0 Main Output Currently Off 1 Main Output Currently On DISC INPUT 10010 Auxillary Output 0 Aux Output Currently Off 1 Aux Output Currently On DISC INPUT 10011 Write EEPROM Flag to indicate if ...

Page 8: ...wer word 18 upper word INPUT REG 30019 30020 Total Quarts Pumped Number of quarts pumped calculated calibrated mode Float 19 lower word 20 upper word INPUT REG 30021 30022 Day Total Quarts Number of quarts pumped for the current day Float 21 lower word 22 upper word INPUT REG 30023 30024 Week Total Quarts Number of quarts pumped for the current week Float 23 lower word 24 upper word INPUT REG 3002...

Page 9: ...0 upper word 16 bits HOLD REG 40031 40032 Batch Amount Auto mode batch volume in QPD float value 31 lower 16 bits 32 upper 16 bits HOLD REG 40033 Display Turn off Time in seconds until display turns off HOLD REG 40034 Cal Rate Pulses Number of pulses counted in Cal Rate 0 999 HOLD REG 40035 Cal Rate Ticks Number of ticks dropped in Cal Rate Where ticks 1Quart per Day per 1 Minute Test interval Sta...

Page 10: ...d only Value voltage set 10 no decimal displayed HOLD REG 40062 Plunger Size 1 0 3 16 Inch 1 1 4 Inch 2 3 8 Inch 3 1 2 Inch Lower byte used only HOLD REG 40063 Plunger Size 2 0 3 16 Inch 1 1 4 Inch 2 3 8 Inch 3 1 2 Inch Lower byte used only HOLD REG 40064 Pin Position 1 1 2 or 3 HOLD REG 40065 Pin Position 2 1 2 or 3 HOLD REG 40066 Temperature Mode Disabled 0 Switched 1 Scaled 2 Lower byte used on...

Reviews: