background image

Rev J

Doc 01-20098

Page 21 of 44

2. Start-Up 

Sensitivity:

Apply a bump to the gate as it starts moving and verify that the gate responds to the bump within a
second.

3. Obstruction 

Alarm:

Cause two obstruction faults before the gate reaches its open or closed limit and verify that the
Obstruction Alarm sounds.

5.  Entry inputs

1.  Activate the CYCLE input (entry system), RADIO input (radio transmitter), and EXIT Loop input
(driving over the exit loop) and verify that they fully open the gate.  If Reclose Timer is enabled, it will
close the gate.

2.  Activate the FIRE input (fire department switch) and verify that the gate fully opens and then
closes after 5 seconds.  If Reclose Timer is enabled, it will close the gate.

6.  Alternate Action

If Alternate Action has been selected so that CYCLE or RADIO commands both open and close the

gate:

Activate the CYCLE command, wait until the gate is fully open, then activate the CYCLE command

again.  The gate should close, verifying Alternate Action operation.

Note:

  If you select Alternate Action, you can't enable ATG and RT in procedures 7 and 8.

7.  Reclose Timer (RT)

If Reclose Timer has been enabled in programming step 8, verify Reclose Timer as follows:

1.  Activate any entry command (except Manual OPEN) to open the gate.

2.  Start timing when the gate reaches fully open and verify that the Reclose Timer recloses the gate
after the desired interval.

NOTE:

  Reclose Timer is not functional when the Manual OPEN command is used.

8.  Inside Interrupt Loop and Anti-Tailgating (ATG) When Exiting

GATE TYPE is SLIDE

ATG OFF:

If ATG is turned OFF (0 entered in step 6), activate the CYCLE command, drive over the Interrupt Loop
and verify its operation:

#


Opening Gates:

  When a vehicle drives on the Interrupt Loop an opening gate will be

unaffected.

#


Closing Gates:

  When a vehicle drives on the Interrupt Loop a closing gate will open and the

Reclose Timer (if enabled) will start.

ATG ON:  

If ATG is turned ON (1 entered in step 6), activate the CYCLE command, drive over the

Interrupt Loop and verify its operation:

#


Opening Gates:

  When a vehicle drives on the Interrupt Loop an opening gate will continue to

open, but will close as soon as the vehicle drives off the Interrupt Loop.

#


Closing Gates:

  When a vehicle drives on the Interrupt Loop a closing gate will stop, but will

close as soon as the vehicle drives off the Interrupt Loop.

Summary of Contents for SL 1000-X3

Page 1: ...L MODEL SL 1000 X3 HEAVY DUTY HIGH CYCLE SLIDE GATE OPERATOR MODEL SL 1000 X3 IS FOR VEHICULAR PASSAGE GATES ONLY NOT INTENDED FOR PEDESTRIAN PASSAGE GATE USE 3 YEAR WARRANTY Serial _____________________ located on electrical box Installation Date ______________ X3 ...

Page 2: ...OPEN DIRECTION SWITCHES S2 AND S3 ________________________________ 13 G POWER UP PROCEDURE __________________________________________________________ 13 H USING MANUAL CONTROLS ________________________________________________________ 14 I SETTING LIMIT CAMS ______________________________________________________________ 15 J GATE SENSITIVITY ADJUSTMENTS _____________________________________________...

Page 3: ...d time the gate is obstructed Cycle counter is able to initiate a service request call at a predetermined number Event recording memory keeps track of all commands and actions even during power interruptions This is very helpful in troubleshooting the system Can be retrieved by modem into your computer Automatic service request call is activated in the event of a fault or warning condition A call ...

Page 4: ...te operator safety features monthly The gate MUST reverse on contact with a rigid object or stop when an object activates the non contact sensors After adjusting the force or the limit of travel retest the gate operator Failure to adjust and retest the gate operator properly can increase the risk of damage injury or death 9 Gate operators and associated control equipment should be installed by qua...

Page 5: ...ould try to discharge any static before handling the boards WARNING Damage caused by static discharge or lightning is not covered by warranty 5 PROVIDE POWER FROM A DEDICATED SOURCE The outlet into which you connect the Gate Operator should be wired to its own circuit breaker This will reduce the line noise introduced into system power and minimize the risk of having other equipment interrupt syst...

Page 6: ...g devices should be mounted at least 6 feet away from the gate to provide safety 3 Allow enough clearance around the gate and the gate operator for installation and services as well as operation of manual disconnect lever 4 The gate operator can provide front and rear drive configuration Figures 1 and 2 and mid drive can be used if the operator is post mounted and clearance is provided under the o...

Page 7: ...bout 4 above ground level to prevent water entrance 3 Four anchor bolts are required to secure the gate operator to the pad The mounting holes in the gate operator are 5 8 in diameter x 3 Red Head bolts are recommended Figure 5 4 Be sure to provide access for wiring conduits Figure 6 5 Track installation should be on concrete not asphalt and should be at least 10 wide and 6 deep 6 A 6 gate overlap...

Page 8: ...d from the telephone company termination block through the conduit to J9 on the control board Polarity is not important NOTE Do not run telephone and AC power wires in the same conduit F OTHER CONNECTIONS 1 Provisions should be made for conduit entrance into the gate operator for external activation devices such as key switches telephone entry systems loops etc 2 Wire size requirement 16 24 AWG st...

Page 9: ...stall photo sensors in three places as shown in Figure 7 A Inside Open Coverage Inside the gate from the gate operator to the gate fully open position B Inside Closed Coverage Inside the gate from the gate operator to the gate fully closed position C Outside Closed Coverage Outside the gate from the fence edge to the gate fully closed position 2 For wiring instructions see Paragraph K Connecting I...

Page 10: ...ve bolts that hold the cover on lift the cover off and set aside 2 Remove the assembly kit and parts 3 Remove the 4 bolts that attach the gate operator to the shipping pallet 4 Mount gate operator on the cement pad using the previously installed anchors Be sure the operator mounting is level and the chain face is parallel to gate movement Figures 8 and 9 5 Move the idler wheel mounting if required...

Page 11: ... Using master link secure chain to the chain connector on one of the chain anchors Fig 10 A 3 Route chain through gate operator to the opposite Gate Anchor and secure chain to the chain connector using master link 4 Ensure the chain is parallel to gate travel both horizontally and vertically 5 Use the jam nut on the chain connector to secure the chain and adjust for proper tension NOTE For rear an...

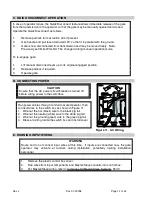
Page 12: ... gate D CONNECTING POWER Figure 11 AC Wiring E RUNNING INPUT WIRING WARNING Route but do not connect input wires at this time If inputs are connected now the gate operator may activate at random during installation potentially injuring installation personnel 1 Remove the plastic control box cover 2 Run wires from input components and Master Slave conduits into control box 3 For Master Slave wiring...

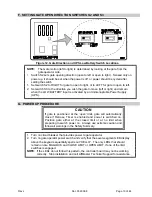
Page 13: ...ated by an Uninterruptable Power Supply UPS G POWER UP PROCEDURE CAUTION If gate is positioned at the open limit gate will automatically close if Relcose Timer is enabled and power is switched on Position gate either at the closed limit or at no limit when preparing to switch power on Always use extreme caution and follow all warnings in the Safety Summary 1 Turn on circuit breaker that provides p...

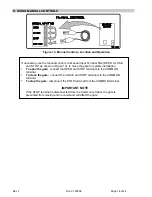
Page 14: ...3 to move the gate for system installation To open the gate connect the OPEN and STOP terminals to the COMMON terminal To close the gate connect the CLOSE and STOP terminals to the COMMON terminal To stop the gate disconnect the STOP terminal from the COMMON terminal IMPORTANT NOTE If the STOP terminal is disconnected from the Common terminal the gate is prevented from moving and no command will a...

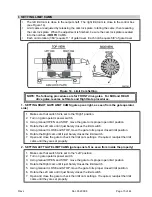
Page 15: ...ing manual OPEN and STOP move the gate to its proper open limit position 4 Rotate the Left cam until it just barely closes the limit switch 5 Using manual CLOSE and STOP move the gate to its proper closed limit position 6 Rotate the Right cam until it just barely closes the limit switch 7 Open and close the gate to check the limit cam settings If required readjust the limit cams until they are set...

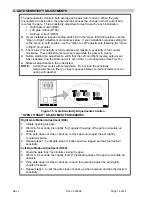
Page 16: ... clockwise and the Start up pot is set to the 11 o clock position See Fig 15 Make all adjustments in the order listed NOTE Current flow varies with temperature Do not tune the sensitivity measurements too finely or they may cause false overcurrent faults to occur during cold weather Figure 15 Gate Sensitivity Adjustments Location OPEN TO RIGHT ADJUSTMENT PROCEDURES Right Gate Motion Adjustment R69...

Page 17: ... then lightly bump the leading edge of the gate to simulate an obstacle 3 If the gate does not stop or back up reopen the gate and adjust the pot slightly counterclockwise 4 Repeat steps 1 3 until the gate stops or backs up when bumped and has the desired sensitivity START UP Current Adjustment R203 1 Turn the pot fully counterclockwise 2 Open the gate 3 If the gate stops due to a fault condition ...

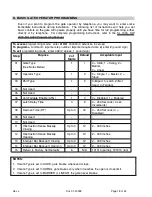
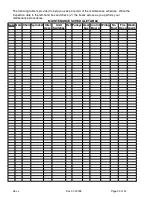
Page 18: ...nput 01 Gate Type See Notes Below 1 1 0 Slide 1 Swing 2 Barrier 3 Linear 02 Operator Type 1 0 0 Single 1 Master 2 Slave 03 Pair Type 1 0 0 Bipart 1 Latch 2 Not Used 3 Tandem 04 Not Used 05 Not Used 06 Anti Tailgate Enable ATG 1 0 0 Disabled 1 Enabled 07 Latch Delay Time 3 6 0 250 Seconds 4 sec Increments 08 Reclose Time RT Up to 3 30 0 250 Seconds 0 Disabled 09 Not Used 10 Not Used 11 Obstruction ...

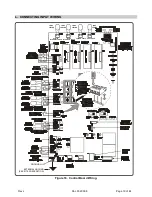
Page 19: ...of 44 L CONNECTING INPUT WIRING Figure 16 Control Board Wiring GROUND LUG EXTERNAL GROUND SEE SITE PREPERATION OUTSIDE INTERRUPT SENSE INSIDE INTERRUPT SENSE SHADOW SENSE EXIT SENSE LOOP SENSOR LOOP SENSOR LOOP SENSOR LOOP SENSOR ...

Page 20: ...Battery is used to store date and time M POST INSTALLATION PROCEDURES 1 Setup 1 Turn on the main power at the gate operator s circuit breaker 2 Verify that switch S2 the Gate Open Direction switch is set to the correct position 3 Turn on the unit power switch 2 Manual inputs 1 Verify that Manual Open fully opens the gate and that the open limit switch stops the gate 2 Verify that Manual Close full...

Page 21: ...7 and 8 7 Reclose Timer RT If Reclose Timer has been enabled in programming step 8 verify Reclose Timer as follows 1 Activate any entry command except Manual OPEN to open the gate 2 Start timing when the gate reaches fully open and verify that the Reclose Timer recloses the gate after the desired interval NOTE Reclose Timer is not functional when the Manual OPEN command is used 8 Inside Interrupt ...

Page 22: ...de the fence line While the gate is closing put your hand or arm through the Outside Photo Sensor beam The gate should stop The gate should restart when the obstruction your hand is removed Coverage Area C Outside Closed Coverage Stand outside the fence line While the gate is closing put your hand or arm through the Outside Photo Sensor beam The gate should stop The gate should restart when the ob...

Page 23: ...e operator control box 2 Make sure that gate operator unit power switch is turned on 3 Install gate operator cover and secure with four bolts 4 Turn on power to the gate operator at the circuit breaker 5 Cycle the gate to ensure it is operating properly Gate Operator Cover in place Clear Plastic Cover Control Box Cover Mounting Bolt 4 places Gate Operator Cover ...

Page 24: ...LL REMOTE CONTROL CODES Press and hold the learn button on the receiver panel until the indicator light turns off about 6 seconds All transmitter codes are now erased Then follow the steps above to reprogram each remote control To prevent possible SERIOUS INJURY or DEATH from electrocution Be sure power is not connected BEFORE installing the receiver To prevent possible SERIOUS INJURY or DEATH fro...

Page 25: ...venience The model SL 1000 has connectors for four LiftMaster supplied loop detector add on boards These boards interface with Interrupts and Exit loop sensors which simply plug into the control board The add on boards can be ordered pre installed or can be installed in existing model SL 1000 units See Figure 22 below for a sample layout Figure 22 Gate Layout with Loop Detectors ...

Page 26: ...00 VAC to 130 VAC CAUTION HIGH VOLTAGE Measure with care Fault Causes Refer to the end of the troubleshooting section 1 OPERATOR IS DEAD When the unit power switch is cycled the 7 segment display does not spell out HELLO sequentially 1 The main circuit breaker is off 2 The unit power switch is off 3 The input power connector is not connected securely to the Control Board 4 Low input AC voltage 5 B...

Page 27: ...TE STOPS WHEN A VEHICLE APPROACHES THE GATE FROM INSIDE Gate Type is set to Swing or Linear causing the Interrupt loops or Photo Sensors to stop the gate 9 GATE OPENS BUT DOES NOT CLOSE 1 Reclose Timer is disabled 2 One of the inputs is continuously activated a stuck input 3 Entry system is connected to the Manual Input 10 GATE DOESN T STOP AT THE LIMIT 1 Limit cams are out off adjustments 2 Limit...

Page 28: ...t 3 Interrupt loop or loop detector is not working properly 18 INTERRUPT LOOP DOES NOT ACT PROPERLY 1 Improper Gate Type setting programming step 1 2 Bad loop sensor or loop detector 3 Bad connection between the loop sensor loop detector and the Control Board 4 GATE TYPE is programmed to SWING or LINEAR 19 MAGLOCK DOES NOT WORK 1 Bad connection between Maglock its power supply and the Control Boar...

Page 29: ...puts FIRE Cycle Radio EXIT B If two sequential faults a combination of faults 1 through 3 and Photo Sensor activation occur during opening or closing gate stops and Obstruction Alarm sounds off for 5 minutes Fault may be cleared by removing the obstruction and cycling Manual Inputs or FIRE C If fault 4 occurs gate stops and Obstruction Alarm sounds off for 5 minutes Fault may be cleared by cycling...

Page 30: ... before the start of the gate movement 3 Stalled motor at open or close limit 4 Bad limit switch 5 IF MAX RUN TIME LED IS TURNED ON 1 Limit cams do not engage the limit switches 2 The belt or chain has been broken 3 The belt slips during gate movement 4 Limit switch cable is disconnected 5 Bad limit switch 6 Stalled motor ...

Page 31: ...bly 5 Limit switches contacts must bounce back rapidly when they are pressed and release Cam lock plate see Figure 15 must firmly hold the cams Do not oil gearbox shaft 6 Belt Check for wear and tension 25 to 30 lbs Adjust the AC motor up or down to set proper tension 7 Pulleys must all line up and be firmly secured to their shafts Tighten set screws if loose 8 Gear Box Check for no oil leakage ar...

Page 32: ...ff power to the gate operator at the circuit breaker 2 Remove the cover mounting bolts and remove the gate operator cover 3 Perform preventive maintenance tasks 3 to 14 above 4 After completing all checks perform the procedure found in Part 2 System Installation Paragraph M Post Installation Procedures Gate Operator Cover in place Clear Plastic Cover Control Box Cover Mounting Bolt 4 places Gate O...

Page 33: ...f the maintenance schedule Write the inspection date in the left hand box and check the boxes across as you perform your maintenance procedures MAINTENANCE SCHEDULE TABLE Date Gate Chain Sprocket Idler Assy Limit Switches Belt Pulleys Gear box Control Board Wiring No Rust Fire Open Obstr Alarm ...

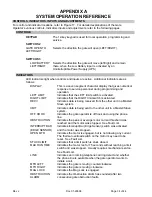
Page 34: ...RECV Indicates data is being received from the other unit in a Master Slave system XMIT Indicates data is being sent to the other unit in a Master Slave system OFF HOOK Indicates the gate operator is off hook and using the phone line OBSTRUCTION Indicates the peak or average motor current threshold was reached and the motor was stopped See Fault List INTERRUPT BAR Indicates Interrupt Bar Edge Sens...

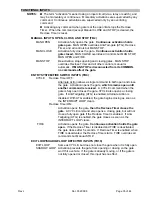
Page 35: ...ternate Action allows a single command to both open and close the gate Activation opens the gate which remains open until another command is received A CYCLE command when the gate is fully open closes the gate CYCLE also opens a closing gate If Anti Tailgating ATG is enabled Alternate Action is disabled With ATG enabled the gate begins closing as soon as the INTERRUPT LOOP clears Reclose Timer ON ...

Page 36: ... gate and deactivation restarts the gate IF GATE TYPE IS SLIDE OR BARRIER Inside Photo Sensor Activation stops an opening gate and deactivation restarts the gate Outside Photo Sensor Activation stops a closing gate and deactivation restarts the gate INTERRUPT BAR INPUTS TB11 INTERRUPT BAR Activation causes gate to stop and reverse a few inches INS OUTS INT SENSE SHADOW SENSE EXIT SENSE TB12 TB13 T...

Page 37: ...able pot controls gate sensitivity to blockages by the LEFT R160 instantaneous rise in motor current When the limit is exceeded the gate reverses a programmed distance minimum 2 inches NOTE LiftMaster gate operators have two obstruction sense adjustments left and right where other gate operators have only one This allows greater flexibility of installation For instance you can install a gate on an...

Page 38: ...C KIT DISCONNECT ACTUATOR ARM 1 15 K75 18953 SVC KIT DISCONNECT RELEASE HANDLE 1 16 K75 18954 SVC KIT DISCONNECT COMPLETE 1 17 K75 20026 SVC KIT MOTOR 1 18 K75 20030 G SVC KIT COVER 1 19 K75 20156 SVC KIT IDLER PULLEY 1 20 K76 20012 ASSY ALARM 1 21 K76 20030 SVC KIT CONTROL BOX 1 22 K78 18888 SVC KIT METAL CHASSIS 1 23 K94 20021 SVC KIT CABLE MOTOR 1 24 K94 20133 SVC KIT CABLE LIMIT 1 25 K94 20221...

Page 39: ...Rev J Doc 01 20098 Page 39 of 44 Figure 24 Exploded View ...

Page 40: ...ing Diode LEDs are indicators placed on the controller board which light up to indicate an action in the system Limit switch A switch which its closure indicates the gate has reached its open or close limit causing the gate to stop There are two limit switches open and close Limit cam An object which its excursion corresponds to the gate traveling distance and closes the limit switch at the open o...

Page 41: ...ed as soon as possible When you are notified you will be given the opportunity to correct the problem and informed of your right to file a complaint with the FCC In the event that any repairs are ever needed on your system they should be performed only by an authorized representative of LiftMaster Inc DISCONNECTION If you should ever decide to permanently disconnect your operator from its present ...

Page 42: ...a representative designated by the supplier Any repairs or alterations made by the user to this equipment or equipment malfunctions may give the telecommunications company cause to request the user to disconnect the equipment Users should ensure for their own protection that the electrical ground connections of the power utility telephone lines and internal metallic water pipe system if present ar...

Page 43: ...Rev J Doc 01 20098 Page 43 of 44 OPERATOR NOTES ...

Page 44: ...n may not be distributed without the prior written consent of LiftMaster The software and firmware included in the LiftMaster product as they relate to this documentation are also protected by copyright and contain information proprietary to LiftMaster FOR TECHNICAL SUPPORT OR TO ORDER REPLACEMENT PARTS CALL OUR TOLL FREE NUMBER 800 528 2806 Tucson AZ Monday through Friday 5 AM 6 PM Saturday 7 AM ...

Reviews: