background image

24

To prevent possible SERIOUS INJURY from a moving chain:
•   DISCONNECT electric power to the operator BEFORE manually 

operating your door.

•   If possible, use emergency disconnect ONLY when door is 

CLOSED. Weak or broken springs or unbalanced door could 
result in an open door falling rapidly and/or unexpectedly.

•   NEVER use emergency disconnect unless doorway is clear of 

persons and obstructions.

ATTENTION

AVERTISSEMENT

AVERTISSEMENT

AVERTISSEMENT

WARNING

CAUTION

WARNING

WARNING

WARNING

PRECAUCIÓN

ADVERTENCIA

ADVERTENCIA

ADVERTENCIA

ELECTRICAL INTERLOCK WITH HOIST FOR MODELS MH AND MHS

Chain Keeper
(with pad locking provisions)

Keyhole Bracket

EMERGENCY DISCONNECT FOR MODELS MJ

EMERGENCY DISCONNECT

This operator has provisions for manually operating the door in case of emergency or power failure. Refer to the appropriate instructions 
below for your model operator. 

MODEL MH

These operators are equipped with a manual hoist. An electrical 
interlock will disable the electrical controls when the hoist is used. 

Pull the disconnect chain (sash chain) to engage the hoist 
mechanism. The disconnect chain may be locked in position 
by slipping the end through the keyhole of the chain keeper 
mounted on the wall.

Operate the door in the desired direction by pulling on one 
side or the other of the continuous loop hoist chain.

The disconnect chain must be released from the chain keeper 
before the door will operate again electrically.

1

2

3

MODEL MHS

The MHS operator includes both a fl oor level disconnect sash 
chain to disconnect the door from the door operator that allows 
manual push up operation and an additional sash chain to engage 
the manual chain hoist that also electrically disables the operator 
controls.

Refer to Model MH instructions for hoist operation.

Refer to Model MJ instructions for manual operation.

When the manual chain hoist sash chain is engaged, electrical 
operation will not function.

1

2

MODELS MJ AND MGJ

This operator has a fl oor level disconnect chain to disconnect the 
door from the door operator.

To disengage, pull the chain and secure in the disengaged 
position by slipping the end through the keyhole bracket 
mounted on the wall. Or if emergency egress device is used, 
pull handle to disengage operator from door.

The door may now be pushed up or pulled down manually. 

Release the disconnect chain or reset the emergency egress 
device to operate the door again electrically.

1

2

3

Summary of Contents for LiftMaster MGJ5011U

Page 1: ...15 MHz Now with Built in Radio Receiver 315 MHz Your model may look different than the model illustrated in this manual THIS PRODUCT IS TO BE INSTALLED AND SERVICED BY A TRAINED DOOR SYSTEMS TECHNICIAN ONLY Visit www liftmaster com to locate a professional installing dealer in your area Serial located on electrical box cover Installation Date 2 YEAR WARRANTY OPERATOR RATING 12 cycles per hour 50 c...

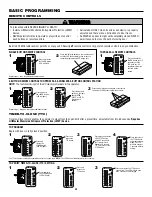
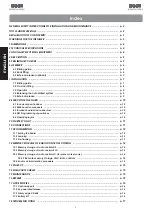
Page 2: ... Connections 11 12 Install 3 Button Control Station 12 13 Setup Radio Antenna 13 14 ADJUSTMENT 15 Adjust the Limits 15 Adjust the Clutch 15 ENTRAPMENT PROTECTION 16 19 LiftMaster Monitored Entrapment Protection LMEP 16 Install the Photoelectric Sensors 17 Mount the Photoelectric Sensors 18 Entrapment Protection Wiring Options 18 19 LOGIC BOARD LAYOUT 19 BASIC PROGRAMMING 20 23 Determine the Wiring...

Page 3: ...ALLATION INSTRUCTIONS 1 READ AND FOLLOW ALL INSTALLATION WARNINGS AND INSTRUCTIONS 2 Install door operator ONLY on properly balanced and lubricated door An improperly balanced door may NOT reverse when required and could result in SEVERE INJURY or DEATH 3 ALL repairs to cables spring assemblies and other hardware MUST be made by a trained door systems technician BEFORE installing operator 4 Disabl...

Page 4: ...lose feature allows the door to automatically close after a preset time only available with B2 wiring and a monitored entrapment protection device Wiring Types The functionality of the operator is based on the wiring type The operator is shipped from the factory in standard C2 wiring type factory default Some wiring types will require an optional monitored entrapment protection device Refer to Bas...

Page 5: ...Y Hanging Weight 60 LBS 27 22 kg A A A A B B B B 6 34 16 1 cm Hand Chain Wheel present with Model MH only 7 19 18 26 cm 12 69 32 23 cm MOUNTING DIMENSIONS A Wall Mounting B Bracket Mounting rolling door 6 34 16 1 cm 12 15 30 86 cm 15 78 40 03 cm 18 87 47 93 cm 3 1 7 87 cm 3 25 8 26 cm 6 13 15 57 cm 9 19 23 34 cm 6 5 16 51 cm 7 17 78 cm 14 75 37 47 cm 5 50 13 97 cm OPERATOR SPECIFICATIONS WEIGHTS A...

Page 6: ... 23 cm second depending on door setup OUTPUT FORCE 125 ft lbs sec MGJ ONLY 40 ft lbs sec OUTPUT RPM MJ 80 RPM MH 80 RPM MHS 38 6 RPM MGJ 23 RPM LIMIT ADJUST Fully adjustable up to 14 door Max DUTY 12 Cycles per Hour Max 50 Cycles per Day Max DRIVE TRAIN Maintenance Free Bearings MGJ ONLY Maintenance Free Bearings Wormgear in Oil Bath Reducer FINISH Powder coated Corrosion Resistant Steel ENVIRONME...

Page 7: ... off to the side near the top of the door jamb Output Shaft PREPARING YOUR DOOR The manufacturer recommends 3 feet 91 4 cm of clearance in front of operator for serviceability Before you begin Disable locks Remove any ropes connected to door Before the operator is installed be sure the door has been properly aligned and is working smoothly Although each installation will vary due to particular bui...

Page 8: ...oor shaft and operator drive shaft is 12 15 inches WALL MOUNT SHELF OR BRACKET MOUNTING Door Shaft Operator Drive Shaft Door Shaft Operator Drive Shaft TYPICAL INSTALLATION NOTE The illustrations may not depict your installation INSTALL THE OPERATOR Place door sprocket on door shaft Door Sprocket Door Shaft 1 Place operator door sprocket on operator Operator Drive Sprocket Drive Shaft 2 Optional M...

Page 9: ... chain is taut not tight If chain is too tight it may cause damage to operator Keep door sprocket and operator door sprocket aligned If sprockets are not aligned they may cause premature wear on the chain Secure both sprockets with key and set screw If sprockets are not secure they may drift and cause damage to operator Set Screw Door Sprocket 5 7 6 INSTALL THE OPERATOR Secure operator to mounting...

Page 10: ...nd Chain Wheel The MHS operator includes both a floor level disconnect sash chain to disconnect the door from the door operator that allows manual push up operation and an additional sash chain to engage the manual chain hoist that also electrically disables the operator controls Keyhole Bracket Chain Retaining Bracket with pad locking provisions Secure keyhole bracket to wall 4 feet above the flo...

Page 11: ... wiring MUST be run in separate conduit ON EMENT AVERTISSEMENT AVERTISSEMENT NG N WARNING WARNING WARNING ÓN ADVERTENCIA ADVERTENCIA NCIA POWER AND GROUND WIRING CONNECTIONS NOTE Power and control wiring must be run in separate conduit in accordance with national and local electrical codes Must use 14 AWG or heavier wire for power wiring Use conduit knockouts for wiring as indicated on the electri...

Page 12: ...control station far enough from the door to prevent the user from coming in contact with the door while operating the controls Install the entrapment warning placard on wall next to the control station in a prominent location that is visible from the door NEVER permit children to operate or play with door control push buttons or remote controls Activate door ONLY when it can be seen clearly is pro...

Page 13: ...ol Common Locate the wire antenna on the outside of the electrical box Cut the wire tie closest to the edge of the electrical box Press the plastic standoff into the hole in the side of the electrical box SETUP RADIO ANTENNA OPTION A Wire Ties Antenna Standoff Antenna Cut Wire Tie 1 Cut this Wire Tie 2 TYPICAL INSTALLATION INSTALL 3 BUTTON CONTROL STATION Fasten the entrapment warning placard next...

Page 14: ... controls out of reach of children NEVER permit children to operate or play with door control push buttons or remote controls 3 ONLY activate door when it can be seen clearly it is properly adjusted and there are no obstructions to door travel 4 ALWAYS keep door in sight until completely closed NO ONE SHOULD CROSS THE PATH OF THE MOVING DOOR 5 NO ONE SHODULD GO UNDER A STOPPED PARTIALLY OPENED DOO...

Page 15: ...or Travel OPEN Limit Switch OPEN Limit Nut CLOSE Limit Switch CLOSE Limit Nut SAFETY Limit Switch Decrease Door Travel Increase Door Travel NOTE When retaining plate is released verify that the retaining plate is fully seated with the notches of the limit nut ADJUSTMENT 1 2 3 FOR MODELS MJ MH AND MHS ONLY 1 2 3 4 ADJUST THE CLUTCH To avoid SERIOUS personal INJURY or DEATH from electrocution Discon...

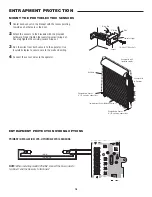
Page 16: ...ERTISSEMENT WARNING CAUTION WARNING WARNING WARNING PRECAUCIÓN ADVERTENCIA ADVERTENCIA ADVERTENCIA LIFTMASTER MONITORED ENTRAPMENT PROTECTION LMEP Safety Reversing Sensor Invisible Light Beam Protection Area Safety Reversing Sensor Right Side of Garage Left Side of Garage Photoelectric Sensor 6 15 cm max above floor Photoelectric Sensor 6 15 cm max above floor Invisible Light Beam Protection Area EN...

Page 17: ...Lag Screws 1 4 20x1 2 Carriage Bolts with square shoulders 1 4 20 Lock Nuts Inside Wall Mounting Bracket with Slot Mounting Bracket with Square Holes C Wrap Mounting Bracket with Slot Mounting Bracket with Square Holes C Wrap Sensor with Wire Indicator Light Floor Inside Wall Inside Wall C Wrap Mounting Bracket with Square Holes 1 4 Lock Nuts Door Track Drill 3 8 Holes 1 4 20x1 2 Carriage Bolts Se...

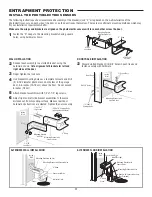
Page 18: ...ointing toward each other across the door Attach the sensors to the brackets with the provided hardware Finger tighten the receiving sensor wing nut Securely tighten the sending sensor wing nut Run the wires from both sensors to the operator Use insulated staples to secure wire to the wall and ceiling Connect the sensor wires to the operator 1 2 3 4 Wire Indicator Light C Wrap Wing Nut 1 4 20x1 1 ...

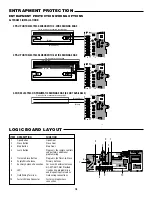
Page 19: ... connections 10 Factory Wiring Connector Factory wiring harness connection ENTRAPMENT PROTECTION WIRING OPTIONS ENTRAPMENT PROTECTION AUX ANT AUX ANT D14 COM INTRLK STOP LED OPEN CLOSE TTC LEARN 1 LMEP1 LMEP2 2 3 4 5 6 7 STOP CLOSE OPEN AUX ANT AUX ANT D14 COM INTRLK STOP LED OPEN CLOSE TTC LEARN 1 LMEP1 LMEP2 2 3 4 5 6 7 STOP CLOSE OPEN AUX ANT AUX ANT D14 COM INTRLK STOP LED OPEN CLOSE TTC LEARN...

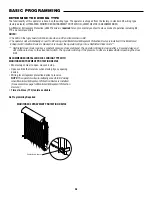
Page 20: ...ator will go into a Restricted Close mode Restricted close mode requires a constant pressure close command The operator will begin closing after a 5 second delay and will continue to close to the close limit switch The operator will stop if the pressure to close is released before reaching the close limit RECOMMENDED INSTALLATION B2 WIRING TYPE WITH MONITORED ENTRAPMENT PROTECTION DEVICE Momentary...

Page 21: ...2 INTRLK COM STOP CLOSE OPEN STOP CLOSE OPEN AUX ANT Logic Board Electrical Box D14 LED LEARN 1 2 3 4 5 6 7 STOP CLOSE OPEN ALTERNATE INSTALLATION C2 WIRING TYPE WITHOUT MONITORED ENTRAPMENT PROTECTION DEVICE FACTORY DEFAULT Momentary contact to open and stop with constant pressure to close Open override that reverses when closing by any opening device Wiring for entrapment protection device to re...

Page 22: ...CONTROL 3 BUTTON REMOTE CONTROL TO OPERATE AS A WIRELESS 3 BUTTON CONTROL STATION NOTE The feature will use 3 of the 20 memory channels in the operator TO ERASE ALL REMOTE CONTROLS BASIC PROGRAMMING 1 Press and release the LEARN button LED will light 2 Repeat steps 1 and 2 for additional remote controls 1 2 3 Press and hold the LEARN button LED will light Press the desired button on the logic boar...

Page 23: ...s STOP button The door should stop Press CLOSE button The door should move in the close direction Release CLOSE button Door should stop if in C2 mode The door should continue closing if in B2 mode Press STOP button The door should stop 1 2 3 TEST 3 BUTTON CONTROL STATION 4 5 Press OPEN button The door should open Allow the door to fully open Press CLOSE button The door should close Allow the door ...

Page 24: ... by slipping the end through the keyhole of the chain keeper mounted on the wall Operate the door in the desired direction by pulling on one side or the other of the continuous loop hoist chain The disconnect chain must be released from the chain keeper before the door will operate again electrically 1 2 3 MODEL MHS The MHS operator includes both a floor level disconnect sash chain to disconnect th...

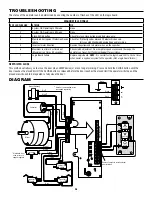
Page 25: ...rol wiring DOOR DRIFTS AFTER OPERATOR STOPS A Door not balanced properly Disconnect trolley assembly and check door for proper operation B Clutch slipping Adjust clutch see ADJUSTMENT section C Brake not functioning properly Check brake mechanism to ensure brake lever is free and brake pads are engaging the brake disc DOOR OPENS CLOSES TOO FAR Limits not adjusted properly Adjust limits See ADJUSTM...

Page 26: ...ction Reverse the yellow and red motor wires on the capacitor 6 Maximum run timer has timed out Maximum run time 90 seconds Check clutch adjustment Door height or speed may exceed the range the operator can travel Call Technical Support for assistance 7 Logic Board Failure Replace Logic Board NOTE It is normal for the logic board LED to flash 4 times when power is applied or cycled to the operator ...

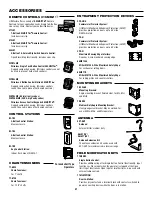
Page 27: ...e while the door is in motion 373LM WPB3LM3 371LM WPB1LM3 3 Button SECURITY Remote Control Includes visor clip Wireless 3 Button Control Station SECURITY Rugged composite housing Wireless controls cannot be used in place of hard wired controls 1 Button SECURITY Remote Control Includes visor clip Wireless Single Push Button Control SECURITY Rugged composite housing Wireless controls cannot be used ...

Page 28: ... Operator 3 BUTTON STATION OR 3 POSITION KEYSWITCH WITH SPRING RETURN TO CENTER AND STOP BUTTON 2 OR MORE KEY LOCKOUT 7 6 3 5 Stop Close Open Stop Close Open 7 6 3 5 Stop Close Open 2 BUTTON STATION OR 3 POSITION KEYSWITCH WITH SPRING RETURN TO CENTER STANDARD 7 6 3 Close Open C2 MODE ONLY 2 OR MORE 7 6 3 Close Open Close Open C2 MODE ONLY DEVICE TO REVERSE EXTERNAL INTERLOCK 1 2 3 4 3 4 Remove Fa...

Page 29: ... PARTS DEVANCO CANADA 19192 HAY ROAD UNIT Q SUMMERSTOWN ON K0C 2E0 TOLL FREE 855 931 3334 www devancocanada com WHEN ORDERING REPAIR PARTS PLEASE SUPPLY THE FOLLOWING INFORMATION 3 PART NUMBER 3 DESCRIPTION 3 MODEL NUMBER ...

Reviews: