


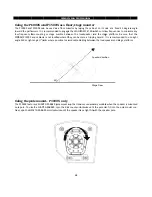


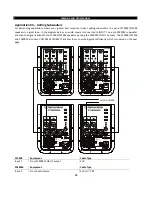


P10
The
pow
(A)
The
is se
setti
loud
(B)
The
inclu
Belo
the f
(C)
The
safe
(D)
The
fan s
000X, P1
P1000X, P15
wer connectio
MAIN P
loudspeaker
et to the pro
ing, be sure
dspeaker.
POWER
power inlet
uded with the
ow the powe
fuse with rat
MAIN P
ON/OFF mas
level before
FAN
fan is autom
should never
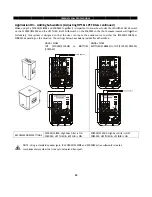
500X and
500X and P1
ons and desc
POWER VOL
r can be used
oper voltage
the proper f
INLET & FU
is an IEC re
e loudspeake
r inlet is the
ted-equivalen
POWER SWI
ster switch c
e placing the
matically cont
r be blocked
d P1800S
800SX powe
riptions belo
LTAGE SELE
d with 100-1
before conn
fuse has bee
USE
eceptacle typ
er.
fuse holder
nt (see Speci
ITCH
ontrols the p
loudspeaker
trolled by th
in order to in
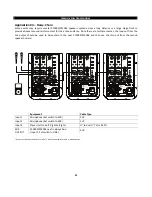
CERWIN
SX Power
er connection
ow to insure
CTOR
120V AC or 2
necting the p
n installed. A
pe and shou
that can onl
fication sect
power to the
r into an ‘ON’
e loudspeake
nsure proper
-VEGA! PROF
13
r Connect
ns are locate
proper use.
20-240V AC
power cord.
Any failure t
uld only be u
ly be accesse
ion).
loudspeake
’ condition.
er and provid
r cooling air f
ESSIONAL
tions - Re
ed on the rea
power supp
In addition,
o meet thes
used with th
ed when the
r. Be sure all
des air-flow
flow to the e
ear Panel
ar panel. It i
ly lines. Be s
if the selecto
e instruction
he power cor
power cord
connections
ventilation f
electronics.
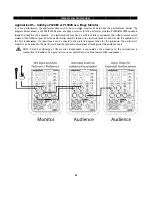
l
s suggested
ure the volta
or is adjuste
ns may result
rd, or rated-
is removed.
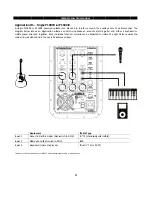
s and audio s
for the intern
to understa
age selector
ed from its sh
t in damage
-equivalent,
Be sure to r
settings are s
nal electronic
nd the
switch
hipped
to the
that is
replace
set at a
cs. The


