Cerwin-Vega CV62BM Owner'S Manual Download Page 2

We reserve the right to change the products and specifications at any time without notice.

Images may or may not include optional equipment.

Introduction

Installation

1

Notes On Installation


The unit is designed for 12V DC negative ground operation system only. 

Before installing the unit, make sure your vehicle is connected to DC12V negative 
ground electrical system.


The negative battery terminal must be disconnected before making

connections, which can decrease the chance of damaging the unit due to 
short circuit.


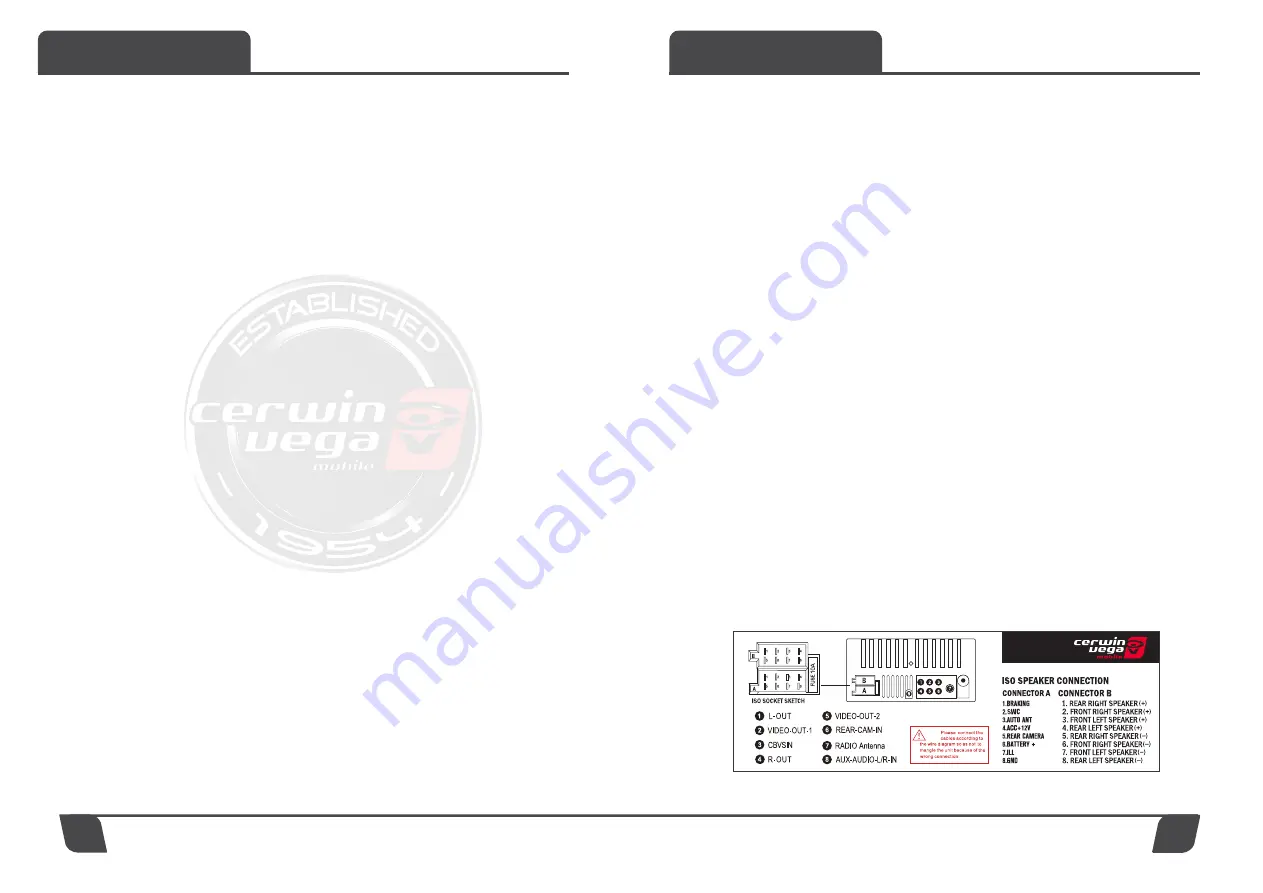
Be sure to connect the color coded leades correctly according to the

diagram. Incorrect connection may cause the unit malfunction or damage the 
vehicle electrical system.


Be sure to connect the speaker (-) leads to the speaker (-) terminal.

Do not connect the left and right channel speaker cables to each other to the
vehicle body.


Do not block vent or radiator panel. Blocking them will cause heat

build up inside and may result in fire .


After the completion of the installation and begin to play the unit 

(including replacing the battery), please press the RESET button on the front
panel with pointed objects (such as ball-point pen) to set the unit to initial status.

2. Wiring Diagram

Cerwin Vega Mobile Radio

Congratulations for purchasing Cerwin Vega Mobile Radio for your car audio system. 

You have chosen Cerwin Vega Mobile because you deserve the best!

Cerwin Vega Mobile Radio are designed and engineered to reproduce great sound 

quality for many years of listening enjoyment in your vehicle! We highly recommend that 

your new speakers be installed by an authorized Cerwin Vega Mobile dealer. Your 

authorized dealer can professionally assemble/disassemble the interior of your vehicle 

and set the proper speaker placement for ideal sound quality.

If you decide to install the speakers by yourself, please thoroughly read through this 

manual before getting started. This manual will help familiarize yourself with these 

speakers and guide you through the installation process and procedures.

Please contact your local authorized Cerwin Vega Mobile dealer if you have any 

questions regarding the instructions in this manual. If you require additional assistance, 

please contact the Cerwin Vega Mobile Technical Support Department during business 

hours at 213-261-4161.

Summary of Contents for CV62BM

Page 1: ...1 South Hill St Los Angeles CA 90007 213 261 4161 2022 Cerwin Vega Mobile All rights reserved a division of CV DA Holdings Inc CERWINVEGAMOBILE COM CV62BM CV7BM 6 2 TOUCH SCREEN MP5 PLAYER WITH WIRELE...

Page 2: ...e battery please press the RESET button on the front panel with pointed objects such as ball point pen to set the unit to initial status 2 Wiring Diagram Cerwin Vega Mobile Radio Congratulations for p...

Page 3: ...connect with power press POWER key button of the unit or the POWER key button of the remote control the unit will turn on and enter into the radio interface The radio interface is as shown below Radi...

Page 4: ...play or pause the song or select the previous or next station when playing MP3 or BT music or in radio mode Radio Bluetooth USB If unit without USB when press this icon it will display No Device Phon...

Page 5: ...a folder in SD or USB click to enter the small keyboard to directly input the number to select the corresponding folder Song List Play progress bar press and slide to adjust the play progress at will...

Page 6: ...tc Folder selection such as when there is a folder in SD or USB click to enter the small keyboard to directly input the number to select the corresponding folder Video List Switch to the last function...

Page 7: ...Key Press to enter BT calling interface as shown below BT call log interface is as follows Received Call History Dialed call Records Rejected Call History Clock to Download Call Log Press to enter int...

Page 8: ...on enters the mobile internet interface as shown below Tips 1 When all connection interfaces are not connected to the mobile phone press the lower right corner icon to exit phonelink 2 The rear USB is...

Page 9: ...adjust the resolution of your phone 4 If the mobile phone cannot be connected all the time please try to restart the mobile phone or press RESET key of the unit to reset and reconnect 5 Autolink Andro...

Page 10: ...disconnect the bluetooth connection 2 Miracast Android Wifi Connection is successful the unit will display the phone mirror as shown below Miracast Android Wifi successful connection interface is as f...

Page 11: ...lp 1 Please click the permission for the relevant bullet box 2 On the phone Change the USB cable and reconnect it once Reminder 1 The sound transmission is not affected when bluetooth is not connected...

Page 12: ...r to the help page press icon to enter help page as follow Connecting Method Help Page 1 Only support audio photo share and screen mirror can t support video share in video s app 2 A few seconds after...

Page 13: ...Carplay Help 1 Please click the permission for the relevant bullet box 2 On the phone change the USB cable and reconnect it once Setting Press icon in the main interface to enter into setting 1 Choos...

Page 14: ...e speaker area settings press icon to enter EQ settings including 16 segment EQ Choose settings interface icon to enter video setting as follow The video settings list are as follows Video ratio setti...

Page 15: ...choose corresponding key button to select the prefer key button learning is successful Save learned button Clear all learned keys The square in the lower right corner of the interface is the button v...

Reviews: