Installing the CP 3100
Installing a Desktop CP 3100
36
Installing a Desktop CP 3100
Installing a desktop CP 3100 involves the following steps:
1.
“Items You Must Supply” on page 36
2.
“Reviewing the SCSI ID” on page 36
3.
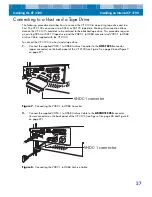
“Connecting to a Host” on page 37
4.
“Connecting to a Tape Drive” on page 37
5.
“Terminating the SCSI Chain” on page 38
6.
“Connecting to the Network” on page 38
7.
“Powering-up the Desktop CP 3100” on page 38
8.
“Installing the Driver” on page 39
9.
“Registering the CP 3100” on page 39
Items You Must Supply
To install the desktop CP 3100, you may need the following additional items:
•
An external Ultra 160 SCSI cable and terminator for connecting the CP 3100 to the host.
•
Another external Ultra 160 SCSI cable and terminator if you intend to connect an existing
SCSI tape drive.
•
A Phillips screwdriver and other appropriate tools.
Reviewing the SCSI ID
Each SCSI device on the bus must have its own unique ID.
•
CP3100D-160 units inherit the SCSI ID of the tape drive to which they are attached. If another
device on the SCSI bus uses this SCSI ID, change the SCSI ID on the tape drive or on the other
device.
•
CP3101D-160 units default to SCSI ID 6. If another device on the SCSI bus uses this SCSI ID,
change the SCSI ID on the other device to one that is not being used by any other device on
the SCSI bus. If this is not possible, use the SCSI ID selector switch on the back panel of the
CP3101D-160 to select a unique SCSI ID for the unit.
Note: Do not set the archive tape drive to SCSI ID 7. For best performance, it is strongly recom-
mended that the CP 3100 be attached to a dedicated SCSI Ultra 160 controller with no other
SCSI devices on the same SCSI cable.
Note: Do not set the CP 3100 selector switch to SCSI ID 7. For best performance, it is strongly
recommended that the CP 3100 be attached to a dedicated SCSI Ultra 160 controller with no
other SCSI devices on the same SCSI cable.


