


11
11
MOODLINER 1430WP User Manual
Eng
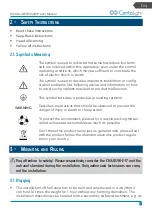
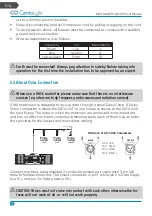
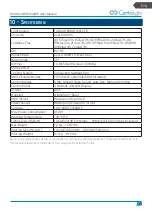
5.4. DMX Terminator
120ohm, 1/4W
Resistor
DMX Terminator
DMX is a resilient communication protocol, however errors still
occasionally occur. In order to prevent electrical noise from dis-
turbing and corrupting the DMX control signals, a good habit is to
connect DMX output of last fixture in the chain to a DMX termina-
tor, especially over long signal cable runs.
The DMX terminator is simply an XLR connector with a 120Ω
(ohm), 1/4 Watt resistor connected across Signal (-) and Signal (+),
respectively, pins 2 and 3, which is then plugged into the output
socket on last projector in the chain. The connections are illustrat-
ed below.
Complimentary signal cable can transmit signals to 20 unit fixtures at most.
Signal amplifier is a must to connect more fixtures.
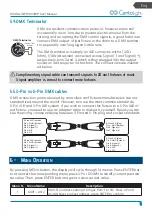
5.5. 3-Pin vs 5-Pin DMX cables
DMX connection protocols used by controllers and fixtures manufacturers are not
standardized around the world. However, two are the most common standards:
5-Pin XLR and 3-Pin XLR system. If you wish to connect this fixture to a 5-Pin XLR in-
put fixture, you need to use an adapter-cable or make it by yourself. Below you can
see the wiring correspondence between 3-Pin and 5-Pin plug and socket standards
5-Pins XLR (plug)
Pin 1: GND (Screen)
Pin 2: Signal (-)
Pin 3: Signal (+)
Pin 4: N/C
Pin 5: N/C
3-Pins XLR (socket)
Pin 1: GND (Screen)
Pin 2: Signal (-)
Pin 3: Signal (+)
5-Pins XLR (socket)
Pin 1: GND (Screen)
Pin 2: Signal (-)
Pin 3: Signal (+)
Pin 4: N/C
Pin 5: N/C
3-Pins XLR (plug)
Pin 1: GND (Screen)
Pin 2: Signal (-)
Pin 3: Signal (+)
6 - M
enu
o
PeraTion
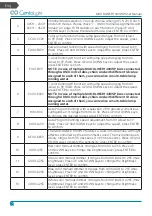
By pressing MENU button, the display will cycle through 14 menus. Press ENTER but-
ton to enter the corresponding menu, press UP or DOWN to modify current parame-
ter value. Then, press ENTER button again to save current value.
Menu N. Menu Name
Description
1
A001 – A512 DMX-512 address setting It ranges from 1 to 512. Press UP and
DOWN keys to adjust address; press ENTER to confirm.


