background image

11 

External Storage 

SD Card:

 (MAX 

1

TB)  

You can safely insert the SD card into your Android TV any when the unit is on or o

. Gently slide the card into 

the SD card slot un

til

 you feel it click into place. A removal storage SD icon will appear on the Android Home 

screen. You can safely remove the SD Card from your Android TV any

tim

e the TV is turned o

. If you need to 

remove the SD Card while your Android TV is on, you must (unmount)eject the SD Card from the device, this to 
prevent, corrup

ti

ng or damaging the SD Card.           

1. Select Se

tti

ngs from the Home screen

2. Select Storage & reset
3. Select SD Card
4. Select Eject
5. SD card is safely Ejected
6. Remove SD Card from the Android TV

USB:

 (Tested up to 1TB)          

You can safely insert the USB device when the TV is on or o

. Carefully insert the device into the USB port 

provided. A removable storage icon with the name of the USB will appear on the Android Home screen. You 
can safely remove the USB device from your Android TV any

tim

e the TV is turned o

. If you need to remove 

the USB device while your Android TV is on, you must (unmount)eject the USB device from the TV 

fir

st, this is 

to prevent, corrup

ti

ng or damaging the USB device.        

1. Select Se

tti

ngs from the Home screen

2. Select Storage & reset
3. Select USB name
4. Select Eject
5. USB name is safely Ejected
6. Remove USB device from the Android TV

If two large storage devices are connected to the TV at the same 

ti

me. You may experience that when 

powering on the TV the screen will be black/grey for a number of seconds before showing a picture. This is 
normal because on start-up, the TV will take some seconds to in

iti

alise the connected storage devices. 

Disconnect any storage devices if not in use if you want to prevent the above.  

The USB output is 5V 

 500mA 

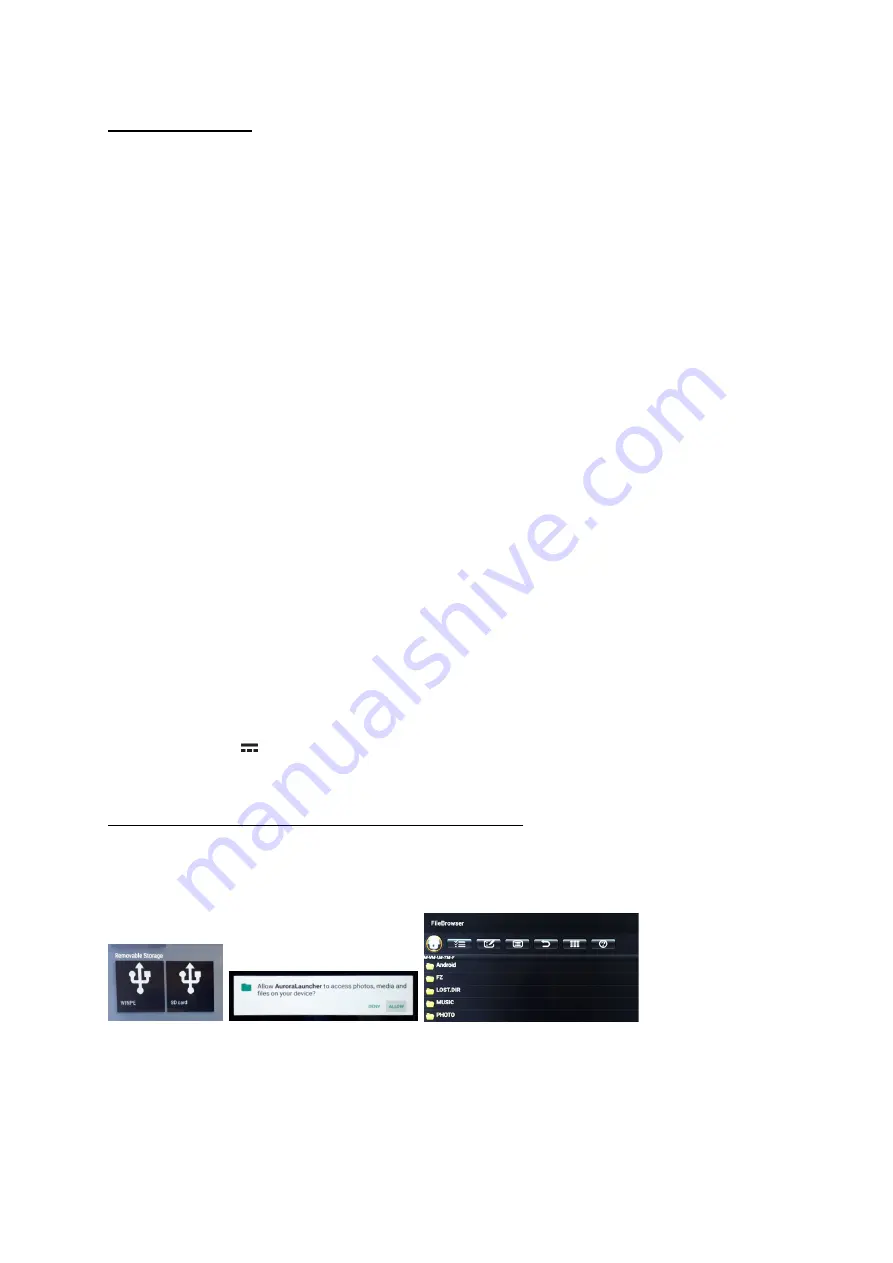
Accessing the external storage device on the TV 

A

fter i

nse

rti

ng the SD/USB device to your TV a “Removable Storage” icon will appear on the screen. Highlight 

and a

cti

vate the Icon you wish to access. Then select “allow” from the pop-up window. Highlight the SD/USB 

icon again and press OK the

 fi

le browser will open and show all 

fil

es on the device for your listening or viewing. 

Summary of Contents for C32SFS

Page 1: ...1 Super fast Android 7 Smart TV INSTRUCTION MANUAL 32 ...

Page 2: ...rt TV tuning 7 Factory reset Quick start function Source menu Channel selection options 8 Various TV options Volume adjust TV picture settings TV Sound settings 9 TV Timer Android Timer Smart TV settings 10 External Storage 11 Apps APKs 12 App Installer Appearance Icon Power key definition Recording 13 EPG timer record Instant record Pause live TV Maintenance 14 How to Install new TV software onli...

Page 3: ...e reference Whats in the box TV Stand Stand fixing Screws ST4 x 12 x 4 Power cable Remote control Batteries 2 x AAA Quick start guide Warranty card Fixing and the TV stand feet Place the TV face down on a soft and flat surface blanket foam cloth etc to prevent any damage to the TV 1 Attach the stand feet in the positions shown below and secure them with supplied screws ST4 x 12 x 4 Wall mounting T...

Page 4: ...nternet Router 2 IR IR Input 3 Headphone Headphone Earphone connector 4 Mini AV Connect devices with composite video and audio outputs 5 Digital Audio out Connect an Optical audio cable 6 Audio out RCA Connect to analogue audio receiver 7 HDMI x 4 Connect HDMI sockets on devices such as game consoles and DVD player 8 TV Aerial Connect the TV aerial 9 USB Play video audio and text files and use as ...

Page 5: ...n the TV and wait for the TV to power on and show a picture on the screen before inserting the batteries This enables the wireless remote control to pair correctly with the TV 1 Insert 2 x 1 5V AAA batteries making sure to match the and ends of the batteries with the and ends shown in the batterie compartment 2 Close the batterie compartment cover The Remote Control Operation Range 1 5 Meters is t...

Page 6: ...ecting to an external device Blu ray disc player Game console Set top box or personal computer with the HDMI cable Select the HDMI in the source menu and the TV will automatically detect the resolution coming from the device For the best picture quality adjust the device output resolution up to 3840 x 2160p Connecting a Digital Audio Receiver For a better sound quality you may want to listen to th...

Page 7: ...emote control and then select continue 5 Setup WIFI All WIFI options will be shown on the screen Select the one you want and if applicable type in the password to activate Once connected you will be prompted to sign into your Google account or create a new one To gain access to all apps and features it is essential that you log into a Google account If you do not want to Setup WIFI or log into or ...

Page 8: ...on the Android home screen and choosing Inputs Now select the source name you wish to change i e HDMI1 another menu will open now select custom name and type in the name of your choice i e XBOX S ONE see below example A list of other pre set names are also available Blu ray DVD Game Console and Cable for you to choose from if you prefer Close all menus by pressing the EXIT key on the remote contro...

Page 9: ...L up down key on the remote control The VOL up also turns off the mute function 2 Press the key on the remote control to turn on and off the mute function TV Picture Settings Press the Menu key on the remote control and select PICTURE Options for Picture mode Custom Settings Colour Temperature and Noise Reduction DNR will be available See below images for options available Press the EXIT key on the ...

Page 10: ... defaulted to turn off the TV after 3hours of inactivity Smart TV Settings Press the EXIT key when In TV mode this will activate the TV mode main user menu To access settings scroll down to the bottom line and select Settings 1 Language Allows you to set the menu Audio Subtitle EPG Visually Impaired and Hearing impaired languages 2 Channel Setup Allows you to organise and modify the Channel list Tu...

Page 11: ... TV anytime the TV is turned off If you need to remove the USB device while your Android TV is on you must unmount eject the USB device from the TV first this is to prevent corrupting or damaging the USB device 1 Select Settings from the Home screen 2 Select Storage reset 3 Select USB name 4 Select Eject 5 USB name is safely Ejected 6 Remove USB device from the Android TV If two large storage device...

Page 12: ...rowsers are available to download to the TV What is an APK File An APK file is an app created for Android Some apps come pre installed on Android devices while other apps can be downloaded from Google Play Apps downloaded from Google Play are automatically installed on your device while those downloaded from other sources must be installed manually One of the differences between the Android operat...

Page 13: ...en is in the Favourite apps row this will not be hidden Suggested Favourites Show or hide Recent Apps Row Show or hide Powerkey Definition This option determines in what power mode the TV will start To access this option In the Android Home screen press the MENU key on the remote control to access SETTINGS then scroll down to TV and press the OK key Activate Powerkey definition with the OK key Two...

Page 14: ... TV Settings menu and to view recordings To delete recording scroll down from Channels to highlight Recordings Press the OK key on the remote and choose the recording you wish to delete Pause live TV Press the pause key on the remote control to pause To restart the programme press the play key on the remote control Maintenance Be sure to disconnect the mains plug before cleaning the TV 1 Use a sof...

Page 15: ...ternet to your device If an update is available a prompt box as in the image below will show on your screen Select install and the update will automatically be installed to your TV Manual search for new Software update To manually check to see if a Software is available for your TV 1 Select the settings Icon on the Android launcher screen 2 Scroll down and select About 3 Select System Update 4 Sel...

Page 16: ...is set to Never Default setting is 3hrs Technical Specifications Screen size and system 32 LED Max Screen resolution 1366 H x 768 V Screen Brightness 200 Nits Contrast Ratio 1200 1 Power Source AC 100 240V Processor AM Logic 962 ARM Cortex A53 quad core CPU 1 5GHz RAM 1GB DDR4 GPU 5 core ARM Mali 450 Built in Flash memory 8GB Operating System Android 7 1 Energy Efficiency Class A Average Annual En...

Page 17: ...ould not be subjected to vibrations The mains socket should be located close to the TV and should be easily accessible This TV is designed for indoor use only Temperature Avoid extreme degrees of temperature either hot or cold Place the unit well away from heat sources such as radiators or gas electric fires Avoid exposure to direct sunlight and other sources of heat Naked Flames Never place any t...

Page 18: ...y from household waste If the battery of accumulator contains more than the specified values of Lead Pb mercury Hg and or cadmium Cd defined in the Battery directive 2006 66 EC then the chemicals symbols for Lead Pb mercury Hg Cadmium Cd will appear below the crossed out wheeled dust bin symbol By participating in separate collection of batteries you will help to assure the proper disposal of prod...

Reviews: