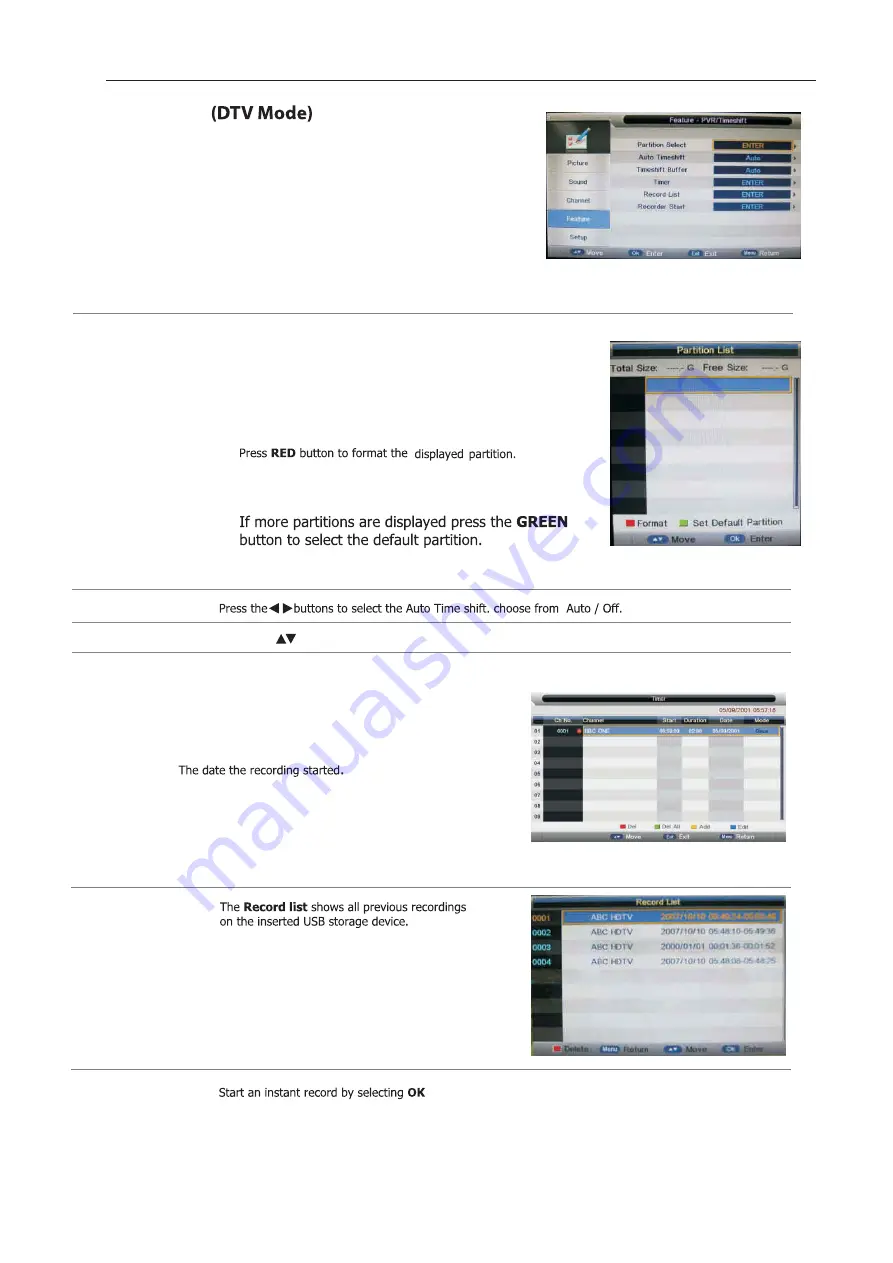
Cello C32224F-DLED User Manual Download Page 26

Partition Select

Press the 

OK

 buttons to select the Partition Select menu.

Display partition’ s infomation / Format partition function /
Set default partition function.

Auto Time shift

Timeshift Buffer

Press the       buttons to select the Timer shift buffer: Auto / 30Mins / 1hr / 2hr.

Timer

Press the 

OK

 button to select the Timer menu.

Record List

Feature Setting

1.

  Press the

 ▲▼

 buttons to select PVR/Time shift  then press the 

OK

 button 

      to confirm.

PVR/Time shift

Allows you to select your preferences in the PVR/Time shift

The list in the menu shows the partitions connected to system.

Total size and Free size.

Partitions 

Partitions' property

Format Partition

Set default partition 

CH NO.        

Channel number.

Channel      

Channel name.

Start            

Start recording time.

Duration     

The total recording time.

Date             
Mode            

Record Mode

.

On the left top of menu is current date and time .

Recorder Start

 2

5

Summary of Contents for C32224F-DLED

Page 1: ...C32224F DLED...

Page 2: ...Noise Reduction 17 Sound Setting 18 Sound Mode 18 Bass Avaliable just in USER Mode 18 Treble Avaliable just in USER Mode 18 Balance 18 SRS TruSurround HD 18 SPDIF 18 Channel Setting 19 21 Channel Man...

Page 3: ...rce in PC 26 HDMI Mode 26 Blue Screen 26 Reset TV Setting 26 Software Upgrade 26 Electonic programme guide EPG 27 Teletext options 28 Connecting a USB storage device 29 Viewing Photos 30 Listening to...

Page 4: ...12...

Page 5: ......

Page 6: ......

Page 7: ...POWER POWER Connect to power supply HDMI1 HDMI2 HDMI3...

Page 8: ...FEATURE...

Page 9: ......

Page 10: ...9...

Page 11: ...1 2 3 10...

Page 12: ...1920 x 1080 Mini YPbPr Mini AV Mini YPbPr 11...

Page 13: ...Mini AV 1 2 3 12...

Page 14: ...Connect your headphones to the TV s Headphone out socket 13...

Page 15: ...n u o C 2 Ok Enter Exit Exit Move f f O r e w o P o t u A 3 The TV will automatically switch off after the selected time has elapsed This setting can also be changed in the main menu 4 Ok Enter Exit E...

Page 16: ...art to install the service you have selected This could take some time depending on your selected service You can tune an additional service at any time by pressing the Quick Start button 22 DTV ATV A...

Page 17: ...s buttons and then p button and then press the to select the following picture options ress the OK button Press the buttons to cycle among aspect ratio 4 3 16 9 Full Zoom1 Zoom2 and then press the OK...

Page 18: ...ution of the HDMI signal and display an image with the same number of pixels This selection will detect the resolutionof the HDMI signal and display an image with the same number of pixels Just scan i...

Page 19: ...Menu button and then press the buttons to select the SOUND menu 2 Press the OK or s buttons and then p button and then press the to select the following sound options ress the OK button Sound sound m...

Page 20: ...vorite channels 1 Press the buttons to Favorite Management then press the OK button to confirm 1 Press the Menu button and then press the buttons to select the CHANNEL menu 2 Press the OK or s buttons...

Page 21: ...nter auto search user operation interface as following 3 4 All Mode DTV Mode ATV Mode Select All to scan all available DTV and ATV channels and store them To skip the ATV search press the Menu button...

Page 22: ...eters manually 1 Press the buttons to ATV Manual Search then press the OK button to confirm 2 Select ATV manual search item to enter air channel manual search in ATV source and the user operation inte...

Page 23: ...1 Press the buttons to Language then press the OK button to confirm OSD Language Press the buttons to select the menu language Preferred Subtitle Press the buttons to select the Preferred Subtitle Pr...

Page 24: ...23...

Page 25: ...1 Press the buttons to CI Info then press the OK button to confirm Feature Setting 24...

Page 26: ...ist Feature Setting 1 Press the buttons to select PVR Time shift then press the OK button to confirm PVR Time shift Allows you to select your preferences in the PVR Time shift The list in the menu sho...

Page 27: ...tions ress the OK button Press the buttons to select the Home Mode Max Brightness Home Max Economy and then press the OK button Allows you to set up a variety of setup options Never OK When activated...

Page 28: ...xt Day Update the program information of the current 7 channels in the channel list to the next day and the start time keeps the same RED Daily Change to Daily mode YELLOW Prev Day If the cursor lies...

Page 29: ...28...

Page 30: ...USB output DC 5V 500mA 29...

Page 31: ...function Play Pause Stop Prev Next Rotate Zoom Info Photo Setup Play list GIF TIFF 30...

Page 32: ...function Play Pause Stop FB FF Prev Next Goto Time Repeat All Play list Music WAVE WMA AAC AC3 MPEG AVI MPEG1 2 MPEG4 WMV H 264 31...

Page 33: ...function Play Pause Stop FB FF Slow mode Step mode Repeat A B Prev Next Play list Info Movie Setup Goto Time 32...

Page 34: ...on Enter method After Time shift start press Info to show the menu Time shift info menu Rec Rec Function explain a Time is equal to current play time minus current recording time b Progress bar is for...

Page 35: ...for the channel Recorder Press the buttons to select the Recorder On or Off Type Press the buttons to select the Type Channel Press the buttons to select the Duration Date Press the buttons to select...

Page 36: ...Press the SOURCE button on the TV or the SOURCE button on the remote control then 35...

Page 37: ...36...

Page 38: ...37...

Page 39: ...38...

Page 40: ...39...

Page 41: ...40...

Page 42: ...41...

Page 43: ...42 1366 x 768...

Page 44: ...738 181 490mm 738 90 480mm 12 5Kg C32224F DLED 32 768 5000 1 450 1366 81cm 32 inch 28W 200x100mm M5 x 10 8W 8W 3 Operating 43...

Page 45: ...44...

Page 46: ...45...

Page 47: ...46...

Reviews: