


Satellite Tuning Process
1. Connect the Co-axial cable from the dish to the threaded satellite “F” connector located on the side of the TV.
2. Turn the TV on and press the ‘SOURCE’ button on the remote and select ‘Satellite’.
3. Press the ‘MENU’ button and select the ‘Channel’ menu.
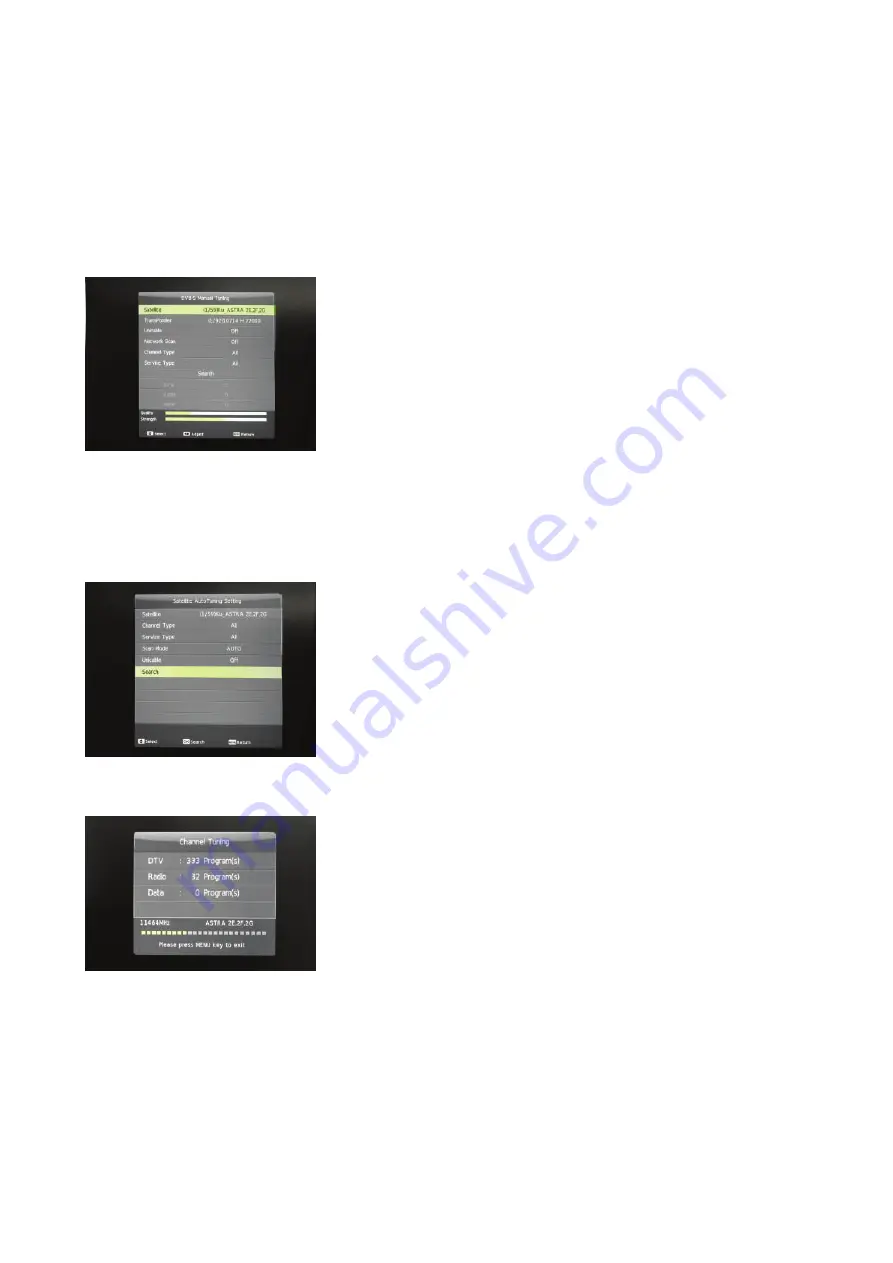
4. From this MENU select ‘DVB-S Manual Tuning’.
This will give several options - for the ASTRA 2 satellite, they should be already set and shouldn’t need altering. For ASTRA 2, please
ensure that they are configured as below.
5. The dish can now be aligned to locate the desired satellite signal. This process is made easier with the introduction of a suitable
signal strength meter, but it is entirely possible to achieve the correct alignment by using the ‘QUALITY’ and ‘SIGNAL STRENGTH’
bars located at the bottom of the screen. As the dish is moved and the signal located, these fields will fill depending on the strength
and quality of the signal found. Typically, a reading of STRENGTH = 50% and QUALITY = 33% will receive all channels OK.
6. Once the ASTRA 2 signal has been obtained in this way, go back to the main satellite menu and select ‘AUTO TUNING’ and
ensure that the fields are set as follows:
7. Select the ‘SEARCH’ option to begin the scan for channels. this will take approx. 10 minutes. You will see the green progress
squares as time passes - the tuner may go through this process twice.
To set up a Favourites list
1. Press the ‘MENU’ button on the remote control and select the ‘Channel’ menu and then ‘Program Edit’. This will bring up a list of
TV channels.
2. Highlight any channel you wish to add to your favourites list using the upa and down arrows and pressing the green button on the
remote control. A red heart symbol appears next to the selected channel. Channels can be de-selected in the same manner.
3. Repeat this for as many channels as you wish and press the ‘EXIT’ button to save your changes.
4. To access your favourite list, press the ‘OK’ button on the remote and then press the green button.
19
Summary of Contents for C19230F
Page 1: ......
Page 2: ......
Page 3: ...1 ...
Page 4: ...2 ...
Page 5: ...3 ...
Page 6: ...4 ...
Page 7: ...5 ...
Page 8: ...Display Power Level Status Indicator 6 ...
Page 9: ...7 ...
Page 10: ...8 ...
Page 11: ...Digital Audio Out 9 ...
Page 12: ...10 ...
Page 13: ...HDMI 1 is ARC CEC HDMI 2 is CEC 11 ...
Page 14: ...12 ...
Page 15: ...13 ...
Page 16: ...14 ...
Page 17: ...15 ...
Page 18: ...16 ...
Page 19: ...17 ...
Page 20: ...18 ...
Page 22: ...Satellite Tuning 20 ...
Page 23: ...Satellite Tuning 21 ...
Page 24: ...Satellite Tuning 22 ...
Page 25: ...23 ...
Page 26: ...24 ...
Page 27: ...25 ...
Page 28: ...26 ...
Page 30: ...28 ...
Page 31: ...29 ...
Page 32: ...30 ...
Page 33: ...31 ...
Page 34: ...32 ...
Page 35: ...33 ...
Page 36: ...34 ...
Page 37: ...35 ...
Page 38: ......
Page 39: ......
Page 40: ......


