background image

Remote control (continued)

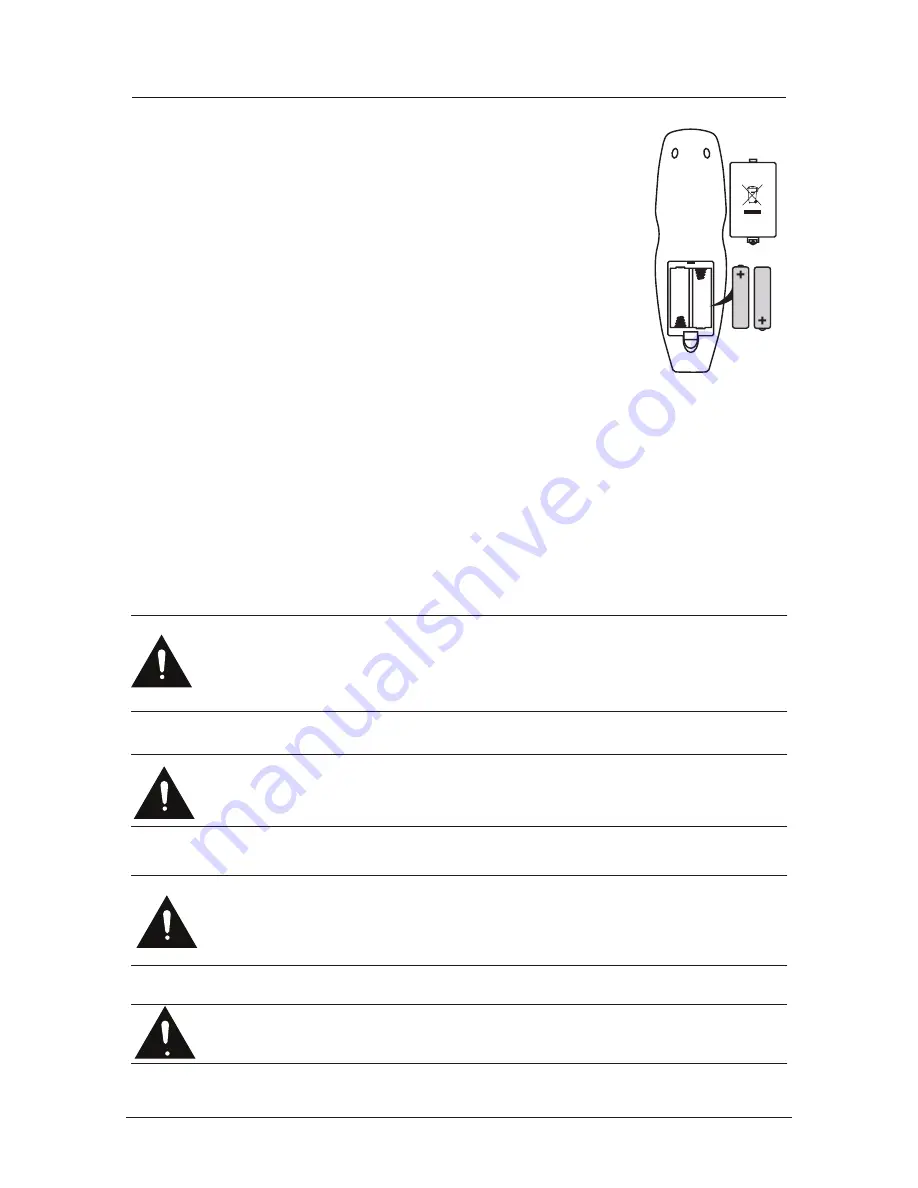
Installing Batteries in the Remote Control

1. Remove the battery compartment cover at the rear of the remote

control by pushing the retaining clip forward and pulling up.

2. Install the supplied batteries, ensuring the polarity matches what

is shown in the battery compartment.

3. Replace the battery compartment cover.

Using the Remote Control

To use the remote control point it at the TV and press the required buttons. You must
be within 6 meters and at an angle of less than 30 degrees from the center of the TV.

NOTE: Sunshine or other strong light sources may interfere with the signal from the
remote control. In this situation turn the TV away from the light source.

WARNING! DO NOT LEAVE BATTERIES IN THE REMOTE CONTROL FOR
EXTENDED PERIODS AS THEY CAN LEAK OR CORRODE CAUSING DAMAGE
TO THE REMOTE CONTROL. CHECK THEM PERIODICALLY AND REPLACE
THEM AS REQUIRED.

WARNING! DO NOT MIX BATTERY TYPES. WHEN INSERTING BATTERIES,
REPLACE ALL BATTERIES AT THE SAME TIME. DO NOT MIX OLD AND NEW
BATTERIES.

WARNING! EXHAUSTED BATTERIES MUST BE TREATED WITH CARE AND
DISPOSED OF ACCORDING TO ANY SAFETY OR RECYCLING REGULATIONS
IN FORCE IN YOUR LOCAL AREA, NEVER DISPOSE OF BATTERIES INTO
GENERAL WASTE, OR FIRE.

S

WARNING! NEVER EXPOSE BATTERIES TO EXCESSIVE HEAT SUCH AS 

SUNSHINE, FIRE OR THE LIKE. 

9

9


Summary of Contents for C1697F

Page 1: ...LCD digital colour TV USER GUIDE C1697F ...

Page 2: ...next generation of digital interface Unlike conventional connections it transmits uncompressed digital and audio signals using a single cable This TV supports high definition video input via the HDMI socket on the back of the TV Safety is important To ensure your safety and the safety of others please read the safety precautions BEFORE you operate this product Contents You will find the following ...

Page 3: ...ces Common Interface slot Auto installation setup Source menu Menu settings DVD Operation Wall mounting options 6 9 Unit and Accessories 4 5 10 10 15 16 17 17 18 24 25 28 31 1 3 SAFETY INFORMATION TROUBLE SHOOTING GUIDE TECHNICAL SPECIFICATIONS 29 30 Contents ...

Page 4: ...ser Guide Protect the power chord from being walked on or pinched particularly at plugs and the point where it exits from the TV Do not allow the power chord to overhang the edge of a table Unplug this TV during lightening storms or when unused for long periods of time WARNING TO REDUCE THE RISK OF FIRE OR ELECTRICAL SHOCK DO NOT EXPOSE THIS TV TO RAIN OR MOISTURE THE TV MUST NOT BE EXPOSED TO DRI...

Page 5: ...rom the mains supply socket Do not pull on the flex the flex can become overloaded and cause a short circuit Set up the unit so that no one is able to trip over the flex Do not place heavy items on the flex which may damage it Take note that the flex cannot be reached and pulled by young children avoiding injury Do not set up the unit near to heat sources The casing and the flex could be damaged b...

Page 6: ...r blinds to prevent direct sunlight falling on the screen Place the TV on a sturdy platform of which the surface should be flat and steady This will prevent it from falling over Make sure the television is located in a position where it cannot be pushed or hit by objects as pressure will break or damage the screen and so that small objects cannot be inserted into the ventilation slots or openings ...

Page 7: ...e menu Vol Press to adjust the volume CH Press to skip through the channels TV AV Press to display the input source menu Power Turn ON OFF the TV set EJECT Eject PLAY Play The functions of the DVD buttons are described below 9 4 Remote Control Window keep clear LED Indicator Insert disc according to the label next to the disc slot ...

Page 8: ...te Control Batteries Source Menu Help Quick Start Guide OK Search Info Exit VOL Picture IP Setup Sound Day abc def ghi jkl mno pqrs tuv wxyz Day CH DVD Menu 1 2 3 4 5 6 7 8 9 0 SUB TXT SD1 IP P S TV Delete User RCC005 Shuffle Text R TV Radio I Player Unit and Accessories continued 9 5 ...

Page 9: ... to work a Satellite receiver the remote controls only the Satellite receiver and not the TV when you press Press to control the TV again Used on TVs with DVD or PVR Used on TVs with PVR or Internet Player Used on TVs with PVR or Internet Player Dependant on the model of theTV some keys will have no function Remote control 9 6 Functions of remote control buttons ...

Page 10: ...programmes you have booked to be recorded Help This displays a page that gives telephone numbers for service Press to enter press again to exit Quick Start Searches all ATV and DTV channels by a single key can take up to 10 Mins Info Taste In DTV mode shows Now Next 2nd Press Extended programme Info Whilst Recording Shows details of the recording and space available on the card DVD Eject Fast forw...

Page 11: ...Dependant on the model of TV some keys will have no function Dependant on Model Remote control continued 9 8 ...

Page 12: ... other strong light sources may interfere with the signal from the remote control In this situation turn the TV away from the light source WARNING DO NOT LEAVE BATTERIES IN THE REMOTE CONTROL FOR EXTENDED PERIODS AS THEY CAN LEAK OR CORRODE CAUSING DAMAGE TO THE REMOTE CONTROL CHECK THEM PERIODICALLY AND REPLACE THEM AS REQUIRED WARNING DO NOT MIX BATTERY TYPES WHEN INSERTING BATTERIES REPLACE ALL...

Page 13: ...truction manual shows the simplest and most effective way of connecting your TV to ancillary equipment Alternate methods are listed below HDMI Lead You can connect this TV to a compatible device using a HDMI lead This method will give the best picture Connect the cable from the HDMI equipment to the TV HDMI socket SCART Lead You can connect this TV to a compatible device using a SCART lead The con...

Page 14: ...Output to Audio amplifier TV Signal Satellite Box or Blue Ray DVD Common Interface Connecting external devices continued 9 11 COAX out r P b P Y SWITCH Turn ON OFF the AC power ...

Page 15: ...r AV Shared with YPbPr YPbPr Connect to the YPbPr output on external devices PC IN PC audio input Connect Headphone Connect to antenna or cable source Output to audio amplifier CI slot pay as you view card slot CI Caution Before connecting external devices Makes sure to disconnect the appliances from the power supply in order to avoid any potential damage from occurring Make sure to establish the ...

Page 16: ... a PC VGA cable not supplied to connect the TV to your PC You can also use an HDMI cable to connect to your PC if your PC Graphic card supports HDMI When the HDMI cable is used the PC audio cable is no longer required If you use the HDMI to DVI cable you will need to use the PC audio cable Connect all cables carefully and do not bend or break the connector pins When using the VGA cable Switch on t...

Page 17: ...r cables refer to the video camera instruction manual Video recorder Connect the Scart cable to the TV and video recorder Turn on both video recorder and the TV Select Scart source You can now see the playback picture from the video recorder Note To connect the video recorder using other cables refer to the video recorder instruction manual Video camera Video recorder AV cable Scart cable All illu...

Page 18: ... Switch on the DVD player Select SCART as input source When using the HDMI cable Select HDMI as input source HDMI to HDMI SCART All illustrated cables are not supplied Connecting external devices continued 9 15 You can supply the TV sound to the stereo system A with the Scart socket Use a special scart cable SCART to RCA Please consult your hi fi instructions for details If you have a surround sou...

Page 19: ...INTO THE COMMON INTERFACE SLOT THEN ADD THE SMART CARD TO THE CAM 1 Turn on the TV and ensure DTV Source is selected 2 If the CAM is detected the TV will display the following message on the screen Common Interface Module inserted wait for a few moments until the card is activated 3 Select the relevant digital Pay Per View channel 4 Detailed information on the Smart Card in use is displayed 5 Pres...

Page 20: ...he input source menu by pressing the Source button on the remote control or the TV AV button on the LCD TV Source OK When you initially turn on the LCD TV you will see the first time installation menu as below Ensure that the aerial is plugged in to the TV Make sure your Remote is in TV mode by pressing button switch on the TV by pressing You will see the first time installation menu Press the but...

Page 21: ...button to exit the Menu EXTRAS MENU Allows you to set up a variety of lock time and setup options SETUP MENU Allows you to setup a variety of setup options TV SETTINGS MENU Allows you to search channels and set up a variety of channel options Allows you to customize the sound options and effects Basi c Use Menu Settings 9 18 DVD SETUP ...

Page 22: ...The TV SETTINGS menu includes the following options Auto Scan Press and buttons to select the Country and press and buttons to select Start and press OK button to start auto tuning Use the and buttons to select the TV SETTING menu as the picture above press button to enter the menu Application Menu Settings continued 9 19 ...

Page 23: ...tton to label the channel as long as the channel has a skip label it will be skipped when searching through the channels with the CH buttons Program Edit Press button to enter the submenu as the following picture ATV Manual Tuning Press button to enter the submenu Storage To Select a position to store the program Current CH Select a program you want to tune Search Press and buttons to manual searc...

Page 24: ...ness Colour Temperature Aspect Ratio Noise Reduction Increase this setting to see crisp edges in the picture decrease it for soft edges Choose from Standard Cool User and Warm Choose from Auto 4 3 16 9 Zoom1 and Zoom2 Reduce any interference noise by selecting ON Note Contrast Brightness and Colour are only available and can be adjusted in the User mode option in the Picture Mode Settings Note Red...

Page 25: ...ity of higher pitched sounds Balance To adjust the balance of the left and right sound track or turn off the volume of the left and right sound track Auto Volume Control the volume of the program automatically when you turn on the function by selecting On Surround Sound Turn on off the surround sound function by selecting off surround Application Use the and buttons to select the SOUND menu as the...

Page 26: ...ou to select subtitle language Country Defaulted to Germany Reset Setting Press button to restore factory default can be selected in DTV mode can be selected in DTV mode Use the and buttons to select the SETUP menu as the picture above press button to enter the menu Menu Settings continued 9 23 DVD Setup Press button to enter the DVD Setup menu in DVD mode DVD Setup ...

Page 27: ... buttons to select OK Press button to enter the submenu to adjust the picture of the screen Set pin code The default is 0000 If the Pin code has been changed you must enter the present code New Enter the new password Confirm Enter the new password and press OK to complete the change Lock the channel you have to enter the code to view the channel Use button to select the channel and press the green...

Page 28: ...mber of playing language the amount of optional languages or Off Language Type Audio Type Subtitle the serial number of playing subtitle the amount of optional subtitles or Off Press the button for the third time the INFO menu fades out 4 Loading and playing VCD Press INFO button once to show the first page Disc Type Track the playing track total tracks Mute PBC Repeat Mode Elapsed Time of the Pla...

Page 29: ... OK When launching the setup routine the pressing of the following buttons will turn off the setup menu while the choices that have been changed will be saved Menu specification 1 SYSTEM SETUP The system setup options are illustrated below 3 The player will then start to play the first track of the selected directory 4 To change directories use the direction buttons Digital Audio Disc 1 Compatible...

Page 30: ...ture like movie ratings This helps you to control what DVD the family watches There are 8 levels of selection from KIDS SAFE to ADULT Adult is the play all selection TV SYSTEM According to the Color system of your TV select proper TV TYPE PASSWORD The password option is initialized as locked You cannot set the ratings limit or change the password To enable these features you must unlock the Passwo...

Page 31: ...r Track A segment of picture or music on a CD Each track is numbered for searching Care of Disc Video disc contains high density compressed data that needs proper handling 1 Hold the disc with fingers by outer edge and or the center spindle hole Do not touch the discs surface 2 Do not bend or press the disc 3 Do not expose the disc to direct sunlight or heating sources Stere discs in cabinet verti...

Page 32: ...hite Check if the same problem exists on other channels Ensure the correct picture settings are selected Noisy Snowy Ghosting picture Check the antenna is connected correctly Check that the antenna Is in good condition Try moving the antenna DVD The Playback picture has occasional distortion The disc is dirty Eject and clean the disc Sometimes a small amount of picture distortion may appear this i...

Page 33: ...15 6 15 4 Diagonal Resolution Panel N156B3 L02 1366 x 768 Panel N154C6 L04 1440 x 900 Aerial input 75 unbalanced Audio output power 2 x 3W Power requirements AC 100 240V 50 60Hz Power consumption 60W Standby power consumption 1W Weight 3 00 kg Remote control specifications Type Infrared Control distance 5m Control angle 30 degrees Horizontal Batteries 2 x 1 5V SizeAA Dimensions 60 x204 x32mm Weigh...

Page 34: ...tructions of the wall bracket not supplied 75mm 75mm 4 Mounting holes Screw size MB4 x 8 1 The stand must first be removed Place the TV face down 2 Remove three screws securing the stand to the back of the TV and one screw from the bottom underneath the stand 3 Remove and store the stand and screws 4 Use four machine screws to mount the TV on the bracket 9 31 ...

Page 35: ... and disposed of separately from household waste If the battery or accumulator contains more than the specified values of lead Pb mercury Hg and or cadmium Cd defined in the Battery Directive 2006 66 EC then the chemicals symbols for lead Pb mercury Hg and or cadmium Cd will appear below the crossed out wheeled dust bin symbol By participating in separate collection of batteries you will help to a...

Reviews: