16
I
I
17
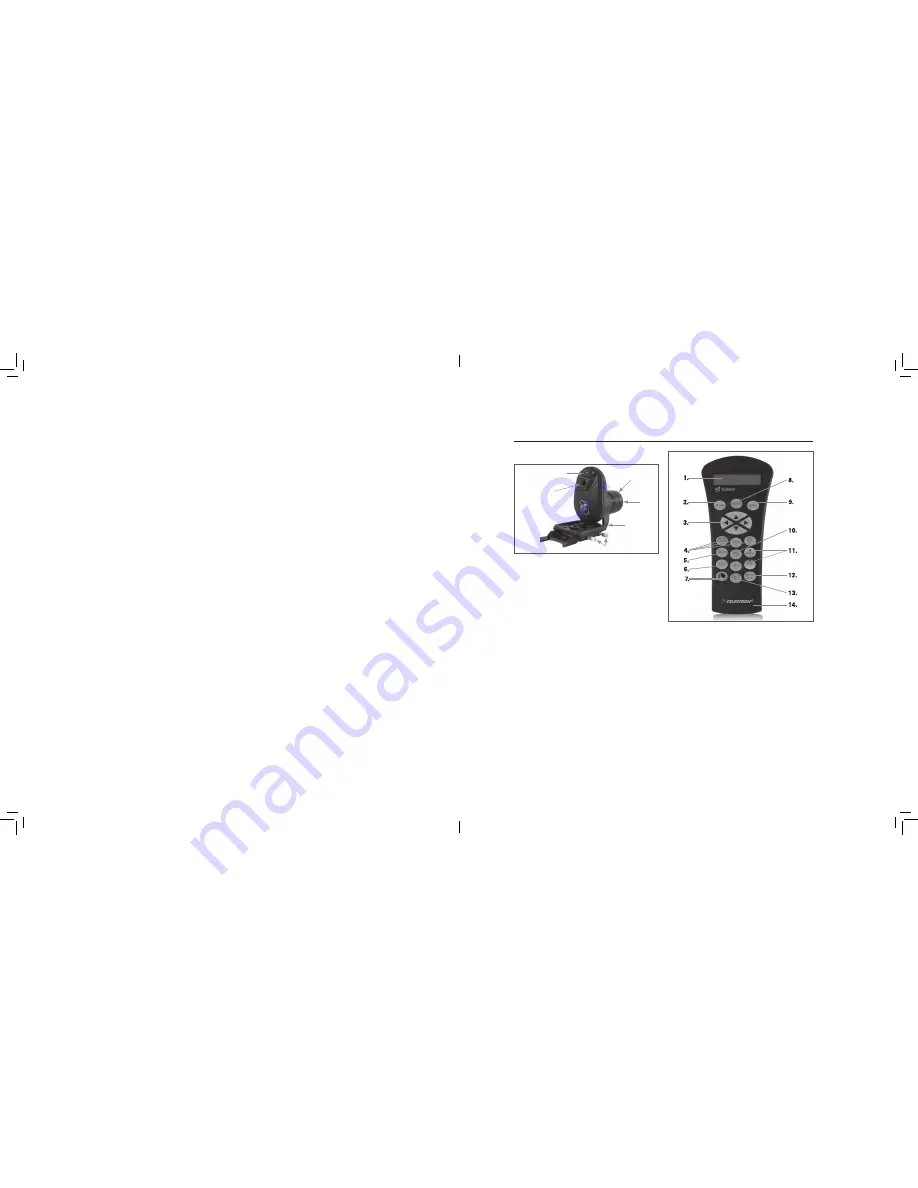
STARSENSE CAMERA
Modular Jack: Connects the StarSense Camera
to your telescope using the provided cable .
USB Port: Available for future software development
and camera fi rmware upgrades .
Camera Lens: A fully multi-coated 20mm f/2
lens responsible for capturing images to align
the telescope .
Lens Shroud: Helps protect the lens from dew
and peripheral light .
Large Camera Bracket: This bracket is preinstalled
in the box with StarSense . The bracket can be
removed and swapped with the smaller included
bracket (see Assembly, Changing Brackets) .
Camera Bracket Attachment Thumbscrews:
Used with the large camera bracket .
STARSENSE HAND CONTROL
StarSense AutoAlign’s hand control gives you
instant access to the night sky . With automatic
slewing to over 40,000 objects and common sense
menu descriptions, even a beginner can master its
features in just a few observing sessions . Below is
a brief description of the individual components of
the StarSense hand control:
1. Liquid Crystal Display (LCD) Window:
Features a four-line, 18-character display screen
that has red backlighting for comfortable viewing .
2 . ALIGN: Instructs StarSense to begin alignment
of your telescope .
3. Direction Buttons: Used to manually slew your
telescope in any direction and center objects in
the eyepiece .
4. Catalog Buttons: StarSense has a key on the
hand control to allow direct access to each of
the main catalogs in its 40,000+ object database .
StarSense contains the following catalogs in its
database: Solar System, Stars, and Deep Sky .
5. IDENTIFY: Searches StarSense’s databases
and displays the name and offset distances to
the nearest matching objects .
STARSENSE OVERVIEW
USB Port for future upgrades
and development
Modular Jack
Connection to mount
Lens shroud
Camera Lens
Large Bracket
(pre-installed on
camera in box)
Attachment Screws
SYNC
Syncing on a star will shift the mount model to the
star position . It will improve GoTo pointing in the
region of sky close to the star you synced on . Sync
can also be used if the mount was bumped or the
clutches were loosened for either axis . Sync will
restore the position of the StarSense GoTo without
using the camera .
1. With a named star selected, press OPTION and
ALIGN simultaneously .
2. Coarse center the star in your fi nder or eyepiece
and press ENTER .
3. Fine center the star in your eyepiece, fi nishing
in the UP and RIGHT directions and press
ALIGN .
POLAR ALIGN
This feature aligns the mount through the hand
controller, using any of the named stars in its
database, essentially eliminating the need for a
polar axis fi nder . Polar Align is use for Equatorial
mounts, or wedge-mounted Altazimuth mounts
only . Polar Align must be performed after a
StarSense Auto or StarSense Manual Align . We
recommend you also add multiple Cal Reference
points to improve the mount model, thereby
improving the polar alignment when adjustments
are made to the mount .
1. After your mount’s GoTo is aligned, Press
ALIGN, scroll UP/DOWN, and select Polar
Align and press ENTER .
2. The screen will display the polar alignment
error of your mount . Press ENTER and select a
named star from the list, then press ENTER to
slew to that star .
3. The controller will prompt you to add a Cal
Star to improve the accuracy, or you may press
BACK to skip this step .
4. Adjust the mount by physically moving the alt-az
adjustments . The direction buttons are locked
out at this time to prevent accidentally moving
the motors in the mount .
5. Press ENTER to complete the polar alignment .
For best accuracy, perform another StarSense
Auto alignment .
Summary of Contents for StarSense AutoAlign
Page 1: ...M A N U A L...


