22
1. Power on the NexStar by flipping the switch located on the bottom portion of the drive base, to the "on"
position. Once turned on the hand control display will say
NexStar Ready.
Press ENTER to choose
GPS Align
or use the UP/Down scroll keys (10) to select a different mode of alignment. Pressing the
ALIGN key will bypass the other alignment options and the scrolling text and automatically begins
GPS
Align.
2. Once
GPS Align
has been selected, the telescope will use its internal compass to move towards north
and find its altitude switch. While the NexStar is positioning itself, the GPS receiver automatically begins
to establish a link with the GPS satellites orbiting the Earth. The hand control screen will display the
message
GPS Linking
to let you know that it is linking with the satellites.
3. Once the NexStar has established a link with the required satellites, the hand control display will read
GPS Linked.
The GPS satellites will then report the current time and position directly to your
NexStar. The NexStar now has all the necessary data to make a virtual model of the sky, select two
bright stars for alignment and begin slewing to the first star.
4. When the NexStar has finished slewing to its first alignment star, the hand control display will ask you to
use the arrow buttons to center the alignment star in the cross hairs of the finderscope. At this point the
telescope is only roughly aligned, so the alignment star should only be close to the field of view of the
finderscope. Once centered in the finderscope, press ENTER. If for some reason the chosen star is not
visible (perhaps behind a tree or building) you can press the UNDO button to have the NexStar select
and slew to a different star.
5. If the finderscope has been properly aligned with the telescope tube, the alignment star should now be
visible inside the field of view of the eyepiece. The NexStar will ask that you center the bright alignment
star in the center of the eyepiece and press the ALIGN button. This will accept the star as the first
alignment position. (There is no need to adjust the slewing rate of the motors after each alignment step.
The NexStar automatically selects the best slewing rate for aligning objects in both the finderscope and
the eyepiece).
After the first alignment star has been recorded, the NexStar will automatically slew to a second alignment star
and have you repeat the alignment process for that star. When the telescope has been aligned to both stars, the
display will read "
Alignment Successful"
and you are now ready to find your first object.
EQ North / EQ South Alignment
EQ North and EQ South Alignments assist the user in aligning
the telescope when polar aligned on an optional equatorial
wedge. Just as with the Altazimuth alignments described
earlier, the EQ alignments gives you the choice of performing
an AutoAlign or a Two-Star alignment.
•
The EQ AutoAlign follows many of the same steps as
the Alt-Az AutoAlign, except instead of asking you to
position the scope towards north, it will ask you to
position the tube so that the index markers are aligned,
and then rotate the telescope base until the tube is
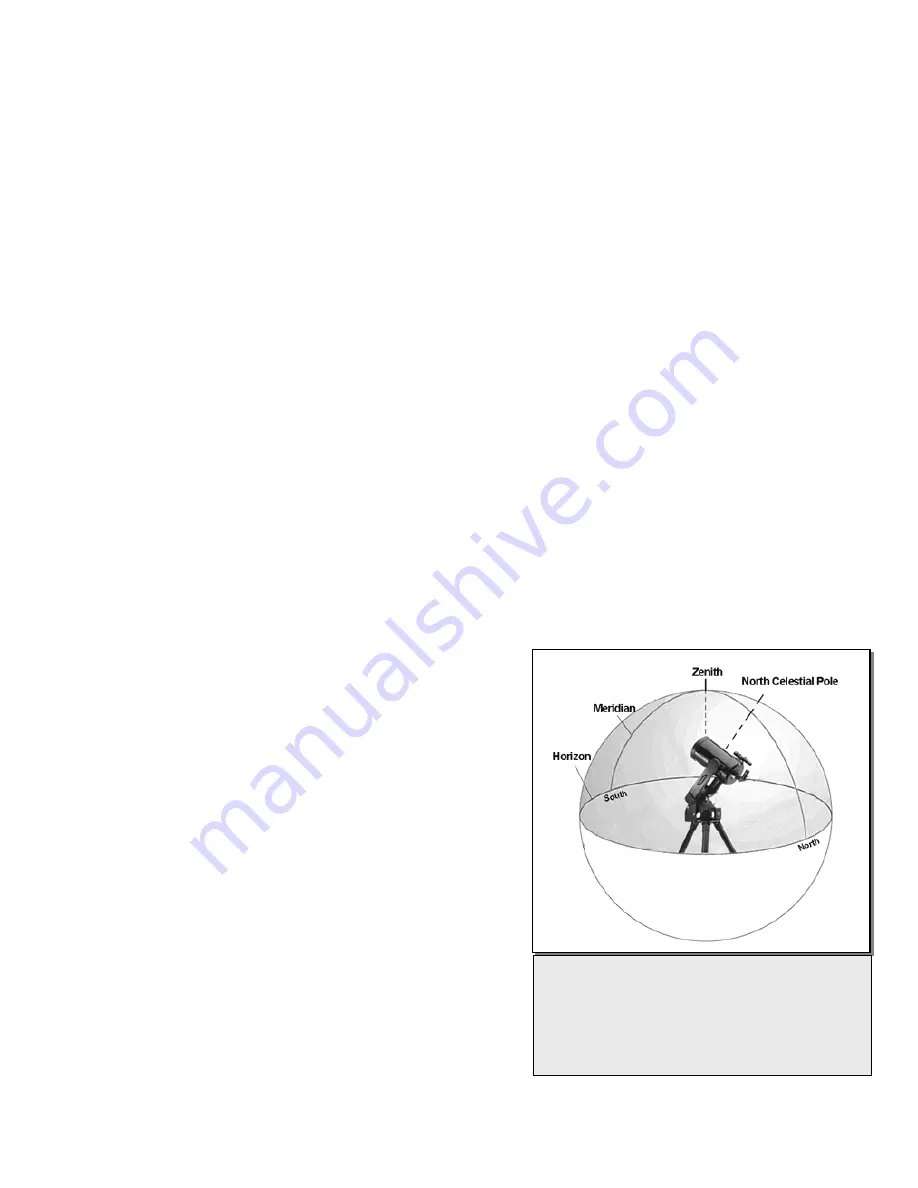
pointed towards the Meridian (see figure 5-3).
•
The EQ Two-Star Align requires the user to locate and
align the telescope on two bright stars. When
selecting alignment stars it is best to choose stars that,
a) have a large separation in azimuth and b) both are
either positive or negative in declination. Following
these two guidelines will result in a more accurate EQ
Two-Star alignment.
Figure 5-3
The Meridian is an imaginary line in the sky that
starts at the North celestial pole and ends at the
South celestial pole and passes through the
zenith. If you are facing South, the meridian
starts from your Southern horizon and passes
directly overhead to the North celestial pole.


