Quick Set-up Guide [cont]
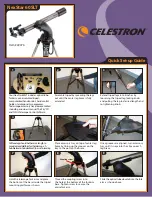
Secure optical tube to fork arm by
tightening the screw located on the
inside of the fork arm assembly.
11
To attach the finderscope, loosen the silver
screw and slide finderscope into mounting
platform .
12
Secure finderscope to mounting platform by
tightening the silver screw. The glass window of
the finderscope should be facing towards the
front of the telescope.
13
Insert the chrome barrel of the star
diagonal into the focuser and tighten the
two silver screws to secure
in place.
14
Select the low power (25mm) eyepiece
and insert it as shown above. Tighten
silver screw to secure.
15
Attach plastic hand control holder to the
tripod leg.
16
Slide Computerized Hand Control into
the hand control holder as shown above.
17
18
Before you begin viewing, please
remember to remove tube lens cap.
19
While observing, tube should be
positioned as shown above.
10
Plug Computerized Hand Control into
the “Hand Control” port on the fork arm.
Before you can begin observing, you must setup your hand control,
align your finderscope and align your telescope. Step by step
instructions are included in the following Hand Control Setup section.
20
Before you can use your telescope, you
must insert 8 AA batteries.
21
Place AA batteries inside the battery
compartment located at the base of the
fork arm.


