ENGLISH |
5
9 0 G T | W i F i
T E L E S C O P E
5.
Once the object is centered in your 25 mm eyepiece, turn on
the Red Dot Finder by rotating the power switch knob on the
right side of the finder clockwise. You will hear an audible click
to confirm that the finder has been turned on. This knob also
controls the brightness of the red dot. Turn the knob all the way
to the end to make the dot as bright as possible.
6.
With your head positioned about a foot behind the finder, look
through the round window of the finder and locate the red dot.
It will probably be close to, but not on top of, the object you see
when you are looking through the 25 mm eyepiece.
7.
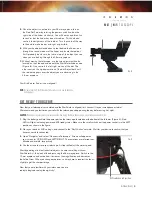
Without moving the telescope, use the two adjustment knobs
located on the side and underneath the StarPointer finderscope
(Figure 8). One controls the left-right motion of the dot. The
other controls the up-down motion of the dot. Adjust both until
the red dot appears over the object you are observing in the
25 mm eyepiece.
Your StarPointer Finder is now aligned!
NOTE:
Be sure to turn off the Starpointer Finder when not in use to conserve
battery power.
Fig. 8
GET READY TO OBSERVE
Now that your telescope is assembled and the StarPointer is aligned, let’s connect it to your smartphone or tablet.
We recommend you familiarize yourself with the telescope and app during the day before using it at night.
CAUTION:
Remember to never point the telescope at the Sun during the day without using a proper full aperture solar filter!
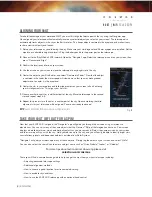
1.
Plug the battery pack into the power port on the telescope, located near the bottom of the fork arm (Figure 9). Red
LEDs will light, indicating power and WiFi-ready status. Make sure the small switch near the power socket is in the LEFT
position as shown in the figure.
2.
Go to your device’s WiFi settings, and connect to the “SkyQLink-xx” network. Wait for your device to confirm that you
have successfully connected.
3.
Open “Navigator” and select “Connect to Telescope”. Arrows will appear on
your screen for UP/DOWN and LEFT/RIGHT. These motions are referred to as
altitude and azimuth, respectively.
4.
Use the arrows to move your telescope. A slider will adjust the motor speed.
Start by pointing at distant terrestrial objects. Locate something with your
StarPointer first, then look at the object using the 25 mm eyepiece. Switch to the
10 mm eyepiece, and notice how it increases the magnification and decreases
the field of view. When you change eyepieces, you may have to readjust the focus
slightly to get the sharpest image.
Now that you are familiar with your telescope, you are
ready to begin observing the night sky!
Fig. 9
WiFi switch on left position.


