background image


9

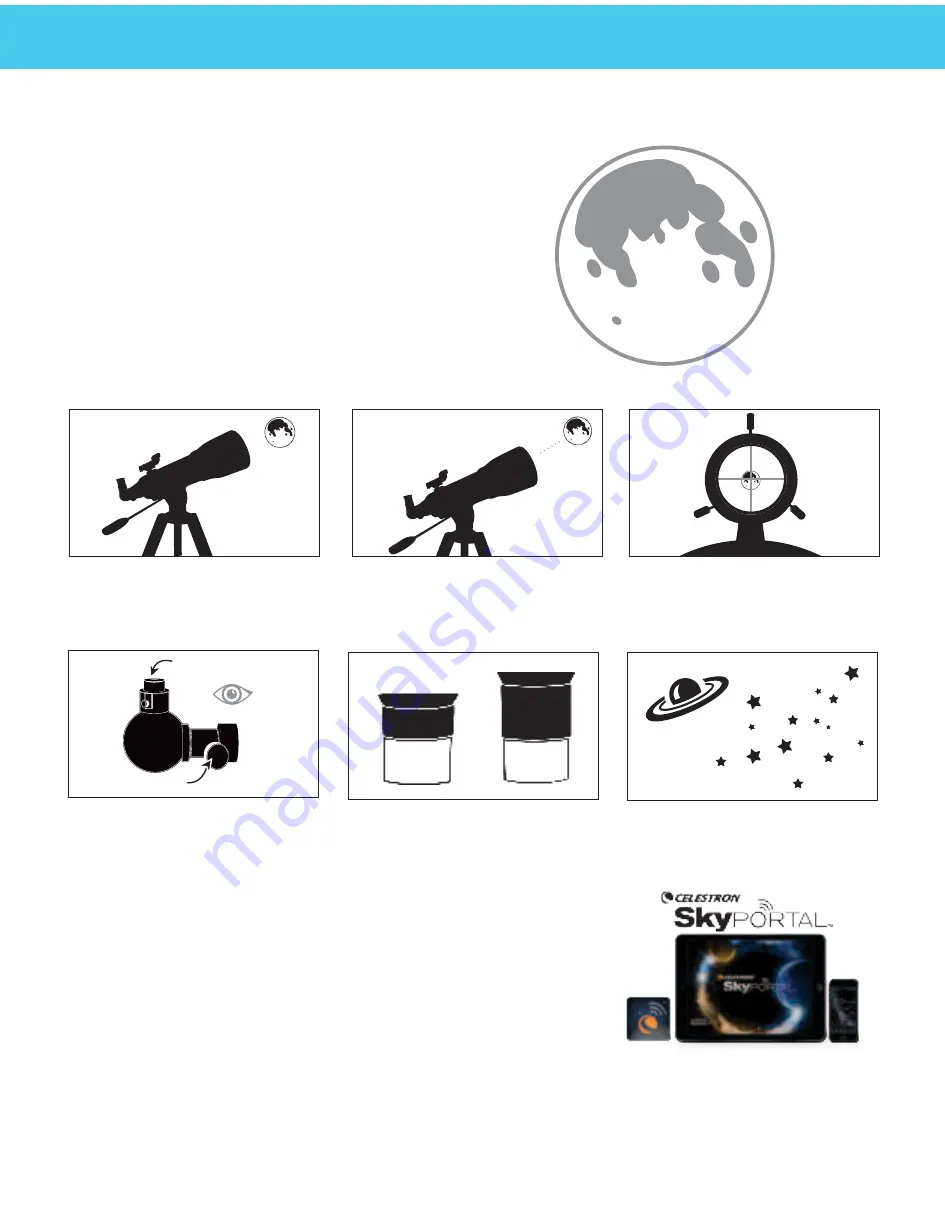
With the Moon visible in the sky, set up your telescope with 
the 20mm eyepiece installed. 

Look through the telescope’s 20mm eyepiece. Gently turn the 
focus knobs to adjust the sharpness of the image. 

You can view many other celestial objects, such as planets, 
star clusters and nebulae using this same technique if you 
know where to find them in the  
night sky. 

The best and easiest target for you to try to view first is 
the Moon. Try observing the Moon at different points in 
its phase cycle. The best time to view the Moon is from 
two days after a New Moon up to a few days before a 
Full Moon. During this period, you will be able to see the 
most detail in the craters and lunar mountain ranges. 

To get a closer view of the Moon, loosen the set screws on 
the focuser and remove the 20mm eyepiece.  Replace it with 
your 10mm eyepiece and tighten the set screws to secure it 
in place. The 10mm eyepiece will give you significantly more 
magnification, making the Moon appear much larger. 

Note:  You may need to adjust the focus knobs when you 

change eyepieces, to make sure you are getting the 
sharpest image possible. 

Move the telescope so that it is roughly pointing toward  
the Moon. 

Look through the finderscope and locate the crosshair reticle. 
Continue moving the telescope until the crosshair appears 
over the Moon.

1

6

3

CONGRATULATIONS!

YOU HAVE NOW OBSERVED YOUR 

FIRST CELESTIAL OBJECT! 

2

5

5

10mm

20mm

YOUR FIRST NIGHT OUT-

THE MOON

4

Low Power Eyepiece

Focus Knobs

YOUR FIRST ASTRONOMICAL OBSERVING SESSION

Celestron’s free SkyPortal app for iOS and Android can help 
you locate and identify a wide array of celestial objects 
quickly and easily.

Summary of Contents for 21182

Page 1: ... 21182 INSTRUCTION MANUAL ...

Page 2: ...eat build up can damage the telescope and any accessories attached to it Never use an eyepiece solar filter or a Herschel wedge Internal heat build up inside the telescope can cause these devices to crack or break allowing unfiltered sunlight to pass through to the eye Do not leave the telescope unsupervised either when children are present or adults unfamiliar with the correct operating procedure...

Page 3: ...to secure the legs being careful not to over tighten 3 Stand the tripod upright and pull the tripod legs apart until the center brace snaps into place 4 Place the accessory tray on top of the center brace line up the keyed hole in the center Rotate the tray until the tabs at the three points of the tray snap into the holders on each arm of the tripod s center brace 2 11 1 12 4 7 8 10 1 Telescope T...

Page 4: ...erence by using the azimuth tension knob on top of the mount Turn the knob clockwise to increase the tension and counterclockwise to loosen it THE TELESCOPE TUBE To attach the telescope tube to your tripod and mount 1 Move the mount so that the telescope mounting platform is parallel to the ground Lock the altitude clutch to prevent it from moving 2 Locate the dovetail bar mounted on the bottom of...

Page 5: ...e the eyepiece in place 4 To see the sharpest image possible focus by looking through the eyepiece and slowly turning the focusing knobs until the image comes into sharp focus Your telescope comes with two eyepieces The 20mm which will give low magnification with a moderately wide field of view The 10mm will give you higher magnification but a narrower field of view Additional eyepieces can be pur...

Page 6: ...e object you chose lies in the center of the view If the image is blurry gently turn the focus knobs until it comes into sharp focus LOOK THROUGH FINDERSCOPE Once the object is centered in your 25 mm eyepiece look through the finderscope and locate the red dot 3 ADJUST THE FINDERSCOPE Without moving the telescope use the two adjustment knobs to move the finder around until the red dot appears over...

Page 7: ... clamp to the eyepiece clamp Slide the phone clamp up and down and rotate it left and right until your camera is looking down through the eyepiece of the telescope Tighten the knob on the bottom of the adapter to secure it in place Use the telescope s focuser to adjust focus of your camera Snap the image using your app Open the eyepiece clamp and place it around the body of the eyepiece Tighten th...

Page 8: ...Press the button on the remote to trigger the shutter on your phone If your camera is in video mode you can press the button once to start recording and again to stop the recording 4 5 To insert or replace the battery place your thumb in the center of the back cover pressing inward and sliding downward remove the battery door The CR2032 battery should be inserted with the positive side facing upwa...

Page 9: ...he Moon loosen the set screws on the focuser and remove the 20mm eyepiece Replace it with your 10mm eyepiece and tighten the set screws to secure it in place The 10mm eyepiece will give you significantly more magnification making the Moon appear much larger Note You may need to adjust the focus knobs when you change eyepieces to make sure you are getting the sharpest image possible Move the telesc...

Page 10: ... 20mm Focal length of Telescope Magnification _________________________ Focal length of Eyepiece FIELD OF VIEW Determining the field of view is important if you want to get an idea of the angular size of the object you are observing To calculate the actual field of view divide the apparent field of the eyepiece supplied by the eyepiece manufacturer by the magnification it gives you in the scope yo...

Page 11: ...bjects in the eyepiece In photographs of nebulae and galaxies you will see vivid reds and blues These colors are not visible when you look through the eyepiece The colorful images were very long exposure images taken over 15 60 minutes or more where your eye only records data on an instant by instant basis Digital sensors are much more sensitive to reds and blues than the human eye is which is mos...

Page 12: ...t observing time is often in the early morning hours before dawn Objects are best observed as they cross the meridian the imaginary line that runs from north to south through a point directly over your head This is the point at which objects reach their highest points in the sky and your telescope is looking through the least amount of atmosphere possible Objects that are rising or setting near th...

Page 13: ... standard flashlight will causes your eye s irises to close down and it can take up to a half hour for your eyes to return to full dark adaptation Red lights do not have the same effect We recommend any red LED flashlight that has adjustable brightness output because even red light if excessively bright can affect your night vision These are available through most telescope retailers but can also ...

Page 14: ...ticles 2 Use a photographer s squeeze bulb to blow away any loose debris You can also use a can of compressed air such as those sold for cleaning computer keyboards but you need to be careful Avoid using cans that are almost empty and be sure to hold the air can vertically Failure to do this can result in the can spitting propellant out onto the optics Hold the optical surface at an angle to the s...

Page 15: ...stron com pages technical support or call 1 800 421 9649 NOTE This warranty is valid to U S A and Canadian customers who have purchased this product from an authorized Celestron dealer in the U S A or Canada Warranty outside the U S A and Canada is valid only to customers who purchased from a Celestron s International Distributor or Authorized Celestron Dealer in the specific country Please contac...

Reviews: