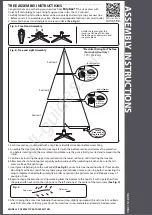
ASSEMBLING THE TREE
Step 1. Remove the protective caps from the tree bottom and insert the pole
into the tree stand.
Step 2. Continue by inserting the upper tree section(s) to the lower section(s)
until inserting the tree top.
Step 3. Shape the branches to your preference by working from the bottom to
the top. When adjusting branches, ensure that all wires are free of
branch hinges.
Step 4. Insert the green label adapter plug into the wall outlet. All your lights
should now be lit.
Step 5. Shape the tree from the bottom to the top. Start with the branches
farthest from the pole – fan out in a star shape, and continue until
the entire tree is shaped.
Step 6. This is a Simple Shape
®
tree and no shaping is required. Just slightly
upsweep and shift branches to fill in any gaps for a fuller, uniform look.
Your Christmas tree is now ready to be decorated.
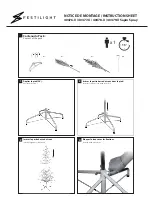
Assembly / Operation Instructions
ASSEMBLING THE TREE STAND
Step 1. Choose a location near a wall outlet.
Step 2. Unfold the legs of the tree stand (E) and lay the stand on the floor.
Step 3. To close the stand(E), press the metal button and fold the legs together.
Top view
Side view
* Electrical Rating For The Tree
(For Indoor Use Only)
Input: 120V, 60Hz, 0.45A
Output: 29V 0.9A
Section 1
Section 2
Section 3
Tree Top
100S
100S
100S
100S
50S
100S
100S
50S
100S
100S
Adapter
to be plugged
into wall
outlet
Insert Green
Label Extension
Cord into Adapter
Light
Controller
DUAL COLOR LIGHT CONTROLLER & REMOTE CONTROL
Simply press the selector button to select from the following light functions:
(1) CLEAR - MULTI: FADING
(2) CLEAR: FADING
(3) CLEAR - MULTI: ALTERNATING
(4) CLEAR: STEADY
(5) CLEAR - MULTI: SLOW FADING
(6) MULTI: STEADY
(7) MULTI: FADING
(8) COMBINATION
REMOTE CONTROL INSTRUCTIONS
1. Remove the insulation tab.
2. Press the button to select from different light functions
(see
DUAL COLOR LIGHT CONTROLLER & REMOTE CONTROL
).
BATTERY REPLACEMENT
1. Loosen the screw of the battery cover with a screwdriver (not included).
2. Replace the used battery with a new CR2032 button cell battery (not included).
Make sure that the battery is installed with the correct polarity (+ and -).
3. Retighten the screw to close and secure the battery cover.
1. For indoor use only.
2. This product contains a CR2032 button cell battery. If swallowed, it could cause severe injury or death in just 2 hours due to chemical burns and potential perforation
of the oesophagus – seek medical attention immediately.
3. Small parts, keep batteries out of reach of children.
4. If you suspect your child has swallowed or inserted a button cell battery, immediately seek urgent medical assistance.
5. Make sure the battery compartment is correctly secured (e.g. the screw or other mechanical fastener is tightened), and do not use if the compartment is not secured.
6. Dispose of used button cell batteries immediately and safely. Flat batteries can still be dangerous.
7. Inform others about the risk associated with button cell batteries and how to keep their children safe.
8. Do not expose the lights to moisture.
9. Remove the batteries when the controllers are left unused, and are not expected to be used for an extended period of time, or when depleted.
10. Dispose of the used battery properly as per the directions on batteries, and local laws and regulations regarding the disposal of hazardous waste.
11. Clean the battery contact surfaces prior to battery installation.
12. Do not dispose of batteries in fire – batteries may leak or rupture.
13. This product is powered by a lithium battery. Due to their small size, lithium batteries can easily be swallowed by children. Ingestion of such batteries has been known
to cause death.
14. This product contains a lithium battery which if swallowed has been known to cause death.
15. Use only CR2032 button cell battery for the remote control.
Insulation Tab
Remote
Control
Light
Controller
Selector Button
WARNING
Click
Cover
Battery
CR2032
Align both arrows
in a straight line
before sliding
down to insert
Open the
cap cover
Do Not Tamper
Internal Parts