background image

English

   - 8 -

If  Home  Mode  is  selected,  Store  mode  will  not  be 
available after the First Time Installation. Press 

OK


button to continue.

Select Yes, and the television will search for digital 
terrestrial TV broadcasts.

NOTE

: You can press 

MENU

 button to cancel.

After all the available stations are stored, the Channel 

/LVWZLOOEHGLVSOD\HGRQWKHVFUHHQ,I\RXDUHVDWLV¿HG

with the order of channels press the 

OK 

button to quit 

the channel list and watch TV.
Note:

Default PIN code can change depending on the 
selected country.

If you are asked to enter a PIN code for viewing a 
menu option, use one of the following codes: 

4725

0000

 or 

1234

.

Media Playback via USB Input

You can connect a 2.5” and 3.5” inch (hdd with external power 
supply) external hard disk drives or USB memory stick to your 
TV by using the USB inputs of the TV.

IMPORTANT!

  Back  up  your  files  before  making 

any connections to the TV. Manufacturer will not be 

UHVSRQVLEOHIRUDQ\¿OHGDPDJHRUGDWDORVV&HUWDLQ

types of USB devices (e.g. MP3 Players) or USB hard 
disk  drives/memory  sticks  may  not  be  compatible 
with this TV. The TV supports FAT32 and NTFS disk 
formatting  but


recording  will  not  be  available  with 

NTFS formatted disks.
While formatting a USB hard disk that has 1TB (Tera 
Byte)  or  more  file  capacity,  you  can  experience 
problems  with  the  formatting  process.  Do  not 
repeatedly  quickly  plug  and  unplug  the  drive.  This 
may cause physical damage to the USB player and 
USB device itself. Do not pull out USB module while 

SOD\LQJD¿OH

Media Browser Menu

<RXFDQSOD\SKRWRPXVLFDQGPRYLH¿OHVVWRUHGRQD

USB disk by connecting it to your TV. Connect a USB 
disk to one of the USB inputs located on the side of 
the TV. Pressing the 

MENU

 button while in the Media 

Browser  mode  will  access  the  Picture,  Sound  and 
Settings  menu  options.  Pressing  the 

MENU

  button 

again will exit from this screen.


You can set your Media 

Browser preferences by using the Settings Menu.

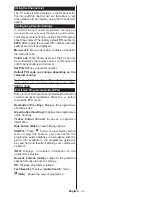
/RRS6KXIÀH0RGH2SHUDWLRQ

Start  playback  with 

  and 

activate 

TV  plays  next  file  and  loop 
the list.

Start  playback  with  OK  and 

activate 

WKHVDPH¿OHZLOOEHSOD\HGLQD

loop (repeat).

Start  playback  with  OK/   and 

activate 

WKH¿OHZLOOEHSOD\HGLQDVKXIÀH

Quick Menu

Quick Settings menu allows you to access some 
options quickly. This menu includes Power 
Save Mode, Picture Mode, Equalizer Settings, 
Favourites and Sleep Timer options.  Press 
Q.MENU button on the remote control to view 
quick menu. See the following chapters for the 
details of the listed features.

Summary of Contents for DLED32167HD

Page 1: ......

Page 2: ... Menu Features and Functions 10 Software Upgrade 12 Troubleshooting Tips 12 Appendix A PC Input Typical Display Modes 13 Appendix C Supported File Formats for USB 13 Appendix B AV and HDMI Signal Compatibility 13 DVD Mode 14 Notes on Discs 14 LFHQFH 1RWL FDWLRQ 14 How to Watch a DVD 14 DVD Control Panel Buttons 15 Overview of the Remote Control 15 General Operation 16 General Playback 17 DVD Troub...

Page 3: ...V to direct sunlight or other heat sources 7KH 79 VKRXOG QRW EH SODFHG QHDU WR RSHQ ÀDPHV RU sources of intense heat such as an electric heater Excessive sound pressure from earphones and headphones can cause hearing loss QVXUH WKDW QR RSHQ ÀDPH VRXUFHV VXFK as lit candles are placed on top of the TV To prevent injury this TV must be securely attached to the wall in accordance with the installatio...

Page 4: ...matic sound mute when no transmission NTSC playback AVL Automatic Volume Limiting PLL Frequency Search PC input Plug Play for Windows 98 ME 2000 XP Vista Windows 7 Game Mode Optional FFHVVRULHV HDWXUHV 6SHFL FDWLRQ 6SHFL FDWLRQ TV Broadcasting PAL B G D K K Receiving Channels VHF BAND I III UHF BAND U HYPERBAND Number of Preset Channels 1000 Channel Indicator On Screen Display RF Aerial Input 75 O...

Page 5: ...t input sources Press the source button on your remote control consecutively to select the different inputs Changing Channels and Volume You can change the channel and adjust the volume by using the V and P buttons on the remote Environmental Information This television is designed to consume less energy to help save the environment To reduce energy consumption you should take the following steps ...

Page 6: ...the MY BUTTON IS SET message is displayed on the screen This confirms that the selected MY BUTTON is now associated with the selected function Using My button 2 3UHVV 0 87721 IRU YH VHFRQGV ZKHQ RQ D desired source channel or link until the MY BUTTON IS SET message is displayed on the screen This confirms that the selected MY BUTTON is now associated with the selected function Digital Teletext Pre...

Page 7: ...ode output will not be available via the scart socket When using the wall mounting kit optional we recommend that you plug all your cables into the back of the TV before mounting on the wall Insert or remove the CI module only when the TV is SWITCHED OFF You should refer to the module instruction manual for details of the settings Connections Connector Type Cables Device Scart Connection back VGA ...

Page 8: ...ress the side function switch until the TV comes on from standby To Switch the TV Off Press the button on the remote control or press the side function switch until the TV switches into standby mode To power down the TV completely unplug the power cord from the mains socket Note When the TV is switched to standby mode the standby LED can blink to indicate that features such as Standby Search Over ...

Page 9: ...ing will not be available with NTFS formatted disks While formatting a USB hard disk that has 1TB Tera Byte or more file capacity you can experience problems with the formatting process Do not repeatedly quickly plug and unplug the drive This may cause physical damage to the USB player and USB device itself Do not pull out USB module while SOD LQJ D OH Media Browser Menu RX FDQ SOD SKRWR PXVLF DQG...

Page 10: ...pending on the selected country If you are asked to enter a PIN code for viewing a menu option use one of the following codes 4725 0000 or 1234 Electronic Programme Guide EPG Some but not all channels send information about the current and next programmes Press the button to view the EPG menu Red button Prev Day Displays the programmes of previous day Green button Next day Displays the programmes ...

Page 11: ... Auto Only available in Scart mode with SCART PIN8 high voltage low voltage switching Film Mode Films are recorded at a different number of frames per second to normal television SURJUDPPHV 7XUQ WKLV IHDWXUH RQ ZKHQ RX DUH ZDWFKLQJ OPV WR VHH WKH IDVW PRWLRQ scenes clearly Skin Tone Skin tone can be changed between 5 and 5 Colour Shift Adjust the desired colour tone RGB Gain RX FDQ FRQ JXUH WKH FR...

Page 12: ...ges timeout duration for menu screens Scan Encrypted Channels When this setting is on the search process will locate the encrypted channels as well Blue Background Activates or deactivates the blue background system when the signal is weak or absent Software Upgrade 7R HQVXUH WKDW RXU 79 DOZD V KDV WKH PRVW XS WR GDWH UPZDUH Application Version Displays application version Hard of Hearing Enables ...

Page 13: ...or new software upgrades If new software is found and downloaded successfully the next time the TV powers up it will have the new software version Note If the TV fails to come on after the upgrade unplug the TV for 2 minutes and plug in again Troubleshooting Tips Tv will not turn on Make sure the power cord is plugged in securely to wall outlet The batteries in the remote control may be exhausted ...

Page 14: ...60Hz O 480P 60Hz O 576I 576P 50Hz O 720P 50Hz 60Hz O 1080I 50Hz 60Hz O 1080P 24Hz 25Hz 30Hz 50Hz 60Hz O X Not Available O Available In some cases a signal on the TV may not be displayed properly The problem may be an inconsistency with standards from the source equipment DVD Set top box etc If you do experience such a problem please contact your dealer and also the manufacturer of the source equip...

Page 15: ...ECT and the RED button together for about two seconds until the red light on the Sky remote control blinks twice 4 Key in 065 The light on the Sky remote control should blink twice 5 Press the STANDBY button on your Sky remote control If your TV switches off press SELECT The light on the Sky remote control blinks twice Now try the other functions ...

Page 16: ...ed green or green and yellow The wire which is coloured blue or black must be connected to the terminal which is marked with the letter N or coloured Black The wire which is coloured brown or red must be connected to the terminal which is marked with the letter L or coloured Red RU FRQWLQXHG SURWHFWLRQ DJDLQVW ULVN RI UH UHSODFH RQO ZLWK VDPH W SH DQG UDWLQJ RI IXVH 67 approved 5A 250VAC fuse CAUT...

Page 17: ......

Reviews: