CEL Power8 CS05 Manual Download Page 4

- 20 -

The machine is intended for lengthways and crossways cutting 

of wood with straight cutting lines as well as mitre cuts in wood 

while resting firmly on the work piece or correctly mounted in 

the POWER8 WORKSHOP CASE. With suitable saw blades, 

thin-walled non-ferrous metals, 

eg, profiles, can also be sawed.

Working ferrous metals is not permitted.

Read and understand all safety warnings and all instructions 

before operating this product.

Failure to follow the warnings and instructions may result in 

electric shock, fire and/or serious injury.

WARNING! When changing battery, blade or whenever the 

tool is not in immediate use the direction switch must be in its 

central locked position to prevent accidental starting. Ensure 

the tool will not be accidentally started by pressing the trigger.

NOTE!  Remove any debris from the area that joins the UniGrip 

and Battery to the tool. Damage to contacts or mechanical 

controls could occur if debris is caught between them.

Prepare Your Work

By preparing your work and work area 

you will be able to perform your cuts 

more accurately, efficiently and safely.

Supporting your work will prevent 

blade pinch allowing the blade to pass 

more freely through the work, this 

will greatly improve battery life and 

appearance of cut as well as reducing 

dangerous kickback.

WARNING!

 Ensure there is nothing 

under the work piece that will touch 

the blade.

PINCHED 

BLADE 

PINCHED 

BLADE 

SUPPORTED 

WORK PIECE 

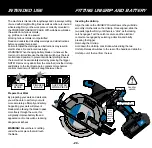
Inserting the UniGrip

Align the rails on the UNIGRIP Circular Saw so they will slide 

smoothly into the rails on the UniGrip. Once aligned, slide the 

two parts together firmly until there is a “click” as the locking 

catch engages. Test the catch is secure and the electrical 

contacts are engaged by selecting a direction and briefly 

pressing the trigger.

Removing the UniGrip. 

Hold down the UniGrip. Lock Button while sliding the two 

UniGrip. Release Switches to the rear of the handle and slide the 

UniGrip. out of the tool from the rear.

INTENDED USE

FITTING UNIGRIP AND BATTERY

Release Switch

(both sides) - Slide

Slide 

firmly

along

rails until 

locked in 

place.

GENERAL

HAZARD

Align Rails

Summary of Contents for Power8 CS05

Page 1: ...e Angle Lock Angle Scale Rip Guide Lock Front Handle Rating Plate Motor Vents Depth Lock Spring Loaded Blade Shield Saw Blade Blade Locking Washer and Screw Blade Shield Retractor UniGrip Release Slider Table Saw Shield Catch Dust Extractor Fitting UniGrip Sold Separately Table Saw Blade Shield Sold Separately Battery sold separately ...

Page 2: ...either side of the blade but not in line with the blade Kickback could cause the saw to jump backwards but kickback forces can be controlled by the operator if proper precautions are taken When blade is binding or when interrupting a cut for any reason release the trigger and hold the saw motionless in the material until the blade comes to a complete stop Never attempt to remove the saw from the w...

Page 3: ...e the guide When cutting thick timber or performing compound or angled cuts it may be necessary to rotate the blade shield to prevent it stopping the cut as it hooks on the edge of the work piece Use the Blade Shield Retractor to rotate the shield into the saw As the rear of the blade enters the work piece release the Blade Shield so it rests on the surface of the work and will safely cover the bl...

Page 4: ...tween them Prepare Your Work By preparing your work and work area you will be able to perform your cuts more accurately efficiently and safely Supporting your work will prevent blade pinch allowing the blade to pass more freely through the work this will greatly improve battery life and appearance of cut as well as reducing dangerous kickback WARNING Ensure there is nothing under the work piece th...

Page 5: ...ck Rotate Trigger Press Safety Swich Press either side Change Blade Depth Rotate the Depth Lock clockwise to unlock Set the blade to the required depth Rotate the Depth Lock anti clockwise so it firmly locks the sole plate Test plate is locked before cutting Change Blade Angle Rotate the Angle Lock anti clockwise to unlock Set the blade angle using the scale Rotate the Angle Lock clockwise to lock...

Page 6: ... dust and dirt regularly Cleaning is best done with compressed air or a rag CAUTION Do not use cleaning agents to clean the plastic parts of the tool A mild detergent on a damp cloth is recommended Water must never come into contact with the tool After each use carefully clean the tool with a brush or rag Clear any debris from around the battery mount moving parts and clips Lubrication No internal...

Reviews: