


17
•
CEDIMA
® • Technical Documentation • All rights reserved according to ISO 16016 • Changes serving technical progress reserved •
Set-up and operation
Joint cutter CF•22 E
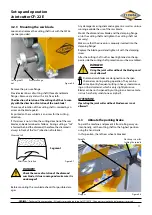
4.2.3 Mounting the saw blade
Loosen and remove the cutting shaft nut with the SW 36
spanner provided.
Cutting shaft Pressure flange
nut
Figure 4.6
Remove the pressure flange.
Provide cleanliness of cutting shaft (thread) and blade
flanges. Remove any dirt with a lint-free cloth.
The direction of rotation of the cutting shaft has to com-
ply with the direction of rotation of the saw blade!
The sense of rotation of the cutting shaft is marked by an
arrow on the blade guard.
Imprinted on the saw blade is an arrow for the cutting
direction.
If this arrow is not visible, the cutting direction of the saw
blade can be determined as follows: During cutting, a “tail”
is formed behind the diamond; therefore, the diamond is
always in front of the “tail” (direction of rotation).
Segment
Diamond tail
Direction of rotation
Figure 4.7
DANGER!
Check the sense of rotation of the diamond
saw blade, its true running and make sure it is
undamaged!
Before mounting the saw blade check it for possible dam
-
ages.
Any damages/missing diamond segments as well as untrue
running exclude the use of the saw blade.
Mount the diamond saw blade and the clamping flange
on to the cutting shaft and tighten the cutting shaft nut
securely!
Make sure that the drive pin is properly inserted into the
clamping flange!
Replace the blade guard and tighten it with the clamping
screw.
After the cutting shaft nut has been tightened on the op
-
posite side the cutting shaft protection must be assembled.
DANGER!
Using the joint cutter without the blade guard
is not allowed!
Diamond saw blades are designed to re-sharpen
themselves during cutting operation. They can be
-
come blunt by frequent cutting in heavy steel armour
-
ing or in hard material, which is only slightly abrasive.
Blades can be re-sharpened by cutting in an abrasive mate
-
rial such as chalky sand stone or asphalt!
ATTENTION!
Operating the joint cutter without blade cover is not
allowed!
4.3
Aktuate the parking brake
To park the machine and prevent it from rolling away un
-
intentionally, set the cutting shaft to the highest position
using the hand crank.
In this position, the left rear wheel is blocked.
Stopper
Figure 4.8
Spindle
Star knop screw for
locking the spindle


