background image

TROUBLESHOOTING

31

1 – The MP70 has been pre-configured at the factory. After 

     boot-up, if no video appears, please check the following:

• Is the monitor used capable of 1080P? The MP70 may be set to a resolution    

   too high for the monitor. 
• Verify that the TV/Monitor is set to the correct input. 
• Is the green power LED on? If not, please check the power connection. Also 

    check the switch on any power strip into which the unit may be plugged. Be 

   patient as the unit starts from boot up, this may take almost 2 minutes. 
• Reboot the unit by disconnecting and reapplying the power connector. This  

    will set the unit back to the default startup item. Please wait two minutes and 

   then press menu on the remote control. Browse the video folder and press 

   play on the desired file. 
• If the green power LED is ON, but there is no video, please check the HDMI 

    video cable and make sure that it is connected properly to the first distribution 

   amplifier or to the correct input on the TV. If all cables are properly 

   connected, please unplug the power cable for 15 seconds and then 

   reconnect. If there is still no video, please contact CE labs technical support  

   at 800-767-6189 for further assistance.

2 – I cannot communicate over the network. 

• Verify that the Ethernet cable is securely connected at both ends. 
• Verify that the Ethernet connector LED is lighted to indicate presence 

   of signal. 
• Press Menu on the remote control and browse to player network setup. 

    Verify that DHCP is turned on and do a “Save and Exit”. Now go to the info 

   screen on the OSD and record the IP address. Verify this address is within 

   the Sub-Net range required on your network. 
• The computer firewall may be blocking the needed ports. Try to communicate 

   with the firewall temporarily disabled.

Summary of Contents for MP70

Page 1: ...MP70 High Definition Media Player L A U N A M N O I T C U R T S N I ...

Page 2: ...THIS PAGE IS LEFT INTENTIONALLY BLANK ...

Page 3: ...the power cord from being walked on or pinched particularly at plugs convenience receptacles and the point where the exit from the apparatus 11 Only use the attachments accessories specified by the manufacturer 12 Use only with the cart stand tripod bracket or table specified by the manufacturer or sold with the apparatus When a cart is used use caution when moving the cart apparatus combination t...

Page 4: ...UPPORTED RESOLUTIONS 6 PACKAGE CONTENTS QUICK FACTS 7 INSTALLATION 8 Detailed Player View 8 Remote Control 9 Connections 10 Mounting 11 CONTROL SOFTWARE 12 Hardware 12 Software 12 OPERATION 22 EXTENDED APPLICATIONS XAPP 26 TROUBLESHOOTING 31 APPENDIX 33 WARRANTY 42 ...

Page 5: ...gh requirements in commercial digital media market This HD Media Player provides an affordable and flexible method for High Definition MPEG2 4 H 264 and WMV9 streaming media delivery without using a PC It supports both real time streaming from a centralized network media source and localized playback from the unit s flash drive an attached USB drive or SD card This HD Media Player comes with full ...

Page 6: ...IR remote for Setup and Playing content on internal storage Full featured playlist Media files Schedule Multiple playlist support Multiple control methods IR remote controlled OSD HDMI CEC 1 3a Fully supported SNMP API for 3rd party Software Integration Quicksign Pro Software Integrated event logging Remote configuration and in circuit Firmware update capability Watch Dog Timer for self recovery C...

Page 7: ... NTP DNS USB SD card FAT FAT32 NTFS HTML v4 0 Partial v5 0 Javascript ECMA262 ed3 Firefox 1 7 InternetExplorer 5 7 CSS v2 1 Partial v3 0 Player port is fixed at 161 Player IP Source port 161 Destination Port 161 Non volatile storage for FW Config Watch Dog Timer RTC Standard 8 GB SD Card Optional 8 16 32 GB SD Card USB Port uses 2 to 32 GB USB drive UL CE FCC Section 15 Input voltage 12VDC Power d...

Page 8: ...768x60 VESA_1280x1024x60 VESA_1280x768x60 VESA_1024x768x60 VESA_800x600x60 RGB_1080i50 HDMI_1080i50 HDMI_1080p60 HDMI_1080i60 HDMI_720p60 HDMI_40p60 HDMI_480i60 HDMI_720p50 HDMI_576p50 HDMI_640x480p59 HDMI_640x480p60 HDMI_480p59 HDMI_720p59 HDMI_1080i59 HDMI_480i59 HDMI_720x240p59 HDMI_720x240p60 HDMI_2880x480i59 HDMI_2880x480i60 HDMI_2880x240p59 HDMI_2880x240p60 HDMI_1440x480p59 HDMI_1080p24 HDMI...

Page 9: ...mode Pressing ENTER will start the video in the upper right hand preview window The file will play one time In order to loop a file it must be in a playlist Look under HTML to launch the locally stored HTML files such as Menu boards and other signage layer content Under SETUP the network settings can be configured This is where you find the unit s IP address You may also view network settings and ...

Page 10: ...8 INSTALLATION Detailed Player View USB Input Digital Audio Out optional HDMI Output 10 100 Ethernet 12V DC Input 700mA SD Memory Socket IR Receiver Power LED Mounting Flange ...

Page 11: ...ons Composite Only 720p 60 720p 50 1080i 59 94 1080i 60 1080p 59 94 and 1080p 60 Note The MP70 will have no video output on the HDMI port if you set the resolution to Composite Only This resolution is intended for use on the MP700 In the blue button section you may use PLAY STOP FWD REV PREV and NEXT Pressing PLAY will alternate between PLAY and PAUSE If you use the FWD or REV buttons press PLAY t...

Page 12: ...ch or Router via an Ethernet cable The unit will automatically obtain an IP address as long as the unit s DHCP is selected as ON and there is a DHCP server somewhere on the local subnet Please wait for approximately 1 1 2 minutes until the unit completes the boot up process The media player can be configured to have a default start up item such as a video file or a playlist If the default startup ...

Page 13: ...The mounting dimensions given below are measured from center to center of the mounting holes The mounting holes will accommodate a 6 screw Mounting The unit has ventilation holes all along the top Theses should remain uncovered during operation There are no ventilation openings on the bottom of the chassis so it may be bolted directly to a shelf or monitor ...

Page 14: ...ware This application allows you to scan your network to discover installed players or you can manually add them Once the player is input the software may be used to check status set video resolution add or delete content create playlists etc The Quick Sign Pro software is available at no cost with the media player It may be downloaded from http www celabs net software qp700_rel The help tab in Qu...

Page 15: ...t screen you see on QuickSign Pro is Player Search Click OK to add the discovered players to the Media Player database The main screen with Player Status selected will show you what is loaded and playing on the selected media player ...

Page 16: ...u may edit an existing layout or create a new layout from the included set of templates The image below is showing the template edit screen There are a couple of samples you can import or you may create your own template with graphics of your choice Please see the help files in QuickSign Pro for additional information on the program operation ...

Page 17: ...Firewall If video files fail to download you may need to verify that the firewall is indeed off for Quick Sign You can temporarily turn the firewall completely off to test if this resolves the file transfer issue Windows7 VISTA Operating System To turn firewall completely off not recommended 1 Control Panel Security Windows Firewall Windows Firewall on off 2 Select Off 3 Click OK To allow just Qui...

Page 18: ...gnPro exe for Quick Sign Pro Typical may be different location on some PCs QS300 and QS400 typical locations QS 300 C Program Files CE labs CCM Quick Sign 300 CCM Quick Sign for HD300ZX exe QS 400 C Program Files CE labs CCM Quick Sign 400 CCMQuickSign exe 5 Click OK Now add port 7898 TCP 1 Click Add Port 2 Set Name http port 7898 TCP 3 Click OK Virus Protection Programs If you are running a virus...

Page 19: ...ing Checksum Offloading on the network card often corrects these errors VISTA Windows 7 1 Go to Control Panel Hardware and Sound 2 Click on Device Manager For Windows 7 Device Manager is located under Device and Printers 3 Select the network device under Network adapters and right click and select properties 4 Find the Checksum Offloading or maybe IP4 Checksum Offloading and select disable 5 Click...

Page 20: ... playlists schedules together Easily add edit or remove playlists and schedules Assign content packages to players Assign descriptive information to the content package Upload video files to be distributed Organize and manage uploaded videos Preview images of videos Layout support Layouts provide a way to show text images and a RSS feed info around a predefined video area Upload layouts created wi...

Page 21: ...ed in any location that has internet access This arrangement does not require port forwarding on the local router and eliminates many of the hassles with firewalls This environment allows System administrators or users to access the secured server over local or internet connections to update content and schedules for all the media players in the system ...

Page 22: ...es department for more information and to schedule a demonstration In order to use the CCM2 system an application is loaded on the MP70 that will link to the control software using the configured server HTTP address This method allows for communications to be established without the need for forwarding ports through corporate routers When communication is established the player is added to the sys...

Page 23: ...AC address but care must be taken to enter the information accurately It is recommended to add the unit to the system once they have connected to the server at least one time Getting Started Steps Step 1 Add Media Players Step 2 Create Player Groups Step 3 Upload Video Files Step 4 Create a Configuration Step 5 Assign Configurations to Players Step 6 Create a Content Package Step 7 Create Playlist...

Page 24: ...but please adhere to the media creation standards in the appendix at the end of this document Also be aware of the bit rate versus the speed of the SD card if you are using local storage If the video experiences freeze frames or stuttering the bit rate may be too fast for the card installed in the player The media player can play content from many sources Real Time Source Ethernet RTSP IP Stream L...

Page 25: ...ders on the storage device in order for it to be visible on this menu The PLAYLIST folder contains playlists that have been created and stored on the internal drive SD or Hard Drive Pressing play will sequentially play all files in that playlist one time If the playlist was created with a loop command at the end the files will loop around and play again continuously The Video folder contains indiv...

Page 26: ... and GATEWAY fields You must highlight Save Changes and press ENTER on the remote control for these settings to be remembered once you exit this screen Warning Verify that there are no other devices on your subnet with this IP Address Two devices with the same address will cause erratic behavior To adjust the appearance of the video on the monitor navigate to the Player Setup menu and press VIDEO ...

Page 27: ...le through several options Composite Only 720p 60 720p 50 1080i 59 94 1080i 60 1080p 59 94 and 1080p 60 In the blue button section you may use PLAY STOP FWD REV PREV and NEXT Pressing PLAY will alternate between PLAY and PAUSE The next item on Player Setup is HARD DISK REPAIR This is used to format a new SD card or repair the internal SD card should it become corrupted The last item on the setup m...

Page 28: ... video playlist browser or music file can selected for playback on player start up The item to start is specified in the configuration file on the external memory device The playback starts when the player first powers up or when the external memory device is inserted Note Browser file types html may include a video zone where a video playlist can optionally be played 2 2 Scheduling of playback Pl...

Page 29: ...figuration items The folder is named MP7XXConfig The MP7XXConfig folder is entirely optional The structure on the SD card or USB flash drive will then be as shown below Html Video Music Picture Playlist MP7XXConfig 3 3 Configuration File mp7xx conf file The configuration file can be optionally placed inside the MP7XXConfig folder This is simple text file consisting of a number of optional commands...

Page 30: ...tartUpItem Sets the item to be played on player start up and upon insertion of the external memory device SD card or USB flash drive This may also specify a special operation on start up such as a Schedule or Script command StartupItem type or operation item name type or operation None Html Video Music Playlist Schedule Kiosk CCM Script item name file name of the item to be played or as based on t...

Page 31: ...drive is re inserted playback will be restarted regardless of current playback conditions Note A USB flash drive will take precedence over an SD card 5 2 Player Startup On player start up the operation is as follows The player checks the USB flash drive for the MP7XXConfig mp7xx conf file If found then the player will begin playback and configuring itself based on command in that file If not found...

Page 32: ...ed Interfacing with CCM2 In order for player to work with CCM2 you must know the CCM2 server address and enter it into the player The address can be configured by either of two methods 1 Use the player s web interface From a browser that is on the same network as the player go to the web interface of the player Type the IP address of the player in the browser address bar Set the CCM2 server addres...

Page 33: ... green power LED is ON but there is no video please check the HDMI video cable and make sure that it is connected properly to the first distribution amplifier or to the correct input on the TV If all cables are properly connected please unplug the power cable for 15 seconds and then reconnect If there is still no video please contact CE labs technical support at 800 767 6189 for further assistance...

Page 34: ...MI video is there but it is all green If you have both a VGA cable connected to a monitor and a HDMI cable connected to a monitor the player may become confused and initiate the video in the wrong colorspace mode Disconnect the VGA cable and reboot the media player by unplugging the power supply This should allow the unit to boot up in the correct mode If the HDMI monitor was disconnected or turne...

Page 35: ...ep 1 Download the latest version from http www celabs net software qp700_rel When prompted save the file Step 2 Find the file and execute the file look in My Documents Downloads Step 3 Follow the on screen instructions When Windows asks to allow the program to access Network resources click on YES ...

Page 36: ...the player s current status By selecting the Player Control Tab and then clicking on File Manager the user can see and manipulate media that is loaded on the selected player The MP70 may be ordered with a pushbutton GPIO interface Under TOOLS SIX BUTTON SETUP QS Pro allows the user to assign media to a specific button as well as determine the file that plays while a button is not pressed ...

Page 37: ...e department can assist in configuring your server if you wish to purchase CCM2 and host your own installation In order to use the CCM2 system an application is loaded on the MP70 that will link to the control software using the configured server HTTP address This method allows for communications to be established without the need for forwarding ports through corporate routers When communication i...

Page 38: ...nt protocol SNMP In this white paper we provide the specifications and performances of the browsers employed with statistical perspective and actual performances will vary based on Internet band width type and sizes of contents used 2 Hardware Specification Comparison As you can see above the chipset used in MP70 is designed to provide about 2 4 times of performance boost over MP500 MP500 can hand...

Page 39: ...ttp nontroppo org test Op7 loadtime html 1 5 AMD T 56N 1 6GHz 2GB Win7e Internet Explorer 9 6 Samsung Galaxy S Cortex A8 1GHz 512MB Android 2 2 5 Summary Both the MP500 and MP70 are capable of rendering Internet websites and local web pages on real time basis while playing 1080P video on the side Primary advantage using the MP500 and MP70 over a PC is their higher video playback quality utilizing ...

Page 40: ...guidelines for encoding each of these formats however we suggest using the MPEG 4 container with the h 24 codec for optimized playback which is specified below MP70 Video Audio Encoding Settings for MPEG 4 h 264 Codec Video Settings File Format Mpeg 4 Frame rate 23 97 or 29 97 Codec H 264 Resolution 1920 x 1080 Bit rate Variable bit rate Target 20 Mbps Maximum 35 Mbps Audio Settings Codec AAC Mpeg...

Page 41: ...d 2 minutes the media player will stop at a command prompt bash 3 000 6 Unplug the player and remove the Firmware Update SD Card 7 Re insert the original content SD Card and re apply power to the unit 8 You may verify the current firmware installed on the unit by looking at the OSD information page Press MENU on the remote and then press INFORMATION 9 Procedure complete Creating an Update SD Card ...

Page 42: ... being played concurrently When navigating from a web page to another web page allow some time for the previous page to unload For large complicated pages both loading and unloading may take several seconds each Recommended time between page changes is 10 minutes depending on the complexity of the page being displayed 7 Page dimensions should not exceed displayed dimensions typically 1366x768 1024...

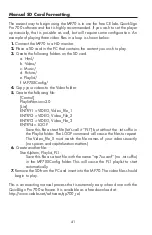
Page 43: ...sion 2 0 List ENTRY1 VIDEO Video_File_1 ENTRY2 VIDEO Video_File_2 ENTRY3 VIDEO Video_File_3 ENTRY4 LOOP Save this file as text file let s call it PL1 but without the txt suffix in the Playlist folder The LOOP command will cause the files to repeat The Video_File_X must match the file names of your videos exactly no spaces and capitalization matters 6 Create another file StartUpItem Playlist PL1 Sa...

Page 44: ...no circumstances will a unit be accepted without a Return Authorization Number RMA This warranty is in lieu of all other warranties expressed or implied including without limitations any other implied warranty or suitability or merchantability for any particular purpose all of which are expressly disclaimed Proof of sale may be required in order to claim warranty Customers outside USA are responsi...

Page 45: ...43 INSTALLER NOTES Purchasing Date S N ...

Page 46: ...44 INSTALLER NOTES Purchasing Date S N ...

Page 47: ...THIS PAGE IS LEFT INTENTIONALLY BLANK ...

Page 48: ...9205 www celabs net WARRANTY Cable Electronics Inc warrants this product to be free from defects in material and workmanship under normal use and service for a period of one year from the purchase by the original purchaser If this product is defective or malfunctions Cable Electronics will replace or repair this unit at their option within a reasonable time No expressed or implied warranty is made...

Reviews: