background image

CE-2500-HVE Band Sealer


Page  7 


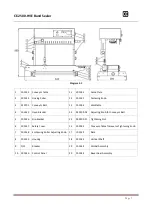
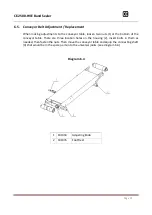
Diagram 5.2 


101333 

Conveyor Table 

11 

101035 

Guide Plate 

101012 

Driving Roller 

12 

101341 

Fastening Knob 

910701 

Conveyor Belt 

13 

101006 

Worktable 

101335 

Fixed Bracket 

14 

930109-01 

Adjusting Knob for Conveyor Belt 

101336 

Slip Bracket 

15 

930109-11 

Tightening Nut 

101337 

Safety Cover 

16 

101334 

Conveyor Table Transverse Tightening Knob 

101338 

Embossing Roller Adjusting Knob 

17 

101335 

Rack 

101339 

Housing 

18 

101342 

Vertical Shaft 

QF1 

Breaker 

19 

101343 

Gimbal Assembly 

10  101340 

Control Panel 

20 

101344 

Bevel Gear Assembly   

Summary of Contents for CE-2500-HVE

Page 1: ...866 888 6327 sales clevelandequipment com 3889 E Raines Rd Memphis TN 38118 www clevelandequipment com CE 2500 HVE Continuous Sealer Operation Manual...

Page 2: ...0 6 4 Drive Wheel Block Adjustment 11 Diagram 6 3 11 6 5 Conveyor Belt Adjustment Replacement 12 Diagram 6 4 12 6 6 Starting procedure 13 VII CE 2500 HVE Horizontal to Vertical Guide 14 VIII Stand Ass...

Page 3: ...er is connected do not touch any electrical parts 2 3 2 4 When the machine is on do not touch any moving parts 2 5 When the machine is on do not touch heating blocks or ink roller heating block 2 6 Do...

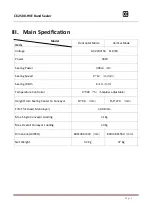
Page 4: ...Power 300 2 W Sealing Speed 0 12 m min Sealing Width 8 10 mm Temperature Controller 0 300 Stepless adjustable Height From Sealing Center To Conveyor 10 40 mm 150 270 mm Film Thickness Monolayer 0 08...

Page 5: ...als and can also be used with varied packaging production lines The machine has no limitations on sealing length with high efficiency continuous sealing reliable sealing quality and convenient operati...

Page 6: ...t to produce heat which leads to a rapid temperature rise of both upper and lower heating blocks 5 2 Adjust the temperature control and speed control to the required temperature and speed for your app...

Page 7: ...Block Lower 11 101036 Silicone Wheel 3 101024 Driven Wheel 12 101014 Guiding Wheel 4 THC1 Control Panel 13 910701 Conveyor Belt 5 930305 U 930305 L Heating Block 14 101333 Conveyor Table 6 102007 Hol...

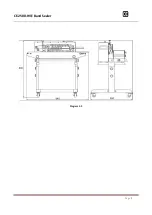
Page 8: ...101335 Fixed Bracket 14 930109 01 Adjusting Knob for Conveyor Belt 5 101336 Slip Bracket 15 930109 11 Tightening Nut 6 101337 Safety Cover 16 101334 Conveyor Table Transverse Tightening Knob 7 101338...

Page 9: ...CE 2500 HVE Band Sealer Page 8 Diagram 5 3...

Page 10: ...re the normal operation 6 2 3 Adjust the height and position of the conveyor table to get the required sealing position for your application 6 2 4 Adjust the position of feed opening according to the...

Page 11: ...owards heating block and remove the sealing belt 6 3 3 Replace with a new sealing belt and install the guiding belt back 6 3 4 Put the driven wheel heating cooling blocks and pinch roller to the origi...

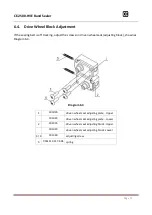
Page 12: ...ws on driven wheel seat adjusting block shown as Diagram 6 4 Diagram 6 3 1 101035 driven wheel seat adjusting plate Upper 101023 driven wheel seat adjusting plate Lower 2 101035 driven wheel seat adju...

Page 13: ...ts 1 at the bottom of the conveyor table There are three location holes on the housing 2 insert bolts in them as needed then fasten the nuts Then move the conveyor table and equip the connecting shaft...

Page 14: ...then feed the bag by aligning the bag opening with the guide plate The bag opening is gripped by the sealing belts which will make the bag move forward automatically At that momento do not push it in...

Page 15: ...CE 2500 HVE Band Sealer Page 14 VII CE 2500 HVE Horizontal to Vertical Guide Step 1 Step 2 Step 3 Step 4 Step 5 Step 6...

Page 16: ...CE 2500 HVE Band Sealer Page 15 Step 7 Step 8 Step 9 Step 10 Step 11 Step 12...

Page 17: ...CE 2500 HVE Band Sealer Page 16 Step 13...

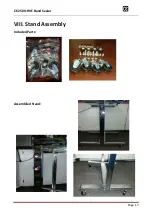
Page 18: ...CE 2500 HVE Band Sealer Page 17 VIII Stand Assembly Included Parts Assemblied Stand...

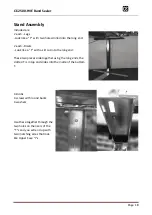
Page 19: ...like a T with a slit cut into the long end These two pieces slide together using the long ends the slotted T is in top and slides into the inside of the bottom T 4 knobs 4 screws with round backs 4 wa...

Page 20: ...s On the side pieces you will find corresponding holes 2 on each side for the 2500 and 4 on each side for the 3000 Use the provided long bolts through the outside and into the threads on the middle su...

Page 21: ...erature Controller SB1 Switch Emergency Stop ST1 Thermocouple K1 Switch on off EH1 Heating Pipe K2 Switch Seal W1 Potentiometer K3 Switch Fan PCB1 PCB Assembly MD DC Motor 940801 11 Speed Regulating P...

Page 22: ...CE 2500 HVE Band Sealer Page 21 X Sealing Unit Parts List Diagram 10 1...

Page 23: ...er 10 936111 2 10 8 50 1 spring of embossing roller 11 101015 2 small pulley shaft 12 101014 2 small pulley 13 935601 6 2 606 2Z bearing 14 101017 1 embossing roller seat 15 101018 1 embossing roller...

Page 24: ...CE 2500 HVE Band Sealer Page 23 XI Conveyer Parts List Diagram 11 1 18 19 20 18...

Page 25: ...11 10 25S 4 spring for copper block 6 101354 4 self made hexagon thin nut 7 930305 1 upper heating block 770 8 921304 2 300W 220V 12 95 heating pipe for sealing 9 930305 1 bottom heating block 770 10...

Page 26: ...CE 2500 HVE Band Sealer Page 25 XII Component Parts List Diagram 12 1...

Page 27: ...nsmission shaft 3 101029 1 connection board II 4 935601 04 1 6004 2Z bearing 5 101031 1 steel gear 6 101028 1 gear shaft 7 920415 22 1 10 pin wiring terminal orange 8 101030 1 middle gear 9 935602 01...

Page 28: ...CE 2500 HVE Band Sealer Page 27 XIII Conveyor Table Parts List Diagram 13 1...

Page 29: ...spacer 12 930109 11 2 knob 674 M8 star handle 13 101333 1 conveyor table 14 101009 1 bearing seat 58 15 101004 1 middle shaft of conveyor table 16 101010 2 sprocket of conveyor table 17 101013 1 bear...

Page 30: ...0 HVE Continuous Band Sealer is a parts kits with the following Item Qty Part Description 1 2 910802 Guiding Belt Rubber Belt with teeth 428x6x4mm 2 2 910902 Sealing Belt Teflon 770x15x0 2mm 3 1 2500...

Page 31: ...own as a symptom o Check gears on the inside of machine after dusting clean off old grease and apply new o for non food applications use any gear grease for food grade applications you will need an h1...

Page 32: ...s too small so the friction is too much Adjust the clearance between sealing belts properly which should be about the thickness of a packing bag in one layer This ensures fast sealing high definition...

Page 33: ...nformation Video for CE 2500 HVE Band Sealer https www youtube com watch v g0vaNhNVZGs CE 2500 HVE Belt Adjustment Belt adjustment video for CE 2500 HVE Band Sealer https www youtube com watch v B6z8y...

Reviews: