background image

EN

GALEO 4.0 Bluetooth

Weatherproof Illuminated Keypad with remote electronics

  INSTALLATION MANUAL

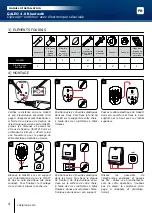
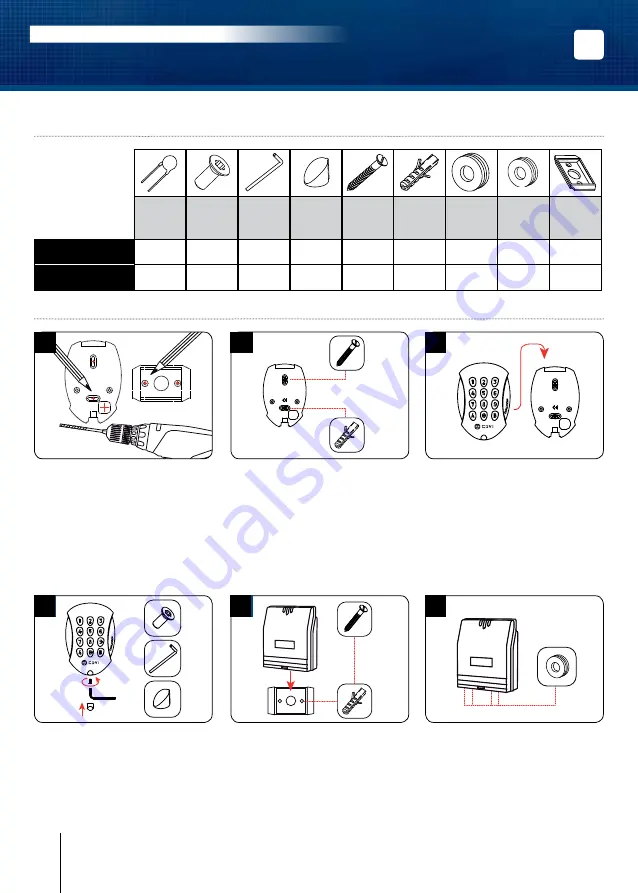
3] MOUNTING KIT

4] MOUNTING

GALEO

®

GALEO

®

(x4)

1

GALEO

®

GALEO

®

(x4)

4

GALEO

®

GALEO

®

(x4)

2

GALEO

®

GALEO

®

(x4)

5

GALEO

®

GALEO

®

(x4)

3

GALEO

®

GALEO

®

(x4)

6

Verify  the  distance  between  the 

GALEO  keypad  and  its  remote 

electronic (Refer to page 3 «Notes and 

Recommendations»). Place the back 

plate  of  the  GALEO  on  the  wall  and 

the  bracket  of  the  remote  electronic 

then mark with a pen the hole location 

then drill the 2 mounting holes (drill bit 

Ø  5  mm  and  35  mm  hole  depth) 

and the hole wiring access.

Fasten the GALEO keypad to the back 

plate  by  using  the  supplied  (M4x10) 

Torx

®

  screw  and  T20  Trox  spanner 

hardware. Place the screw cap at the 

bottom of the keypad.

Insert the 2 plastic anchors in the 

holes.  Place  the  back  plate  of  the 

GALEO and screw on the wall using 

the  supplied  (M4x30)  mounting 

screws.

Insert the 2 plastic anchors in the holes. 

Place  the  bracket  of  the  electronic 

and screw on the wall using the supplied 

M4x30 screws. Slide the box from up 

to down on the bracket.

Insert the cable in the hole access 

area of the back plate. Then mount 

the  keypad  on  the  back  plate, 

placing  first  the  top  in  the  hooks 

and then the bottom.

Insert the cable in the remote electronic 

and  wire  the  cable  to  the  terminals. 

Do  not  forget  to  install  the  varistor 

on  the  lock  (Refer  to  page  3  «Notes 

and Recommendations»).

Varistor

(M4x10) 

Torx

®

screw

T20 Torx

®

Spanner

Caps

(M4x30) 

mounting 

screws

Plastic 

anchors

Wiring 

sealed 

cap

Wiring 

sealed 

cap

Mounting 

plate for 

remote 

electronic 

box

GALEO

-

1

1

1

2

2

-

-

-

Remote

Controller

1

-

-

-

2

2

2

2

1

12

cdvigroup.com

Summary of Contents for GALEO 4.0 - Bluetooth

Page 1: ...lectronique s curis e Weatherproof Illuminated keypad with remote electronics Verlicht codeklavier met gescheiden elektronica FRAN AIS FR ENGLISH EN 4 Galeo Le choix de l installateur The installer s...

Page 2: ...e Programmation par d faut Pas de code ma tre par d faut sortie d usine seulement 5 termes 2 installations possibles Fonctionnement de la BOXCODE uniquement avec l app CDVI Fonctionnement de la BOXCOD...

Page 3: ...t en code ma tre Lors de la cr ation des codes utilisateurs vitez les codes trop simples ex les suites 3 4 5 6 7 Recommandations d installation Pour s curiser l installation n oubliez pas de placer la...

Page 4: ...sage du c ble lectrique destin au clavier Bloquez le GALEO sur son support par l interm diaire de la vis TORX et de son outil sp cifique cl m le coud e Pour finaliser le montage de ce produit placez l...

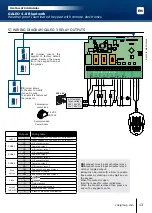
Page 5: ...lavier fil marron E Clavier vert ou bleu clairage 5 SCH MA DE RACCORDEMENTS GALEO 3 RELAIS Le raccordement du bouton poussoir PB1 est pr vu pour commander le relais 1 Le raccordement du bouton poussoi...

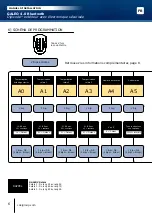
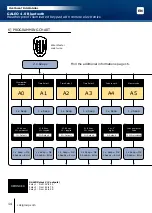
Page 6: ...ion relais 1 1 bip 1 bip OK 4 bips Erreur 01 99 sec 00 continue 01 D faut A3 Temporisation relais 3 1 bip 1 bip OK 4 bips Erreur 4 ou 5 5 D faut A4 Nombre de termes 1 bip 1 bip OK 4 bips Erreur Tous l...

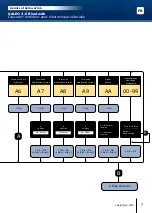
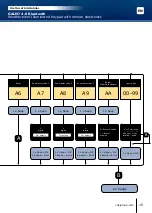
Page 7: ...modification relais 2 1 bip 1 bip OK 4 bips Erreur 2 chiffres 46 d faut A9 Termes de modification relais 3 1 bip 1 bip OK 4 bips Erreur 0 Supprimer les bips 1 Autoriser les bips AA Signal sonore 1 bi...

Page 8: ...odes ma tres saisis sont identiques 2 bips sonores sont mis Sinon attendez que le lecteur se remette clignoter pour ressaisir les codes ma tres environ 10 secondes Entr e en mode programmation 3 Confi...

Page 9: ...ier clignote en attendant la saisie du nouveau code ma tre D CHANGEMENT DU CODE D ENTR E PAR L UTILISATEUR L autorisation de changement de code par l utilisateur est d termin e par le positionnement d...

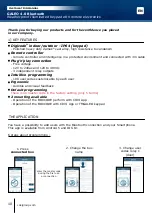
Page 10: ...ting only 5 terms 2 mounting available Operation of the BOXCODE perform with CDVI App Operation of the BOXCODE with CDVI App or TMGALEO keypad 1 KEY FEATURES Thank you for buying our products and for...

Page 11: ...ty advice reasons there is no master code in the factory setting only 5 terms The 1 2 3 4 5 code is forbidden as a master code When selecting a master code and user code avoid sequencial codes example...

Page 12: ...he keypad Insert the 2 plastic anchors in the holes Place the back plate of the GALEO and screw on the wall using the supplied M4x30 mounting screws Insert the 2 plastic anchors in the holes Place the...

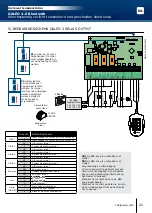
Page 13: ...H input can be used with a timer to enable free access by pressing on any digit key on the keypad When the contact is open then the request to enter is disabled When the contact is closed then press...

Page 14: ...Default A1 Time Relay 1 1 x beep 1 x beep OK 4 beeps Error 01 99 sec 00 toggled 01 Default A3 Time Relay 3 1 x beep 1 x beep OK 4 beeps Error 4 or 5 digits 5 Default A4 Code length 1 x beep 1 x beep O...

Page 15: ...t A8 Sub master code 2 1 x beep 1 x beep OK 4 beeps Error 2 digits 46 default A9 Sub master code 3 1 x beep 1 x beep OK 4 beeps Error 0 Buzzer disabled 1 Buzzer enabled AA Buzzer Audible feedback 1 x...

Page 16: ...r code twice about 10 seconds Entry in programming mode 3 Configure the system with the programming chart Press B to exit from programming mode B RESET MEMORY 1 Cut off the power and put the jumper on...

Page 17: ...R To authorize a user to modify its own user code put a jumper on P2 to disable the feature remove the jumper 1 Enter the current user code The relay is activated and a beep is emitted 2 Enter the 2 d...

Page 18: ...instellingen slechts 5 cijfers Werking van de BOXCODE uitvoeren met enkel de CDVI App Werking van de BOXCODE uitvoeren met CDVI App of TMGALEO keypad 1 BELANGRIJKSTE KENMERKEN Bedankt de aankoop van o...

Page 19: ...m veiligheidsredenen is er geen master code in de fabrieksinstelling slechts 5 tekens De 1 2 3 4 5 code is verboden als mastercode Wanneer u een mastercode en gebruikerscode kiest vermijd dan sequenti...

Page 20: ...ier Plaats de schroefdop aan de onderkant van het klavier Plaats de 2 anker pluggen in de gaten Plaats de achterplaat van de GALEO en schroef hem vast aan de muur met behulp van de bijgeleverde bevest...

Page 21: ...endeling en wisseluitgang H invoer kan worden gebruikt met een timer om vrije toegang in te schakelen door op een willekeurige cijfertoets op het klavier te drukken Wanneer het contact open is de REX...

Page 22: ...99 sec 00 ingeschakeld 01 Standaard A2 Tijdrelais 2 1 x biep 1 x biep OK 4 bieps Error 01 99 sec 00 ingeschakeld 01 Standaard A1 Tijdrelais 1 1 x biep 1 x biep OK 4 bieps Error 01 99 sec 00 ingeschak...

Page 23: ...AB standaard A7 Sub master code 1 1 x biep 1 x biep OK 4 bieps Error 2 digits 13 standaard A8 Sub master code 2 1 x biep 1 x biep OK 4 bieps Error 2 digits 46 standaard A9 Sub master code 3 1 x biep 1...

Page 24: ...ieptonen Indien dit niet gebeurt wacht u tot het klavier opnieuw knippert om de mastercode tweemaal in te voeren ongeveer 10 seconden Een invoer in de programmeermodus 3 Configureer het systeem met he...

Page 25: ...achten op de nieuwe mastercode D HET WIJZIGEN VAN DE CODE DOOR EEN GEBRUIKER Om een gebruiker toe te staan om zijn eigen gebruikerscode te wijzigen plaatst u een jumper op P2 om de functie uit te scha...

Page 26: ...NOTES GALEO 4 0 Bluetooth INSTALLATION MANUAL 26 cdvigroup com...

Page 27: ...37 38 39 40 41 42 43 44 45 46 47 48 49 50 51 52 53 54 55 56 57 58 59 60 61 62 63 64 65 66 67 Rangs User Code Nom Name 68 69 70 71 72 73 74 75 76 77 78 79 80 81 82 83 84 85 86 87 88 89 90 91 92 93 94 9...

Page 28: ...33 0 1 48 91 01 02 CDVI SAS FRANCE EXPORT 31 av du G n ral Leclerc 93500 PANTIN France Phone 33 0 1 48 91 01 02 www cdvi com CDVI AMERICAS CANADA USA Phone 1 450 682 7945 www cdvi ca CDVI BENELUX BELG...

Reviews: