23
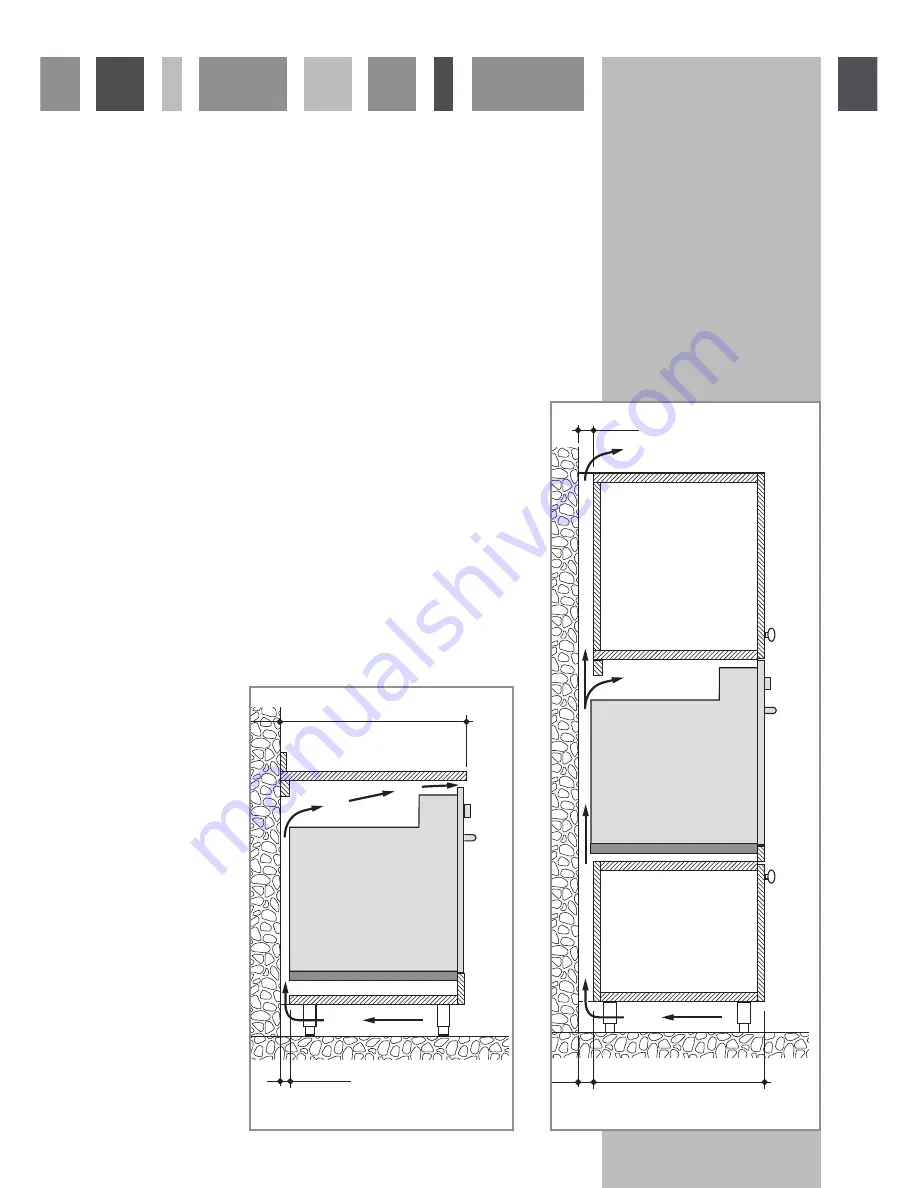
To ensure internal ventilation, aeration channels must be provided as illustrated in the figures 22 and 23.
30 mm
600
50 mm
50
550
Fig. 22
Fig. 23
Page 1: ...mer Care Department The Group Ltd Harby Road Langar Nottinghamshire NG13 9HY T 01949 862 012 F 01949 862 003 E service cda eu W www cda eu Oven Manual for Installation Use and Maintenance Model SVA 10...
Page 2: ...register your appliance for guarantee purposes Appliance Model Serial Number Important Information for Correct Disposal of the Product in Accordance with EC Directive 2002 96 EC At the end of its work...
Page 3: ...portant Precautions and Recommendations for Use of Electrical Appliances Use of any electrical appliance implies the necessity to follow a series of fundamental rules In particular never touch the app...
Page 4: ...ven gloves when removing the shelves and food trays from the oven whilst hot Clean the oven regularly and do not allow fat or oils to build up in the oven base or trays Remove spillages as soon as the...
Page 5: ...icator lamp 5 Oven thermostat indicator light Please Note This appliance incorporates a safety cooling fan which you will hear operating whenever the oven or grill are in use The cooling fan may also...
Page 6: ...apters TRADITIONAL GRILLING and USE OF THE GRILL Operating Principles Heating and cooking in the fan oven are obtained in the following ways a by Forced Convection A fan sucks in the air contained in...
Page 7: ...ob Fig 3 This only sets the cooking temperature and does not switch the oven on Rotate clockwise until the required temperature is reached from 50 C to 225 C The thermostat indicator light will illumi...
Page 8: ...ar element and fan come on The heat is dispersed by forced convection and the temperature can be regulated to between 50 C and 225 C via the thermostat knob The oven does not require preheating Recomm...
Page 9: ...thout the smells and flavours mixing The only precautions required are the following The cooking temperatures must be as close as possible with a maximum difference of 20 25 C between the different fo...
Page 10: ...ey again automatic cooking End the time you would like the oven turns off by touching the key two more times Increases the number shown on the display Decreases the number shown on the display Illumin...
Page 11: ...does not turn the oven off The timer can be set for up to 23 hours and 59 minutes To set the timer touch the key for more than 2 seconds the symbol flashes than the or keys After about 8 seconds an a...
Page 12: ...UTO will show in the clock display The oven will switch off but is now set for automatic cooking If you are already at home to turn the oven on and only want the oven to turn off automatically start c...
Page 13: ...cool first Do not allow vinegar coffee milk saltwater lemon or tomato juice to remain in contact with enamel parts inside the oven and on the oven tray Do not use abrasive cleaners or powders that wi...
Page 14: ...cooled down The cavity should be cleaned using a mild detergent solution and warm water Suitable proprietary chemical cleaners may be used after first consulting with the manufacturers recommendations...
Page 15: ...priate product Always dry thoroughly Donotuseharshabrasivecleanersorsharpmetalscraperstocleanthecontrol panel since they can scratch the surface which may result in shattering of the glass CAUTION Do...
Page 16: ...C fig 5 Replace the halogen lamp B with a new one suitable for high temperatures having the following specifications 230V and same power check watt power as stamped in the lamp itself of the replaced...
Page 17: ...le the wire racks to the oven walls using the 2 screws Fig 6 Slide the tray and rack into the runners Fig 7 The rack must be fitted so that the safety catch which stops it sliding out faces the inside...
Page 18: ...right hinges fig 8b Hold the door as shown in fig 8 Gently close the door fig 8c until left and right hinge levers A are hooked to part B of the door fig 8b Withdraw the hinge hooks from their locati...
Page 19: ...lass The oven door has two panes To clean these you need to remove the inner pane 1 Lock the door open Fully open the oven door fig 9 Fully open the lever A on the left and right hinges Fig 10 Gently...
Page 20: ...ide guides fig 15 and gently slide it to the retainers H fig 16 Reassemble the seal G in the correct way fig 17 by hooking the no 3 fixing hooks in the proper holes fig 18 Unlock the oven door by open...
Page 21: ...e carrying out any maintenance operations or repairs The walls surrounding the oven must be made of heat resistant material Taking care NOT to lift the oven by the door handle WARNING When correctly i...
Page 22: ...ndard units width and depth 60 cm Installation requires a compartment as illustrated in figures 20 and 21 On the lover side the oven must lay on supports standing the oven weight 560 550 min 591 594 5...
Page 23: ...23 To ensure internal ventilation aeration channels must be provided as illustrated in the figures 22 and 23 30 mm 600 50 mm 50 550 Fig 22 Fig 23...
Page 24: ...essential that when installing your oven adequate air circulation is allowed for within the installation See figures 22 23 Inadequate air circulation may greatly impair the performance of your oven an...
Page 25: ...of the oven door To ensure the trim is not damaged due to the appliance being placed on the floor the appliance should be suitably supported as in below illustrations After installation the appliance...
Page 26: ...e coloured in accordance with the following code Green Yellow Earth Blue Neutral Brown Live As the colours of the wires in the mains lead for the appliance may not correspond with the coloured marking...
Page 27: ...pen the cable gland by unscrewing screw F fig 28 unscrew the terminal screws and remove the cable The new supply cable of suitable type and section is connected to the terminal board following the dia...
Page 28: ...owing information available when booking a service call 1 Model type make and model see the product data plate 2 Evidence of installation purchase date 3 Retailer where appliance was purchased 4 Clear...
Page 29: ...date must be produced before a service call will be booked The appliance must be used for domestic purposes only Appliances used for commercial or professional purposes are not covered by the guarante...
Page 30: ...30...
Page 31: ...31...
Page 32: ...he Group Ltd Harby Road Langar Nottinghamshire NG13 9HY T 01949 862 012 F 01949 862 003 E service cda eu W www cda eu To contact our Customer Care Department or for Service please contact us on the de...