CDA RV 1001 Installation And Use Manual Download Page 37

37

+8 

mm

+8 

0

mm

+35 

mm

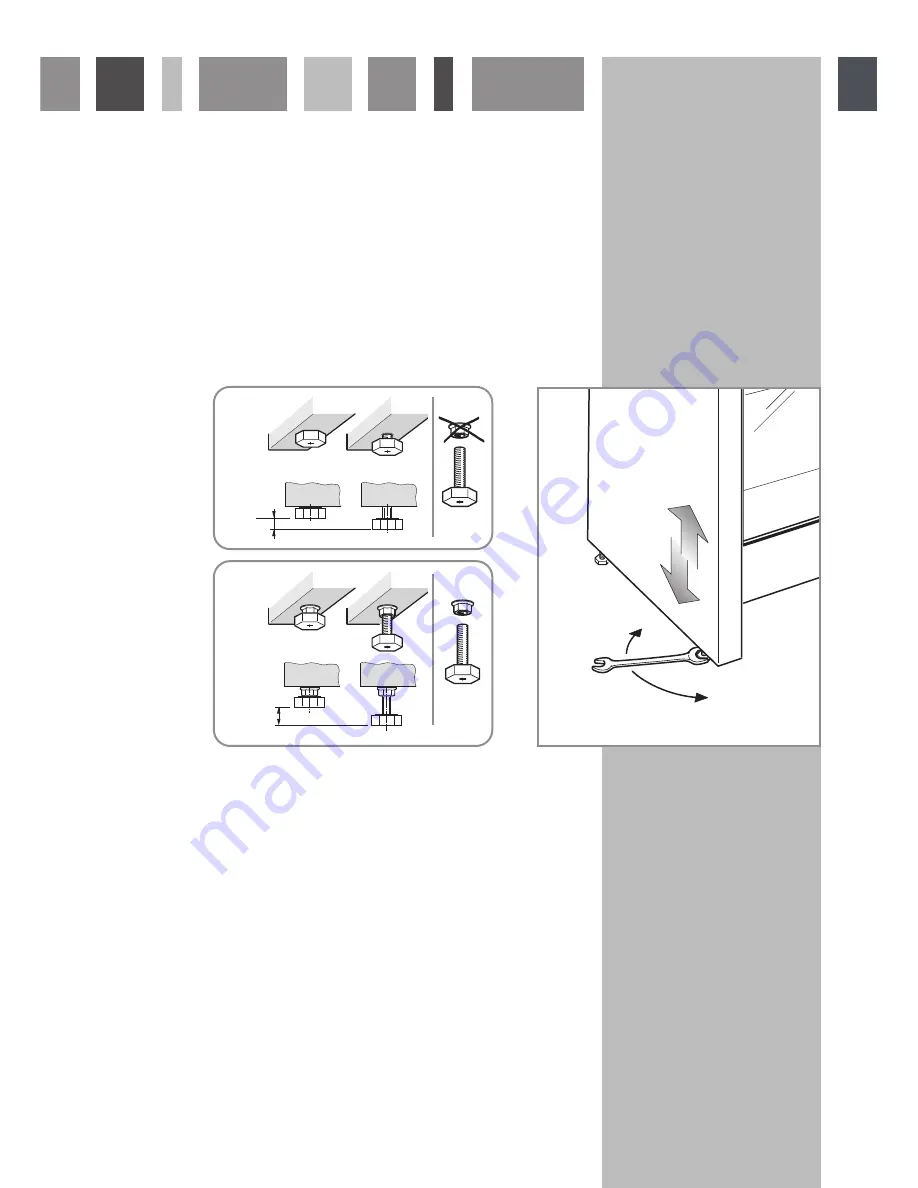
Levelling the cooker

mod. RV 1001 ..

The cooker is equipped with 4 levelling feet and may be levelled by screwing or unscrewing the feet with 
a spanner (fig. 33).
It is important to observe the prescriptions of figures 33a - 33b.

Fig. 33

Fig. 33a

Fig. 33b

Summary of Contents for RV 1001

Page 1: ...rtment The Group Ltd Harby Road Langar Nottinghamshire NG13 9HY T 01949 862 012 F 01949 862 003 E service cda eu W www cda eu GB RV 901 RV 1001 Twin Cavity Dual Fuel Cookers Manual for Installation Us...

Page 2: ...guarantee purposes Appliance Model Serial Number Important information for correct disposal of the product in accordance with EC Directive 2002 96 EC At the end of its working life the product must n...

Page 3: ...pid burner SR 1 75 kW 4 Rapid burner R 3 00 kW 5 Triple Ring burner TR 3 50 kW Note The electric ignition is incorporated in the knobs The appliance has a safety valve system fitted the flow of gas wi...

Page 4: ...75 kW 3 Rapid burner R 3 00 kW 4 Triple Ring burner TR 3 50 kW Note The electric ignition is incorporated in the knobs The appliance has a safety valve system fitted the flow of gas will be stopped if...

Page 5: ...ntrol keys main oven only 11 Conventional oven thermostat knob 12 Conventional oven switch knob Pilot Lamps 13 Main oven thermostat indicator light 14 Conventional oven thermostat indicator light Plea...

Page 6: ...touching the MODE key again automatic cooking End the time you would like the oven turns off by touching the MODE key two more times Increases the number shown on the display Decreases the number show...

Page 7: ...t turn the oven off The timer can be set for up to 23 hours and 59 minutes To set the timer touch the MODE key for more than 2 seconds the symbol flashes than the or keys After about 8 seconds an acou...

Page 8: ...TO will show in the clock display The oven will switch off but is now set for automatic cooking If you are already at home to turn the oven on and only want the oven to turn off automatically start co...

Page 9: ...en the hob is not being used set the gas knobs to their closed positions and also close the cock valve on the gas bottle or the main gas supply line Lighting of the Hob Burners To ignite the burner th...

Page 10: ...y one third full of oil DO NOT cover the pan with a lid and DO NOT leave the pan unattended In the unfortunate event of a fire leave the pan where it is and turn off all controls Place a damp cloth or...

Page 11: ...irectly onto the pan support To use the WOK you need to place the proper stand in order to avoid any faulty operation of the triple ring burner Figs 7 8 Important The wok pan stand fig 8 MUST BE PLACE...

Page 12: ...g element inside the oven cavity Attention The oven door becomes very hot during operation Operating Principles Heating and cooking in the MULTI FUNCTION oven are obtained in the following ways a by n...

Page 13: ...rmostat knob The oven must be preheated before cooking Recommended for Food that requires the same degree of cooking both inside and out for example roasts spare pork ribs meringues etc Thermostat Kno...

Page 14: ...of reach Defrosting Frozen Foods Only the oven fan comes on Use with the thermostat knob set to other positions have no effect The food is thawed by ventilation without heating Recommended for Quick...

Page 15: ...ot during operation Keep children well out of reach Maintaining Temperature After Cooking or Slowly Heating Foods The upper heating element the circular element and the fan come on The heat is dispers...

Page 16: ...ors together This is possible since the fats and vapors are oxidized while passing through the electrical element and therefore are not deposited onto the foods The only precaution to follow are The c...

Page 17: ...Use of the Grill Preheat the oven for about 5 minutes Introduce the food to be cooked positioning the rack as close to the grill as possible The dripping pan should be placed under the rack to catch t...

Page 18: ...possible traces of grease on the heating elements liquid WARNING The door is hot use the handle ATTENTION MOST IMPORTANT Pay special attention not to touch the hot heating element inside the oven cavi...

Page 19: ...the rotisserie Recommended for Food that requires the same degree of cooking both inside and out for example roasts spare pork ribs meringues etc Traditional Grilling The infrared grill element comes...

Page 20: ...en is equipped with a rotisserie This device is made up of an electrical motor mounted on the rear part of the oven a stainless steel rod equipped with a detachable athermic handle and 2 recordable fo...

Page 21: ...it sliding out faces the bottom of the oven see detail of figure 14 The plates must be positioned as indicated in figure 14 To facilitate this operation pull the special rack up to the safety lock KEE...

Page 22: ...base Do not place cooking utensils or plates directly onto the oven base Do not grill food containing fat without using the grid Do not cover the grilling grid with aluminium foil Do not use the oven...

Page 23: ...layed with by children Keep children away from the appliance during use Children or persons with a disability which limits their ability to use the appliance should have a responsible person to instru...

Page 24: ...e as these areas are not designed or intended to be touched and may contain sharp or rough edges that may cause injury Flexible Tube From time to time check the flexible tube connecting the gas supply...

Page 25: ...very carefully to avoid scratching and abrasion You are advised to use a soft cloth and neutral soap CAUTION Do not use abrasive substances or non neutral detergents as these will irreparably damage...

Page 26: ...always clean to ensure trouble free sparking Check that the sensor T figs 16 18 next to each burner is always clean to ensure correct operation of the safety valves Both the sensor and ignition plug m...

Page 27: ...er must be correctly positioned see fig 18 the burner ribs must be fitted in their housing as shown by the arrow The burner correctly positioned must not rotate fig 19 Then position the cap A and the...

Page 28: ...sible through the pivoting panel Attention Do not store flammable material in the oven or the storage compartment Drawer Model RV 1001 The drawer fig 22 comes out like a normal drawer Attention Do not...

Page 29: ...the cavity surface NOTE The manufacturers of this appliance will accept no responsibility for damage caused by chemical or abrasive cleaning Let the oven cool down and pay special attention no to tou...

Page 30: ...C fig 25 Replace the halogen lamp B with a new one suitable for high temperatures having the following specifications 230V and same power check watt power as stamped in the lamp itself of the replaced...

Page 31: ...metal bar above them fig 26b Lift the oven door slightly The noch on the bottom of the hinge will disengage fig 26c Now pull the oven door forwards off the appliance Release both hinge sections from t...

Page 32: ...es of glass since they can scratch the surface which may result in shattering of the glass Reassembling the Inner Pane Check the correct positioning of the no 4 four silicon rubbers D fig 27b Check th...

Page 33: ...l not be guaranteed if installed in any of the above environments and could affect any third party or public liability insurances you may have If the cooker is installed adjacent to furniture which is...

Page 34: ...ician and in compliance with local safety standards If the cooker is located on a pedestal it is necessary to provide safety measures to prevent falling out 650 mm 500 mm 200 mm 450 mm Fig 28a 650 mm...

Page 35: ...ling the Backguard Remove the two spacers A and the screw B from the rear of the cooktop Assemble the backguard as shown in figure 29 and fix it by screwing the central screw B and the spacers A A B F...

Page 36: ...fore use Rest the rear of the cooker an a piece of the polystyrene packaging exposing the base for the fitting of the feet Fit the 4 legs by screwing them tight into the support base as shown in pictu...

Page 37: ...the cooker mod RV 1001 The cooker is equipped with 4 levelling feet and may be levelled by screwing or unscrewing the feet with a spanner fig 33 It is important to observe the prescriptions of figures...

Page 38: ...prevent damage to the adjustable feet figs 34a 34b Fig 34b Fig 35b Fig 36b Warning Be carefull do not lift the cooker by the door handle when raising to the upright position figs 35a 35b Warning When...

Page 39: ...e shown in fig 38 can be purchased from most plumbers merchants and do it yourself D I Y shops Brackets Existing slot in rear of cooker Dotted line showing the position of cooker when fixed Fig 37 Fig...

Page 40: ...e shown in fig 40 can be purchased from most plumbers merchants and do it yourself D I Y shops Brackets Existing slot in rear of cooker Dotted line showing the position of cooker when fixed Fig 39 Fig...

Page 41: ...de air in which case no permanent ventilation is required For rooms with a volume greater than 10m3 no permanent ventilation is required Note Regardless of room size all rooms containing the appliance...

Page 42: ...led and Serviced by a competent person in accordance with the current editions of the following Standards and Regulations or those regulations appropriate to the geographical region in which they are...

Page 43: ...hnical knowledge of electricity should install the appliance He should observe the Regulations and Codes of Practice governing such installation of gas appliances Note It is recommended that the gas c...

Page 44: ...should also be connected in such away that it does not touch the floor To screw the connecting tube operate with two spanners fig 41 The unused end inlet pipe must be closed with the plug interposing...

Page 45: ...ortant Prescriptions for Gas Connection 700 mm Rear wall Suggested area for gas mains connection 200 mm Fig 43a 700 mm Rear wall Suggested area for gas mains connection 200 mm Fig 43b mod RV 1001 mod...

Page 46: ...th those most suitable for the kind of gas for which it is to be used see Table for the choice of the injectors The burners are constructed in such a way so as not to require the regulation of the pri...

Page 47: ...T Increase of Air Necessary for Gas Combustion 2 m3 h x kW Burners Air necessary for combustion m3 h Auxiliary A 2 00 Semi Rapid SR 3 50 Rapid R 6 00 Triple Ring TR 7 00 Lubrication of the Gas Taps T...

Page 48: ...not exceed 75 C at any point Once the cooker has been installed the switch must always be accessible Before effecting any intervention on the electrical parts the appliance must be disconnected from t...

Page 49: ...ance should be connected to a DOUBLE POLE SWITCHED FUSED SPUR OUTLET similar to that shown in Fig 49 We recommend that the appliance is connected by a suitably qualified person who will comply with th...

Page 50: ...owing information available when booking a service call 1 Model type make and model see the product data plate 2 Evidence of installation purchase date 3 Retailer where appliance was purchased 4 Clear...

Page 51: ...date must be produced before a service call will be booked The appliance must be used for domestic purposes only Appliances used for commercial or professional purposes are not covered by the guarante...

Page 52: ...he Group Ltd Harby Road Langar Nottinghamshire NG13 9HY T 01949 862 012 F 01949 862 003 E service cda eu W www cda eu To contact our Customer Care Department or for Service please contact us on the de...

Reviews: